

Overview
Often cited as one of the best sync pairs in all of Pokemon Masters, Serena & Delphox bring one of the most effective tech strategies and extremely high damage to the game in one highly practical package. A genuine specialist in each of their fields, the main ways to build Serena & Delphox largely fall into one of three categories; first is an all-out damage dealing set, like our Overheat Pure Offense grid. The second is a more versatile set that focuses on both tech and offensive options as exemplified in Overheat Balanced Offense. And finally, a grid build that supports sleep and trapping first and foremost is also very viable, as can be seen in the Pure Tech build.
Sync Grid Build 1: Pure Offense

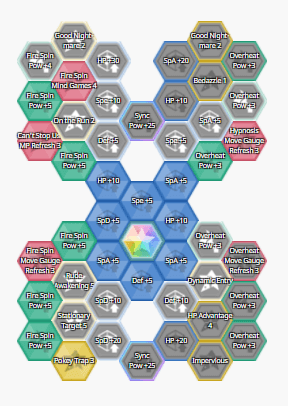
Serena & Delphox are well known for their potential to deal some of the highest damage in the game currently, and this grid largely foregoes many of the common boosts granted to their more tech-oriented strategies in favor of pure damage output. Stationary Target 5 is the first node worth noting, as it provides a huge damage boost if the opponent is trapped by Fire Spin or similar moves provided by teammates. Good Night Mare 2 is next, as it provides another large boost to damage when the opponent is asleep, while HP Advantage 4 provides a sizable boost based on Serena & Delphox’s current HP. Finally, Impervious ensures that Delphox won’t suffer a drop in its special attack after the use of Overheat.
The entire point of this grid is to pump out maximum damage via Overheat. Because of this fact, this grid requires a bit of setup and has a variable to watch thanks to HP Advantage 4. For these reasons and the lack of MP refreshes that this grid invests in, this is not a strong grid for the Battle Villa. Its performance will tend to drop after just a few battles, making it less suitable for the sustained performance demanded by this game mode. However, it is great for the Champion’s Arena, as it can mow down strong opponents very quickly with just a bit of support. It’s also great for Full Force battles and the Legendary Arena, though HP management can become difficult for longer battle formats.
One of the best possible team mates for this version of Serena & Delphox has to be Sabrina & Alakazam due to their ability to max out critical rate and special attack, not to mention physical damage protection via Barrier. All of this plus healing and a very high base speed patches up every issue that Serena & Delphox have with this grid perfectly. Sun support is also important due to its 50% damage boost, and Lyra & Meganium are arguably the best sun setters to pair with Serena & Delphox due to their ability to reliably raise the sun throughout the battle and their host of additional offensive support options, including the ability to provide maximum Critical Rate. Other sync pairs that provide critical support such as New Years Lillie & Ribombee or Phoebe & Dusknoir are also great options, as a boosted critical rate is basically required for maximum damage potential on this grid. Skyla & Swanna are also great, as they can provide speed support to help manage the high move gauge cost of Overheat. They can also help keep Serena & Delphox dealing maximum damage thanks to Potion support, and have a potentially net-zero gauge use move to keep the sync move counter moving along despite Overheat’s fairly high cost.
Sync Grid Build 2: Balanced Offense

While the previous grid goes all-out for pure damage, this grid takes a more conservative approach to the same basic concept. Stationary Target 5, HP Advantage 4, and Impervious are picked up as before, as they’re key to making the most of Overheat. Overheat Move Gauge Refresh 3 is next on this grid in order to make Overheat’s gauge usage more manageable, and Can’t Stop Us! MP Refresh 3 is last in order to give Delphox & Serena a very good chance to be able to max out their own special attack.
While this grid has a bit less damage potential than the previous, it is also far more self-sufficient, and allows Serena & Delphox to fit on more teams while not necessarily acting as the central sync pair. The general effectiveness of this grid makes it a great choice for the Champion’s Stadium, where it can both disable the opponent with sleep and deal heavy damage fairly easily. It’s also outstanding in Full Force Battles for the same reasons, and can even hold its own in the Legendary Arena where Sleep and Fire Type damage in particular are effective.
If not used as the central attacker in a team, this grid appreciates speed support in order to keep from taking up too much of the gauge with Hypnosis, Fire Spin, and Overheat. To this end, sync pairs like Skyla & Swanna are outstanding partners, as are partners that give outright gauge boosts such as Sygna Suit Blue & Blastoise, who can also provide extremely valuable critical rate support. Other Critical Rate buffing sync pairs such as Sabrina & Alakazam or New Years Lillie & Ribombee make outstanding partners as well, especially thanks to the former’s high base speed and Special Attack support. Lyra & Meganium are especially important here as well, as they can provide the boosts that Serena & Delphox need to hit for maximum damage, as well as the boost provided from the sun, allowing this grid to provide damage that can rival the previous to a certain degree.
Sync Grid Build 3: Pure Tech
While Serena & Delphox are well known for their damage output, their ability to operate as a true tech unit is likely their best known niche. Hypnosis Move Gauge Refresh 3 is first, as it supports this sync pair’s ability to spread sleep whenever needed. Then Fire Spin Move Gage Refresh 3, Fire Spin Mind Games 4, and Pokey Trap 3 are picked up in order to support Serena & Delphox’s ability to trap opponents while also increasing the damage that the resulting trap deals and decreasing the opponent’s special defense with repeated uses of Fire Spin. Finally, Can’t Stop Us MP Refresh 3 is useful for increasing accuracy and sp.attack while also removing status effects.
The ability to spread sleep and trapping effects is extremely valuable and powerful in many game modes, and the versatility of this grid makes it very appealing in that respect. The strategy supported by this grid does not require the use of trainer moves to function, making it outstanding for the Battle Villa, where it can basically shut down the opposing team repeatedly with Hypnosis. Beyond the Villa, this grid actually doesn’t have any large issues with any other game modes outside of the occasional sleep and/or trap immune opponent. Where effective, this grid can be used with little opportunity cost.
Sync pairs that appreciate Serena & Delphox’s ability to inflict both sleep and trap statuses make great partners for grid, such as Karen & Houndoom. Support pairs that can spread passive healing like Sygna Suit Leaf & Venusaur, Holiday 2020 Erika & Comfey, or Misty & Starmie also tend to become more effective due to the free turns that sleep can buy. Frail yet strong strikers such as Lusamine & Pheromosa also appreciate Serena & Delphox’s ability to put the opposing team asleep, as it gives them more time to do what they do best before being taken out.
Lucky Skills
Delphox & Serena’s sync grid build and intended purpose can change what lucky skill is optimal. For offensive builds, Critical Strike 2 is optimal for damage. While it requires critical rate support to be useful, an offensive Delphox generally should not be used without critical support to begin with. Troublemaker 1 is nice on sleep builds, as it virtually ensures that the initial use of Hypnosis will land without needing to rely on accuracy buffs. This can be outstanding for shutting down the opponent early game, though it does wane in utility as Serena & Delphox buff themselves. Finally, Dauntless can be very useful on some builds, as it allows Overheat to be used freely without having to pick up Impervious on Serena & Delphox’ grid, though in most cases the extra energy won’t net many nodes that end up more valuable in the long run.
Sync Workshop Index:
If you're looking for help building your other Sync Pairs or getting a sense of what each does for your gem economizing efforts, the Sync Workshop Index is the place for you! Even if you aren't, really, you can't go wrong with it in an attempt to broaden your understanding of the meta or just find something interesting to binge read either.

About the Author(s)


