

Introduction
Operation Cube is a story event that takes place between Chapter 5 and Chapter 1 Night. Cube features four Night maps of varying difficulty with the first one serving as an introduction to Night battles.
Event rewards and limited drops are as follows:
| Event Map Number | Clear Rewards |
|---|---|
| E-1 | 16Lab Infrared (PEQ Laser Sight) |
| E-2 | SPP-1 |
| E-3 | 16Lab Armor Piercing rounds |
| E-4 | OTs-14 |
| Event Map Number | Limited Drop |
|---|---|
| E-2 | 6P62, Z-62 |
| E-3 | ASh-12.7, 6P62, Z-62, ARX-160 |
| E-4 | ASh-12.7, PSG-1, Z-62, ARX-160 |
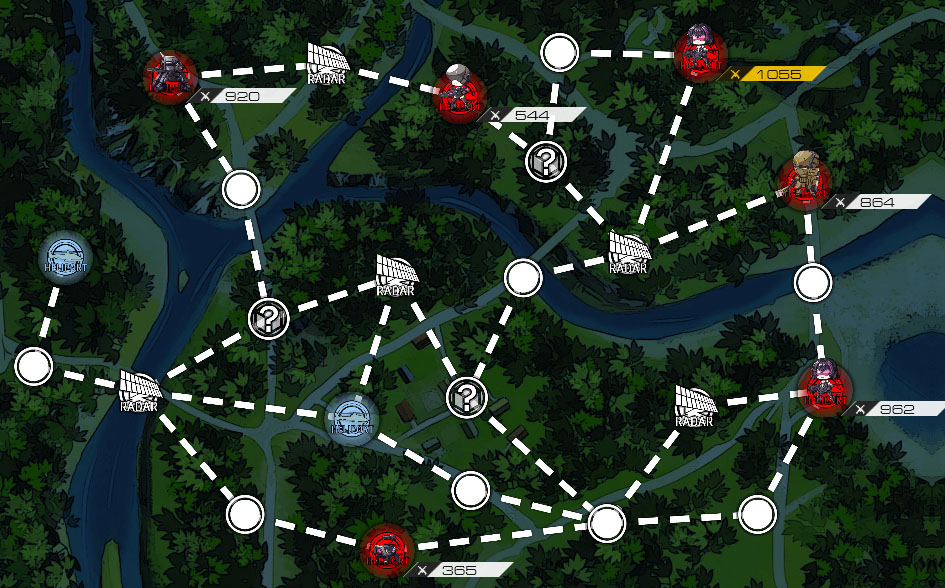
In E-1 we are required to KO all Sangvis squads in 8 turns, and our reward for doing this is the 16Lab Infrared PEQ Laser Sight. We start with two Heliports, so we can deploy two squads before starting the map. It is recommended to run AR/HG/SMG squads as Handguns grant any Echelon they are contained in vision on adjacent nodes (effect does not stack). ARs can equip a PEQ Laser Sight to help minimize or completely nullify the Night battle accuracy penalty (-90%).
Because E-1 only has a single armored squad, it is not recommended to run RF or MG compositions as these Echelons struggle against unarmored enemies at Night due to the accuracy penalty and their inability to equip laser sights.
Recommended HGs for AR SMG Echelons


These HGs provide strong Damage buffs that help ARs deal with armored enemies easily.
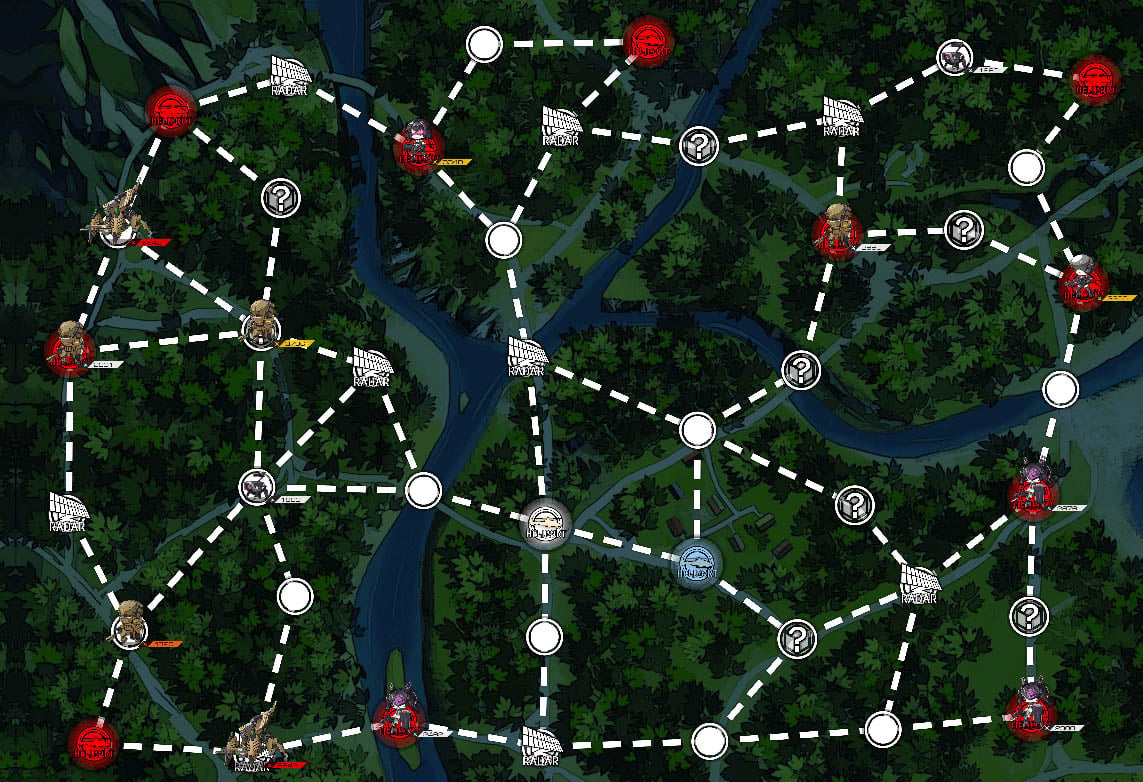
The green nodes in the following image are called Radars. Radar nodes provide vision for up to two adjacent nodes on all directions when captured. These are very useful and it is recommended to capture some of them as soon as possible as they will allow you to quickly illumine the map and track Sangvis units. It’s not necessary to capture all of them, though.
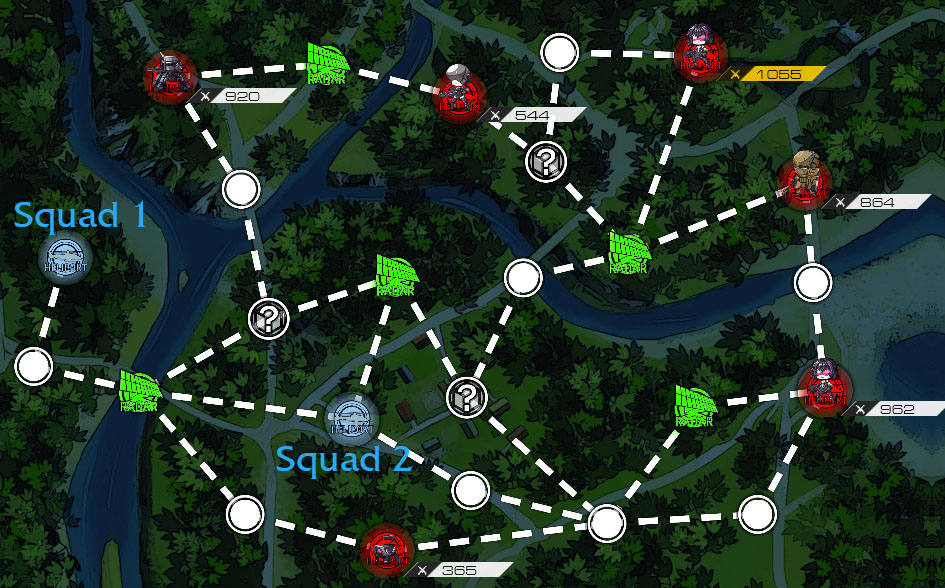
Your main fighting squad will be the one labeled Squad 2 due to its proximity to most Sangvis units. Make sure it’s well prepared even if it won’t be facing much of a threat. And remember, your squads have a chance of being ambushed in random nodes, so pay mind to your Echelon’s Rations and Ammo before stepping into one.
E-2 (Corner Breaker)
In E-2 we are required to find and eliminate the Sangvis boss Hunter within 5 turns, and we must do this six times to obtain SPP-1. Although the map features a lot of armored squads, they are not strong enough to require RF HG Echelons, and since AR HG SMG are better at dealing with bosses, it is recommended to employ those instead.
2212 and 2907 CE armored squads as well as Hunter Elite have a chance to drop 6P62 and Z-62.
Recommended HGs for AR SMG Echelons
| Hunter Stats | |
|---|---|
| Health | 6800 |
| Damage | 67 |
| Rate of Fire | 55 |
| Accuracy | 30 |
| Evasion | 3 |
| Armor | 30 |
| Vespid (AR) x4 Stats | |
|---|---|
| Health | 173 |
| Damage | 22 |
| Rate of Fire | 40 |
| Accuracy | 9 |
| Evasion | 6 |
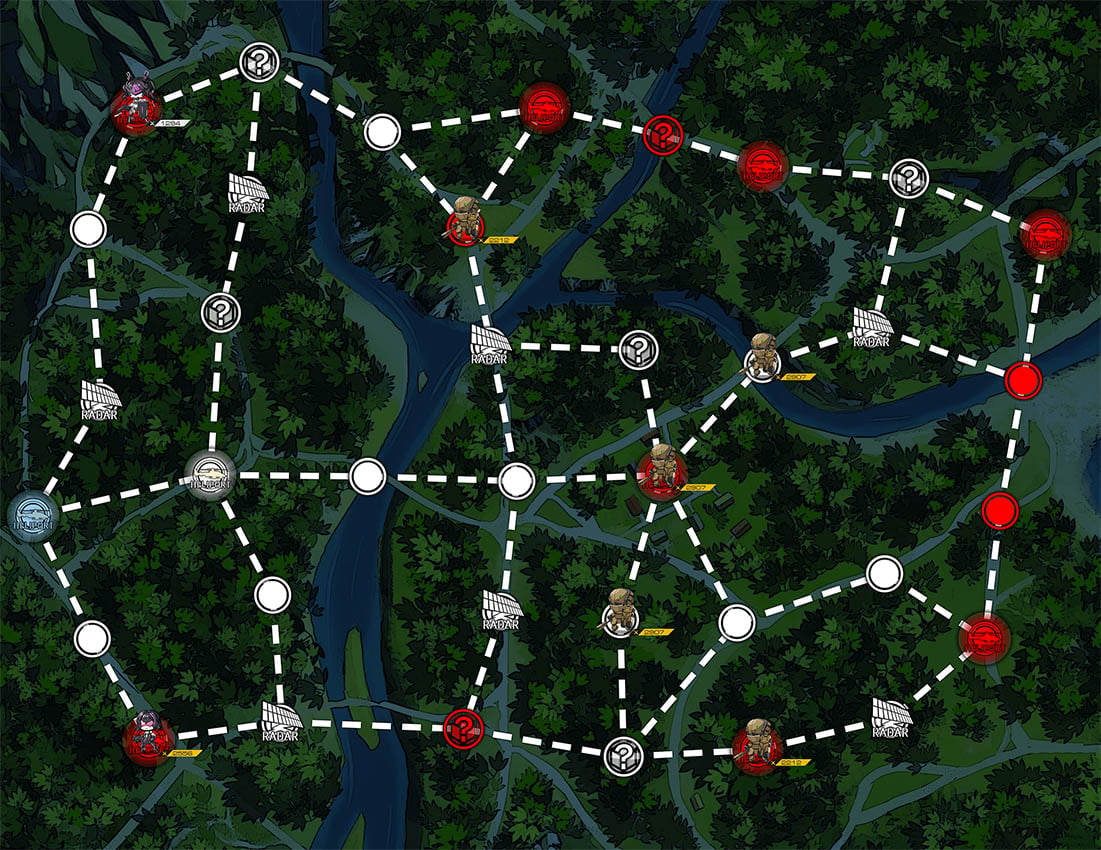
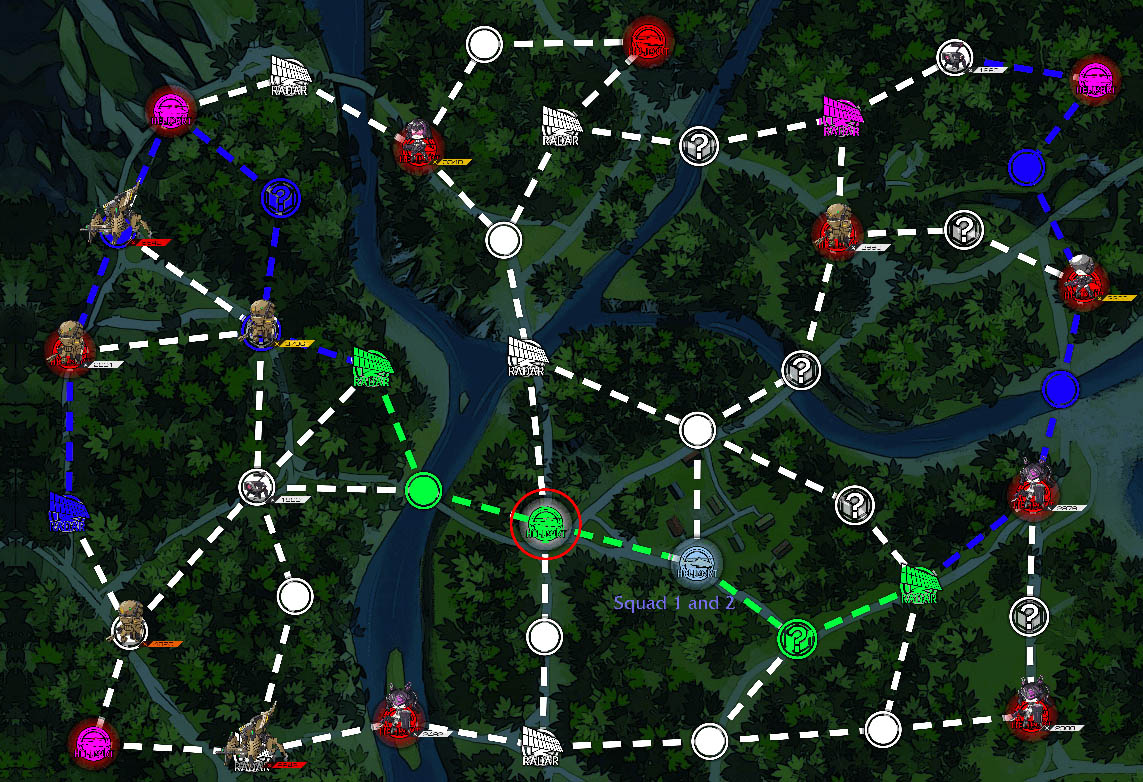
This map features a ‘hide and seek’ mechanic -- Hunter will spawn in a random node of a given set. In the following image, Hunter Elite’s possible spawn locations are marked in purple.
Follow the green path on turn two and capture the encircled Heliport in the middle. On the second turn, follow the blue path to search for Hunter Elite and KO her to complete the map.
E-3 (Layer Reversal)
E-3’s objective consists of searching and KOing a Sangvis Boss, just like in the previous map. This time, we’re on the hunt for Executioner Elite and we are given 6 turns to find her and destroy her. Completing the map 10 times allows us to obtain 16Lab Armor Piercing rounds.
E-3 has a healthy mix of armored and unarmored enemies, so it is up to you what squads you will utilize. Keep in mind that, however, that RF and MG Echelons have trouble dealing with unarmored enemies at night.
2601, 2462, 4820, 3796, 6642 CE enemy squads as well as Executioner Elite have a chance to drop ASh-12.7, 6P62, Z-62, and ARX-160.
Recommended HGs for AR SMG Echelons
| Executioner Elite Stats | |
|---|---|
| Health | 9000 |
| Damage | 88 |
| Rate of Fire | 45 |
| Accuracy | 18 |
| Evasion | 10 |
| Armor | 24 |
| Jaeger (RF) x4 Stats | |
|---|---|
| Health | 193 |
| Damage | 25 |
| Rate of Fire | 20 |
| Accuracy | 60 |
| Evasion | 6 |
| Aegis (melee armored humanoids) Stats | |
|---|---|
| Health | 667 |
| Armor | 50~54 |
| Manticore (armored quad pod) x2 per squad Stats | |
|---|---|
| Health | 8000 |
| Damage | 81 |
| Rate of Fire | 42 |
| Accuracy | 45 |
| Evasion | 0 |
| Armor | 34 |
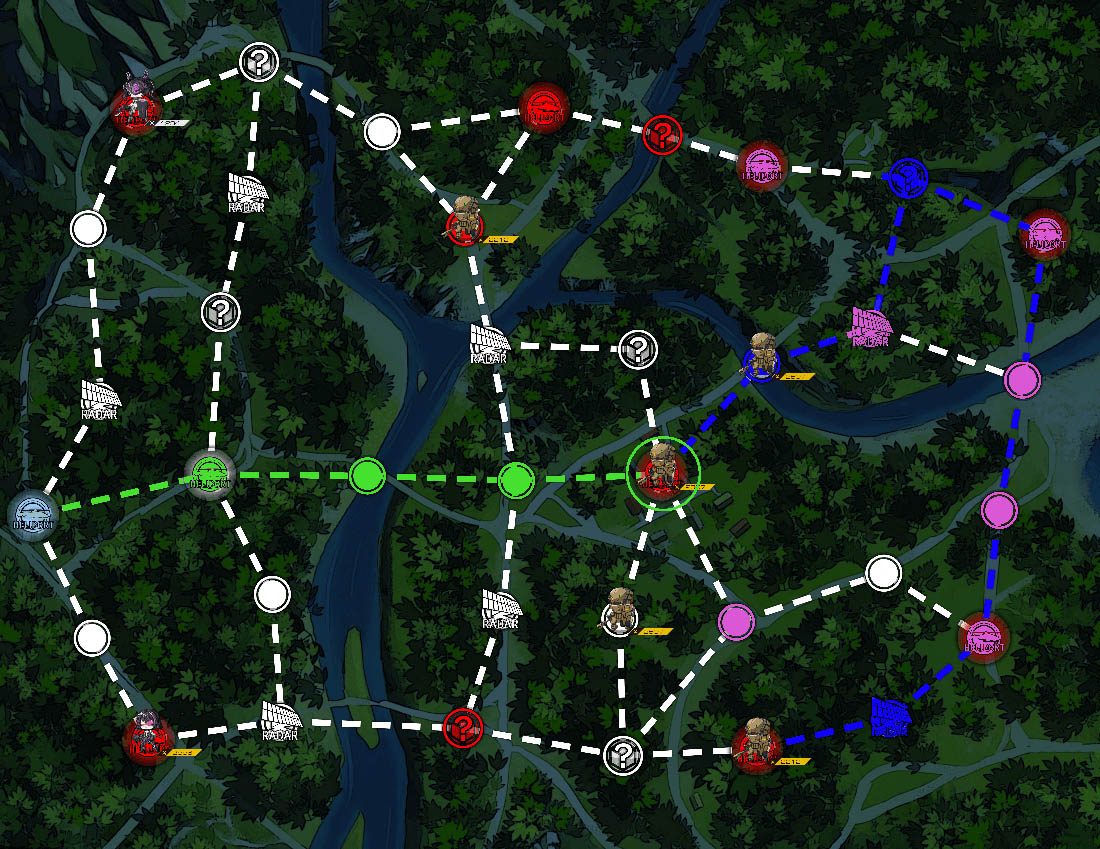
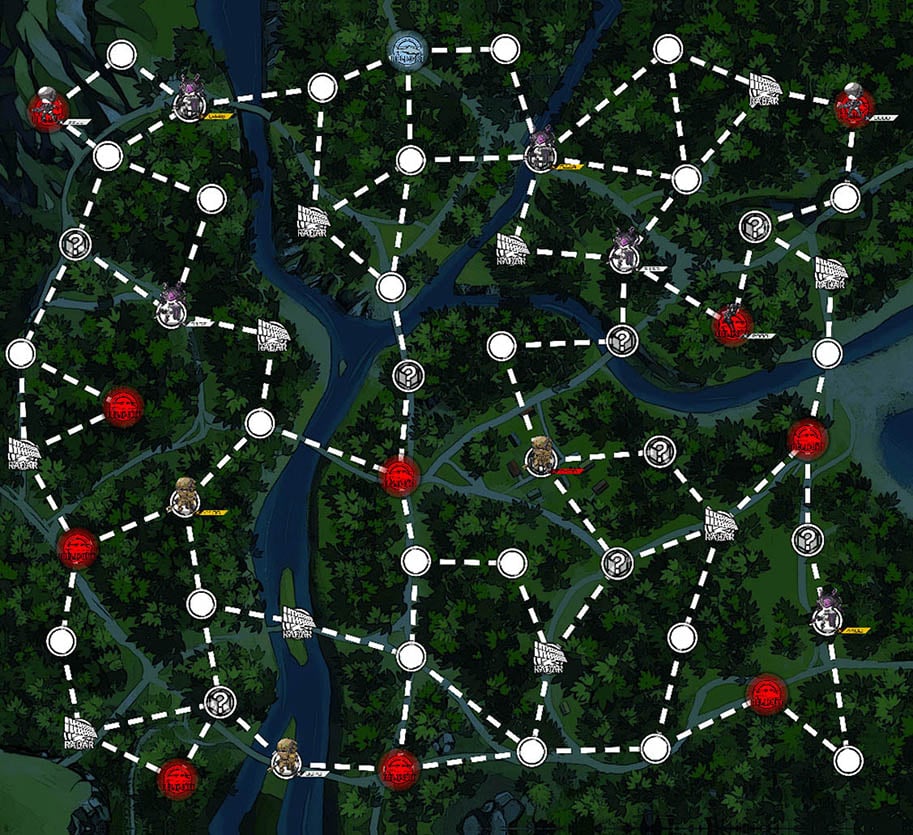
This map also features a ‘hide and seek’ mechanic -- Executioner will spawn in a random node of a given set. Executioner Elite’s possible spawn points are marked in purple in the following image.
Deploy Squad 1 and move it to the green Heliport circled in red to make room for the second squad. End your turn after deploying Squad 2.
On turn 2, follow one of the the green paths with one Echelon and the other green path with your second one. Capture both Radars to light up a good portion of the map.
Follow the blue paths on the following turns to search for Executioner Elite and defeat her.
It is recommended you search the left side of the map first as Executioner reportedly has a higher chance of spawning there.
E-4 (Side Collapse)
In this map we must defeat Sangvis Boss Ouroboros within 8 turns. Completing the map 15 times grants OTs-14 Groza.
This is a big map, but it contains relatively weak enemies. Ouroboros herself is not much of a threat -- instead, the turn count is the main threat here. 8 turns is not always enough to check all the possible spawn locations of the boss due to the sheer size of the map.
It is recommended to run AR HG SMG squads due to the high amount of unarmored enemies.
The Aegis (armored humanoid) squads and the 4402 CE Guards as well as Ouroboros have a chance to drop ASh-12.7, PSG-1, Z-62, ARX-160
Recommended HGs for AR SMG Echelons
| Ouroboros Elite Stats | |
|---|---|
| Health | 15000 |
| Damage | 120 |
| Rate of Fire | 55 |
| Accuracy | 20 |
| Evasion | 12 |
| Armor | 23 |
| Manticore x4 Stats | |
|---|---|
| Health | 2550 |
| Damage | 12 |
| Rate of Fire | 45 |
| Accuracy | 30 |
| Evasion | 12 |
| Armor | 22 |
| Jaeger (RF) x1 Stats | |
|---|---|
| Health | 260 |
| Damage | 32 |
| Rate of Fire | 20 |
| Accuracy | 88 |
| Evasion | 9 |
| Aegis (armored humanoids) Stats | |
|---|---|
| Health | 591~677 |
| Armor | 45~50 |
As yet another map with a hide-and-seek mechanic, you’ll need to search for Ouroboros who will spawn at a variety of points. Ouroboros’ possible spawn points are marked in purple in the following image.
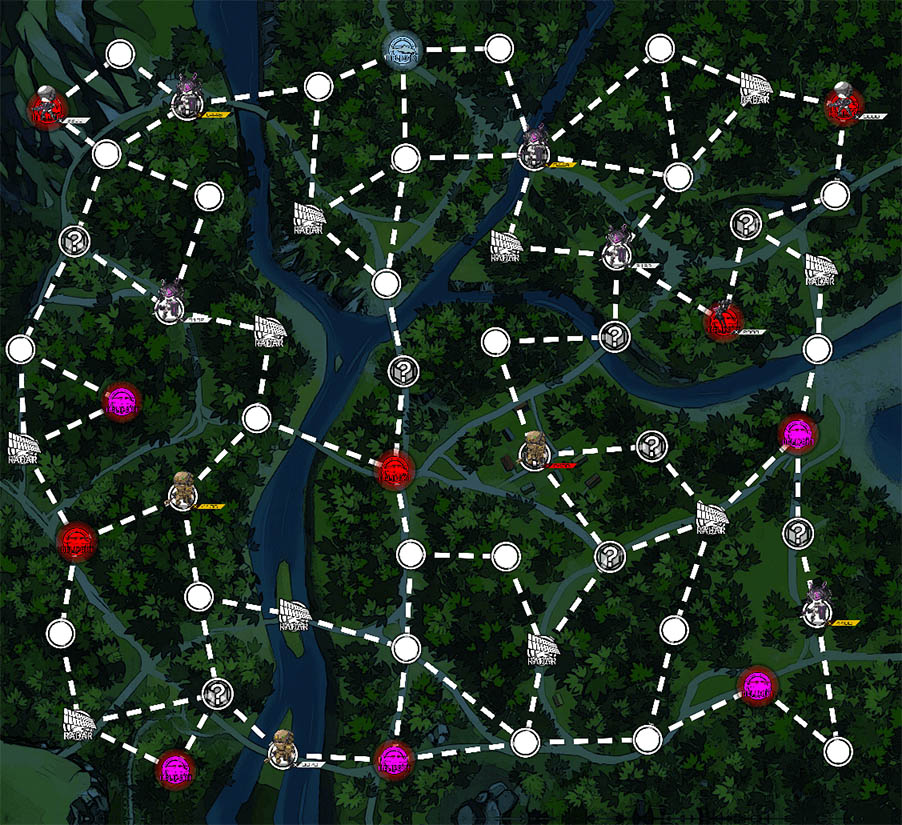
Deploy your first squad and start the map. On the first turn, move your squad directly south and deploy a second squad on your captured Heliport.
Now, since this map has simply too many possible variants and locations, we will use a handy tool that a fellow Korean player made during the time Cube was active over on the Korean server.
On turn 2, scroll down to the lower half of the map and take note of all red nodes, then head to the Ouroboros Finder and click on the white nodes to match the ones in your game. Once you’ve matched all the red nodes, the page will color a few possible nodes purple, indicating where Ouroboros might be located.
Keep in mind that there are many variants and possibilities and you are not guaranteed the exact location of Ouroboros in most of them. If you have 3 or more possible spots where Ouroboros may be hiding, it may be a good idea to restart the map.

Disable auto-resupply in the settings on the game so that you can restart the map if you get 3 or more possible Ouroboros locations for little to no cost.
That is all for this event. If you’re not at a point where you can beat a map or spawn locations are causing you to tear your hair out, don’t worry -- Cube lasts for a month so it’s okay to grind or take breaks. There’s no prize for completing the event quickly, so it’s perfectly fine to take your time. May RNG be with you!


