OUTDATED
THIS ENTIRE PAGE IS OUTDATED!!!
THIS IS FOR THE ORIGINAL CT RANKING!!
THIS IS NOT FOR THE CT+ RANKING RERUN!!!!


Introduction
With Hurricane Rescue being a 5-turn map, the opening turns are extremely important to snowball your progress later.
Because points scale directly with number of Supply Points (and therefore kills), and the number you can grab is in turn directly proportional to your available Action Points (AP), snowballing your AP and Kill Count as hard as possible in the first three turns is widely considered the optimal strategy for all ranking strategies that involve combat in any capacity.
To learn more about the topics mentioned above, check out the rest of this article!
General Tips
Before starting the ranking map for real, doing your research is a must (and you're already much better off than the average ranker if you're reading this!)
Getting your feet wet with some practical testing is a great idea to iron out any kinks so they don't crop up during the middle of your run.
Try Multiple Times
The game only reports your highest score, so there is no penalty for taking as many attempts as needed. This is all the more reason to start with a few trial runs (either partial or complete), so you can refine your strategies over time.
-
Playing through the map gives you invaluable first-hand experience, which no guide or video can provide.
-
The specific nature of team compositions on this map means that in-field trial-and-error is often the best way to learn what will and will not work given the tools you have at hand.
Learn Save-Scumming
In Girls' Frontline, battle information is only sent to the GFL servers when the battle finishes (i.e. when the loading circle pops up). If you close and restart the GFL App before a battle finishes, you'll be able to redo your current fight, possibly altering some pre-conditions.
This is not officially recommended by MICA, but considering that just about everyone does it, there's zero chance of any sort of action being taken against your GFL account for savescumming.
You can control the following aspects:
- Unit Formation
- You can change your formation from the main menu before re-entering battle
- Combat Fairy Skill Activation
- Quickly toggle Fairy Skill Auto as you load into the map to change this
- Fairy Talent proc
- You will need to gain Commander EXP somehow to reset the RNG seed. Autobattling 1-1 and letting it finish will do the trick.
- It is recommended to avoid this when possible as it can be a large time sink.
- Auto-Skill Settings
- If you forgot to put a unit on/off forced manual, this can be changed in their character page before you return to battle.
- In-battle unit movement and manual skill activation timings
- If you made some mistakes in a fight, you can restart and try again while doing these differently.
- This can help in particularly mechanically-intensive fights.
- Damage & Evasion roll RNG
- You can't fully control this, but you can get lucky
- Note that you'll have to move your units with slightly different timing for this to work
- Damage RNG is seeded, but if you can alter the sequence of shots (i.e. how fast your dolls shoot/enemies shoot you), this will change all subsequent hits from both sides.
You cannot control the following aspects:
- Unit Equipment
- HOC Support Fire
- Strategic Fairy Skill Activation (e.g. Combo, Illumination, Defense, etc.)
Pausing the game before closing and restarting the app can make savescumming more reliable on certain phones.
Practice Your Teams
Because every Commander's armory is different in terms of Skill level, Fairy rarity, and Equipment, a team comp that works for one person may not work for the next.
All teams should be field-tested in CT Ranking to ensure you start your serious run with teams that can comfortably fight the enemies you plan to fight. For example, the playpen enemies can be fought immediately by players willing to assess their experimental teams:
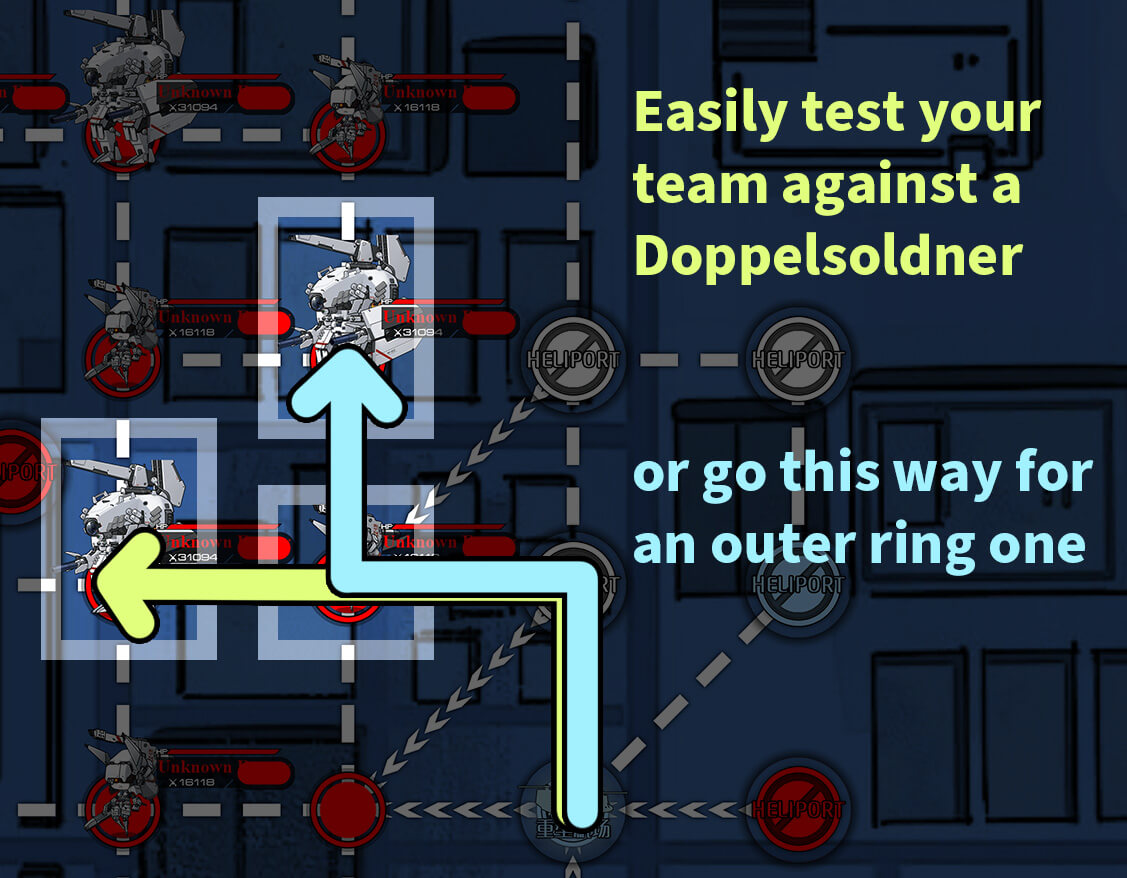
If you cannot defeat an enemy you are testing against or cannot finish it without being critically damaged, do not worry! Simply terminate the map as shown below:
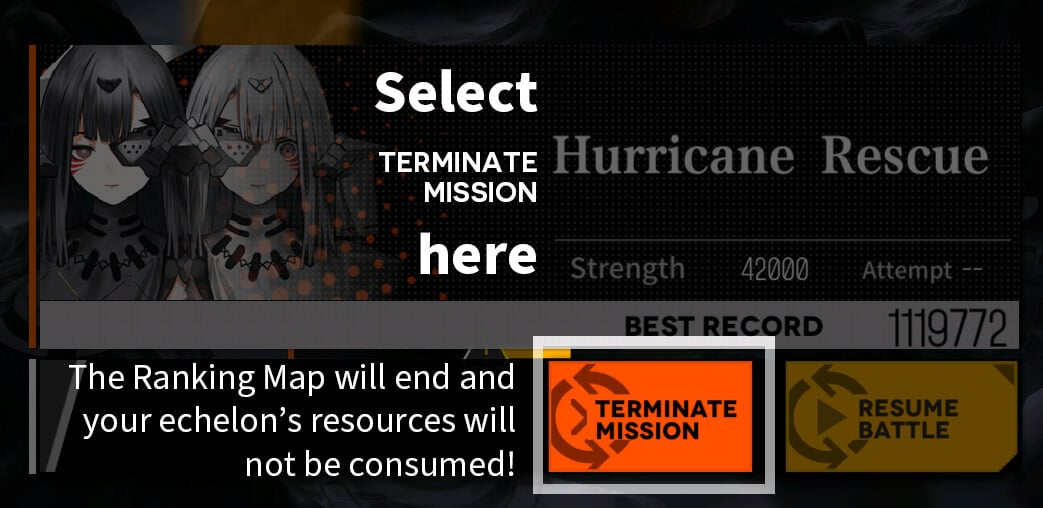
Terminating an in-progress battle on Hurricane Rescue will not cost resources (it'll be as if the battle never happened), making it even easier and less expensive to test out your teams than other maps. (Enterprising players can even use Kill Switches to avoid fighting the Rodelero on their way to their Gundam of choice.)
This feature is present only on ranking maps - don't try this in a story stage!
Because it's really cheap to do so, make sure to experiment! This cannot be emphasized enough.
Play around with your formations, the Dolls in them, the micro you use, Fairies, etc. Unconventional tactics can be quite effective for this ranking, and if you are willing to use and abuse them, you can make your own armory do a lot more work for you than copy-pasting standard team compositions from a guide.
Be mindful of the AP-to-point ratio of your actions
When debating the merits of the many options you have for your action points in ranking, maximizing the AP-per-point ratio is an excellent way to do moves that are close to optimal. A crate that's 1 tile away is often worth more than a crate 2 tiles away (10,000 point/AP vs. 5,000 point/AP)
Generally, grabbing a Supply Point is more valuable than combat. Combat should not be ignored, however, as every two kills result in an extra Supply Point spawn, potentially netting you an additional 10,000 points on every subsequent turn (provided you can resupply from it successfully).
- Prioritize pathing through enemies to grab low-AP cost (0-3 tiles away) Supply Points in the Playpen, because this both nets immediate points and gets kills (future points)
- If presented with the chance, destroy any Installations you can. These are worth 10,000 points by themselves.
- Then, consider retreating and redeploying echelons to get a Supply Box (either near open Helipads you have vision of, or with the help of a Parachute Fairy).
- Parachute Fairy's cooldown resets when the echelon it's attached to is retreated and redeployed, so its Skill can be spammed over and over if needed.
- After subtracting the -1500 point penalty of retreating a team, this is a net profit of 8,500 points, so do not be afraid to do this if you can accomplish it with only 2 or arguably 3 AP.
When no more Supply Points are within easy reach, consider the ones 4-5 nodes away if there are enemies in the way and you have enough ammo to get there. This brings us to the next important point:
Tracking Enemies
Enemy movement in the Playpen is deterministic, so players can predict enemy positions ahead of time as long as they keep track of which mobs were killed.
This is entirely optional, but can be done to help you plan your movement better in the later turns; if you are interested and know what you are doing, try the tool below:
Managing Fairy Commands
Since Continuum Turbulence ranking is not as demanding as Singularity in terms of Fairy Command consumption (unless you use a Taunt Fairy to fight enemies in the Playpen), using Fairy Commands liberally to reduce damage taken or save AP can give you a strategic advantage that improves the final score of your current run.
Use a Combat Echelon for your Parachute Fairy
If you can spare a fourth fully-decked out Combat Echelon, using one instead of a dummy can let you fight and win some battles even with the severe airdrop debuff.
- Parachute-debuffed teams can, under optimal conditions, fight Rodeleros without taking damage and last at least two fights against Doppelsoldners without losing Dummy Links on the DPS units or main tank (by shifting damage to the HGs).
Turn 1
Your Turn 1 opening moves and positions will largely depend on what you are able to field.
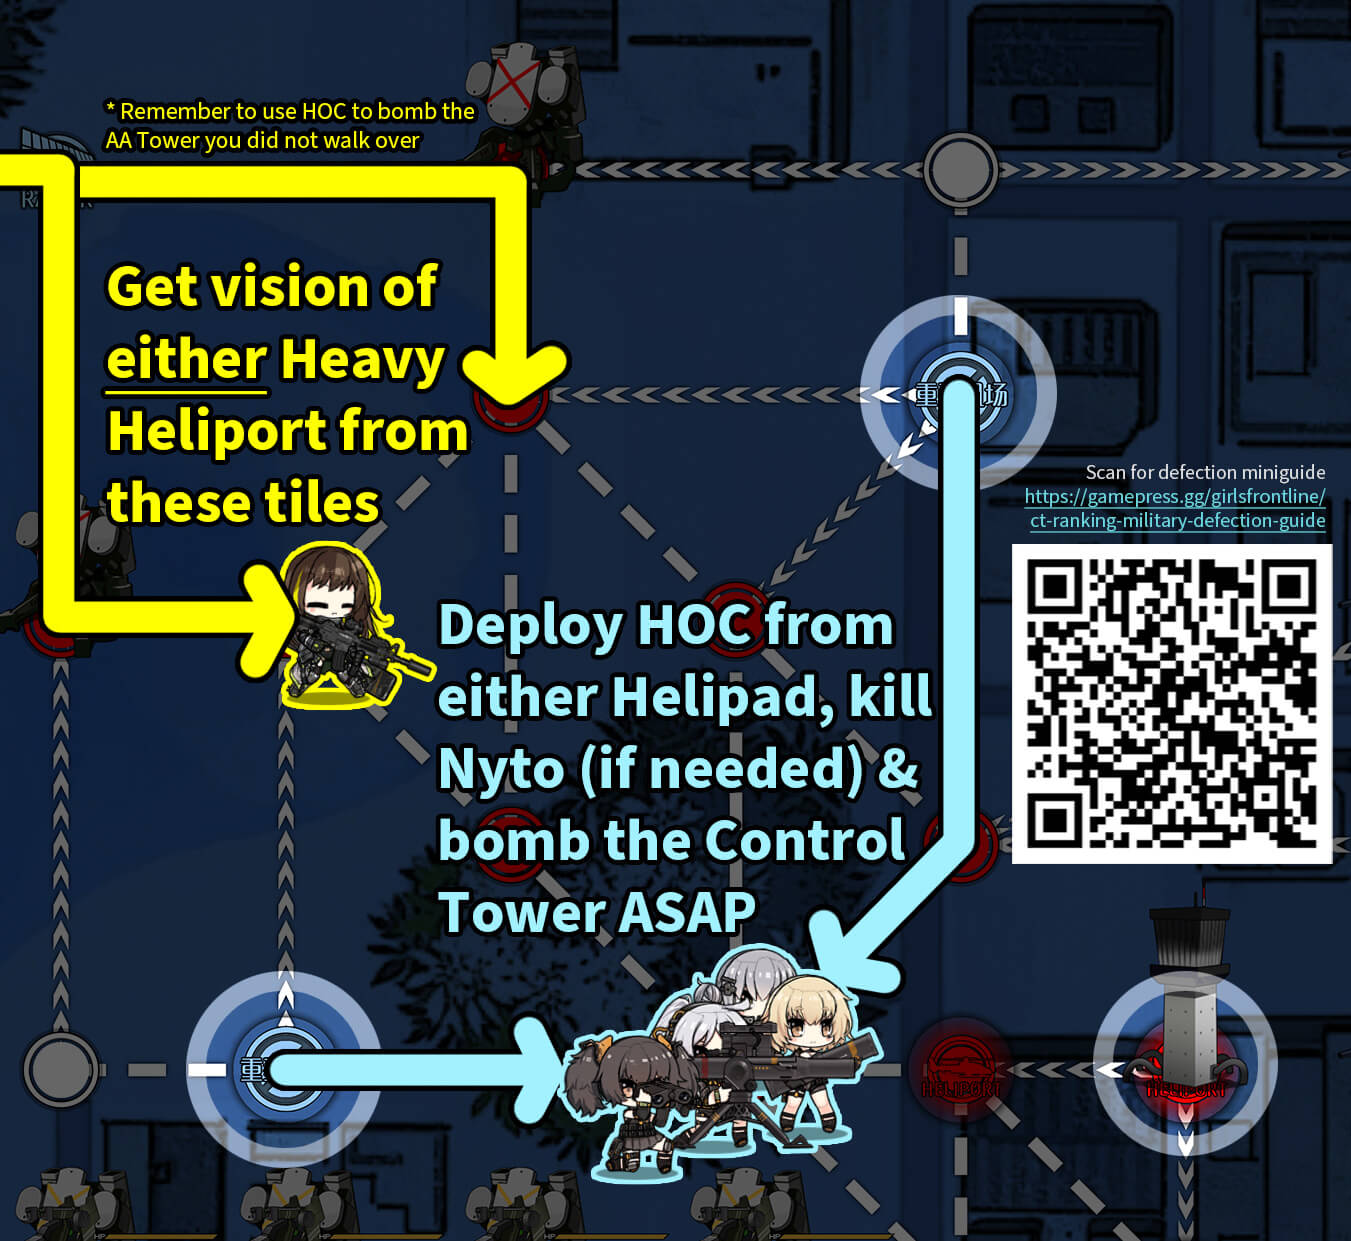
As a rule of thumb, field a HOC on the Heavy Heliport near the Command post to allow for the easy destruction of the Anti-Air Towers nearby. This should be 2B14 or AGS-30 if at all possible, but BGM-71 can work in a pinch.
Keep in mind how actions on early turns affect your AP going forward. While it might cost 2 AP to capture a pair of Heliports turn 1, the extra 8 AP over the following turns is extremely valuable.
Initial Opener - Left Side
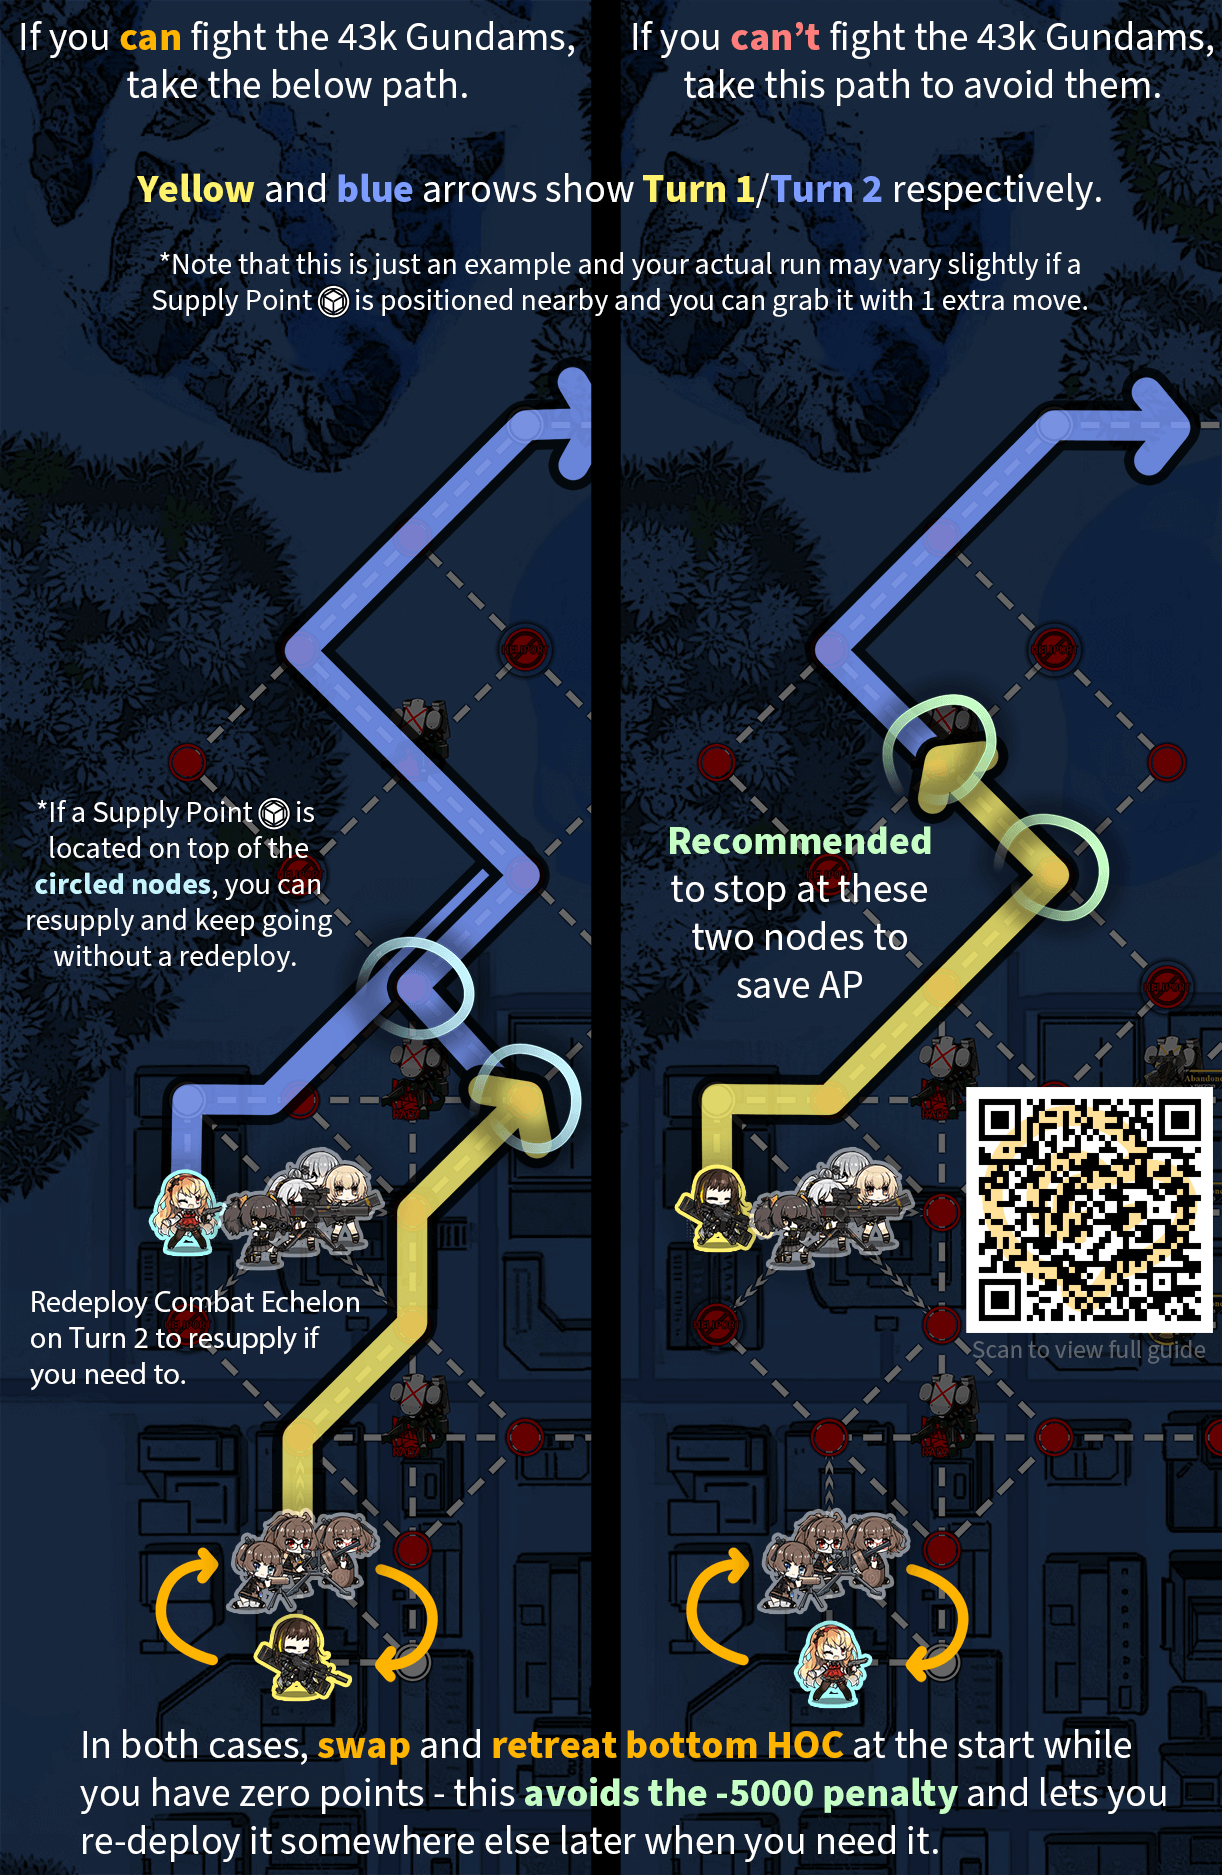
The left side opener shown above is fairly standard for EN. No matter which route you pick, it accomplishes a few different things:
- Gets your HOC retreat out of the way so you can deploy it to help fight Nyto from a nearby helipad on Turn 2.
- Moves your main Taunt echelon closer to the Boss Area, so you don't need to spend as many AP starting the process of triggering Military Defection next turn.
- Gets rid of 43k Gundams (if applicable)
- Gets rid of nearby installations (via HOC bombardment once you have vision)
- You need to do this manually while you have vision - don't simply execute planning mode!
Initial Opener - Right Side
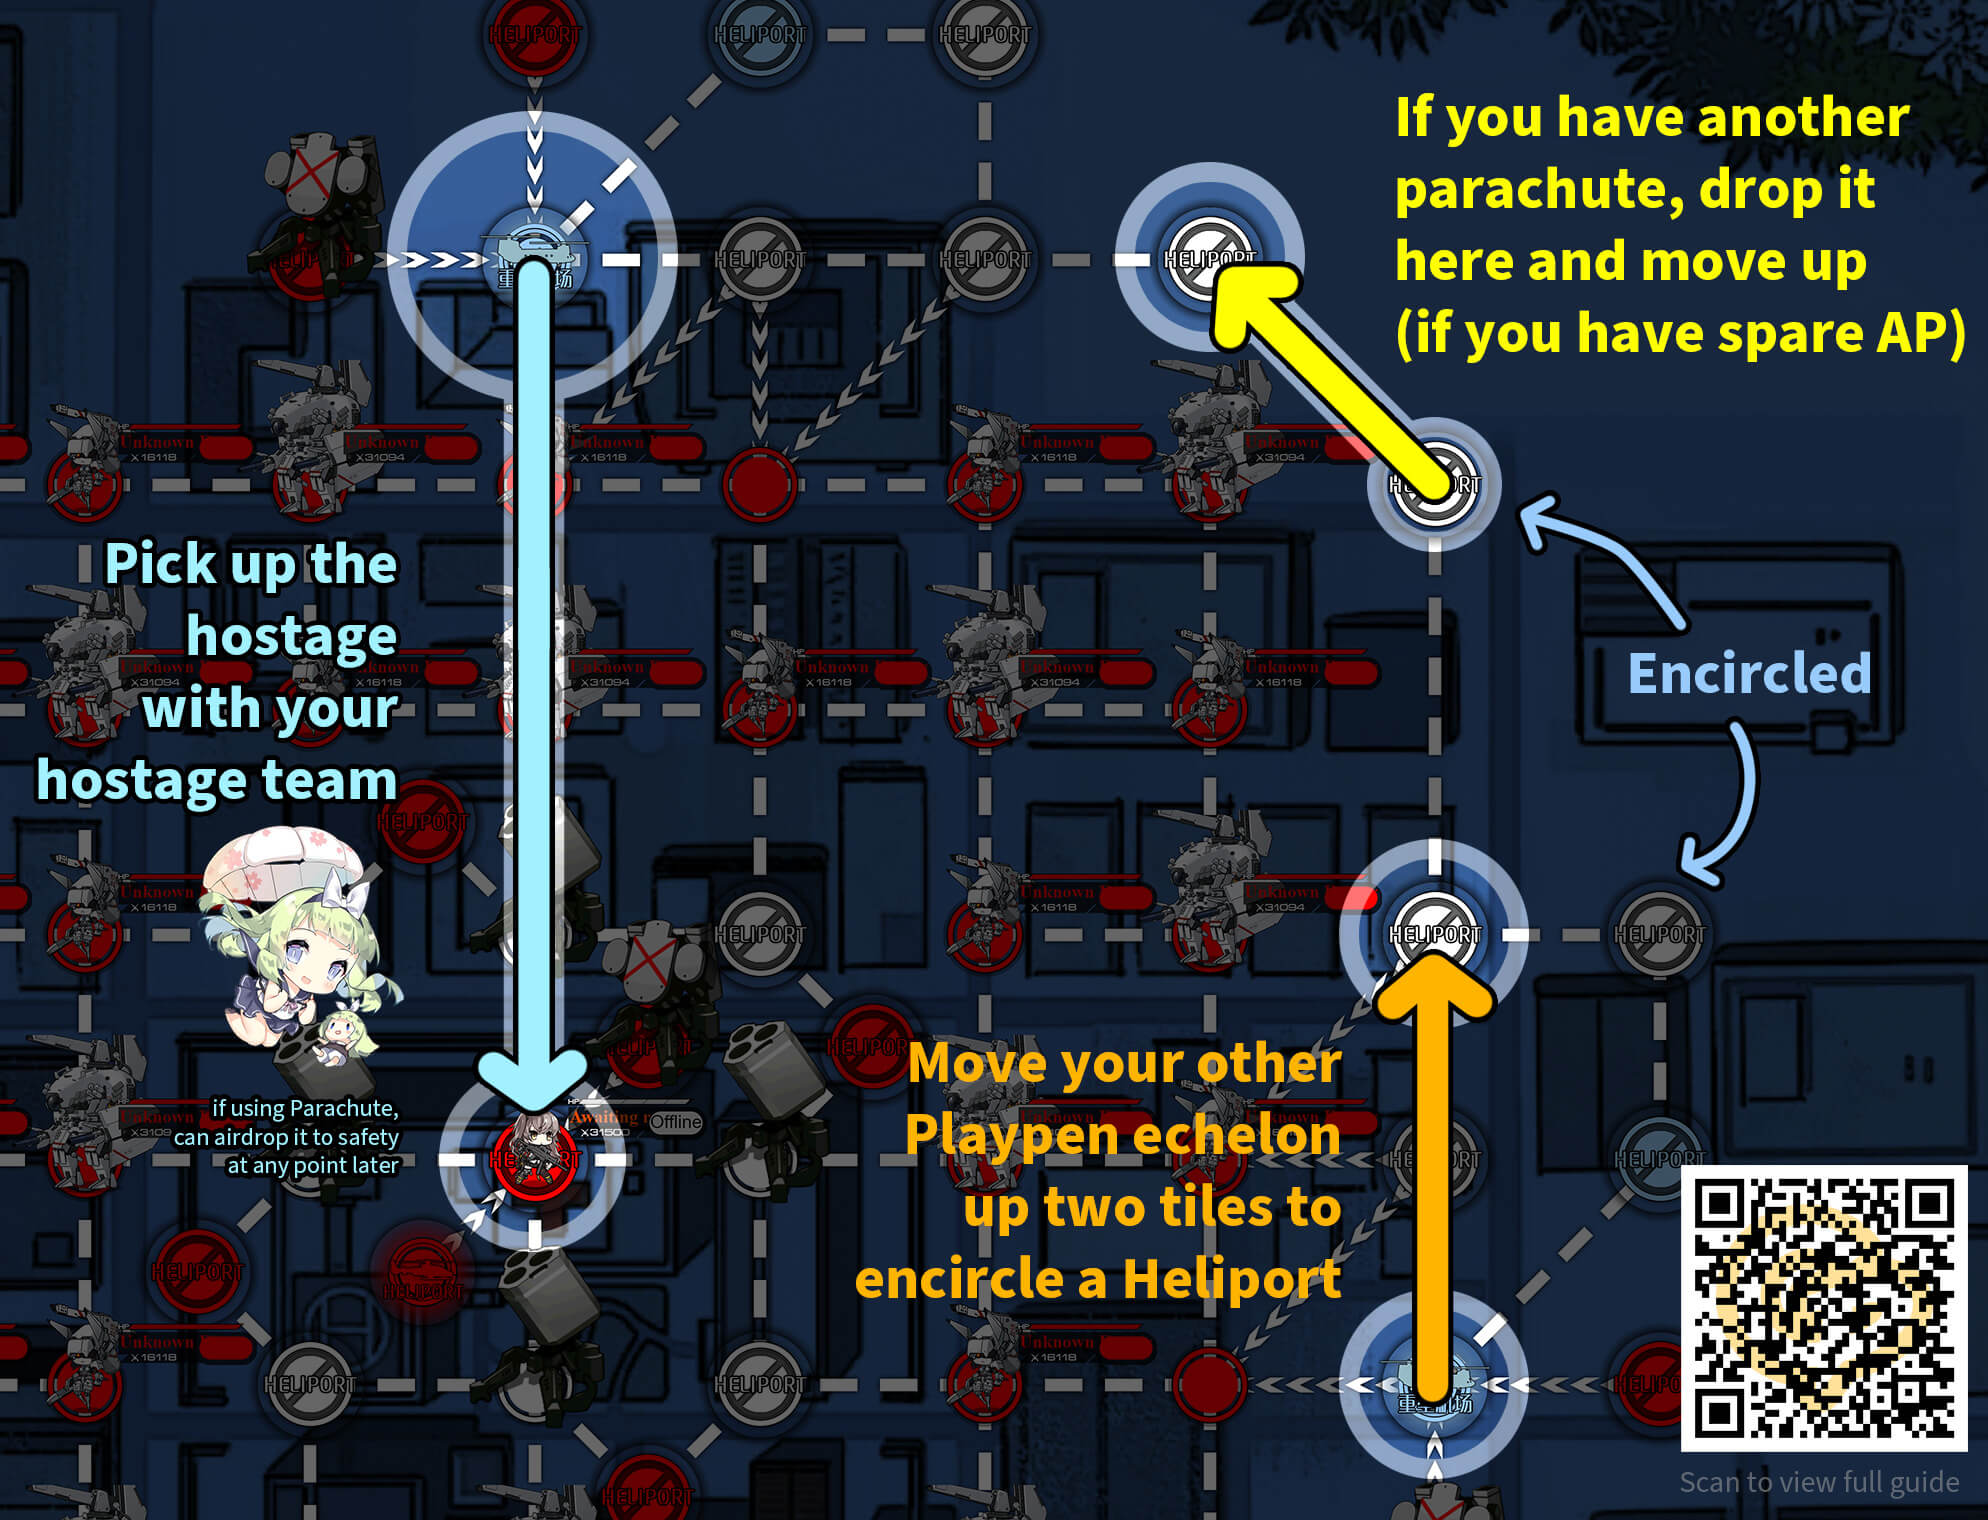
Because you start with 16 AP, you should have plenty left to do the right-side opening shown above. The main goals are:
- Pick up or swap the Hostage to a safe spot so it doesn't lose health
- Tanks will not aggro the hostage (but will still run it over if it's in the way - tanks move counterclockwise)
- Capture Heliports for more AP next turn
Advanced players who notice a Supply Point in the Playpen in a convenient spot can alter their routing to pick up the crate (gaining additional kills and points), but this should only be done when it doesn't significantly compromise the other goals (i.e. when enough spare AP exists to do it).
If the player has more AP remaining, they should generally use it to move their HQ team along the path to the Boss Area.
If you killed 43k CE Doppelsoldners
Players that took out the 43k gundams can move their HOC to either surround the nearby Heliport (do NOT step on it, since it's a kill switch) or capture a radar by using the Combat Echelon. See the below image for details:
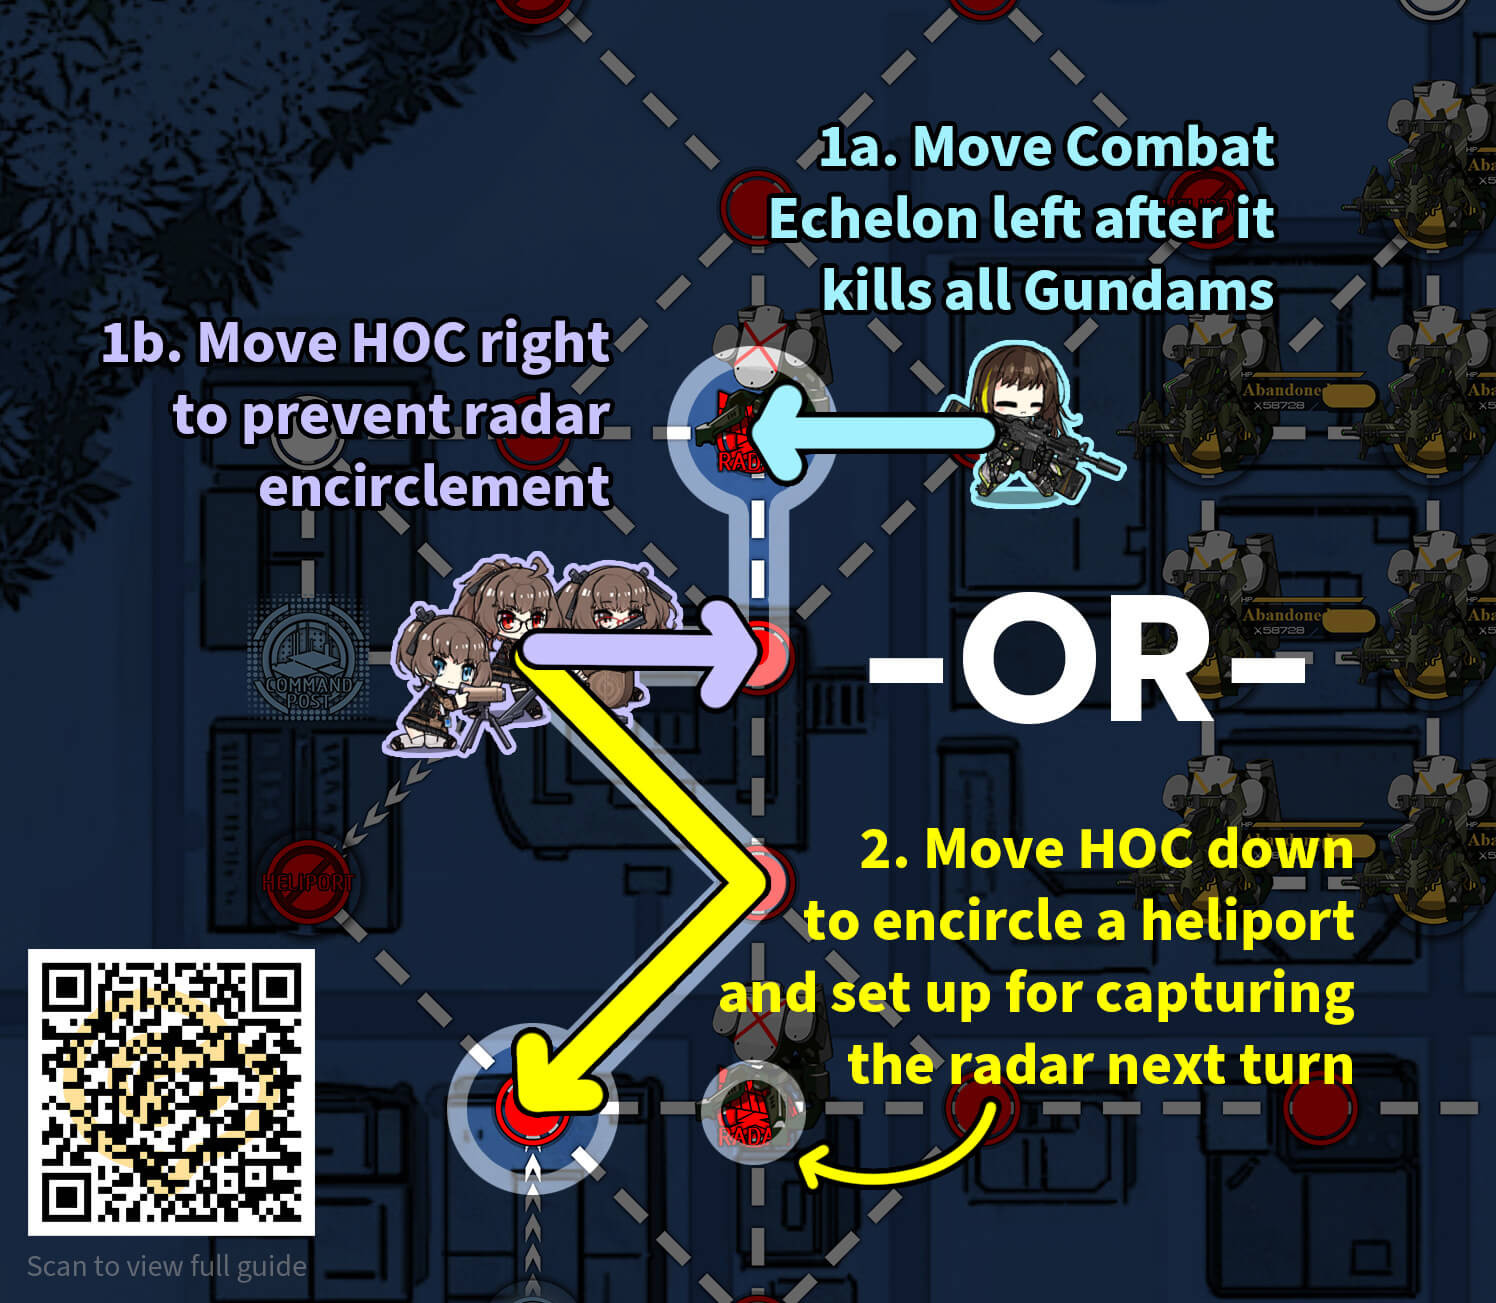
Both options cost 2 AP and either capture a radar or set up for a next-turn radar capture, giving you permanent vision of HQ.
Turn 2
The amount of AP available on Turn 2 should be between 23-27 depending on how many additional helipads were captured in the outer rim of the Playpen.
Left Side
Turn 2 is fairly deterministic on the left side of the map, because blowing up the Control Tower to trigger Military Defection is a main goal this turn.
This requires 11 kills, so get them in the Playpen if you haven't reached that number yet.
If the player chose Option 2 with their HQ HOC after killing 43k Gundams, they should now spend 1 AP to capture the base radar.
Right Side
Once defection prerequisites are satisfied, the playpen team(s) should pick up Supply Points in the Playpen and get any kills along the way.
- If spare AP allows, take a path that maximizes kills before resupplying (as long as there's enough ammo).
- Grab additional helipads with spare AP if no crates are left.
This will mostly be ad-lib by the ranking player, as crate spawns are random. If you have a lot of spare AP and 2/3 combat capable echelons in the Playpen, grab extra kills to increase future Supply Point spawns.
Turn 3
The amount of AP available on Turn 3 could be as high as 30, depending on any additional Heliports captured.
A step-by-step walkthrough is not possible at this point, as the opener is essentially over - players should follow the below rules of thumb:
- Kill the last Command Tower mob to trigger Military Defection
- Make sure to set Hydra AI per the guide!
- Pick up Supply Points in the Playpen and get any kills along the way
- If you Parachuted a Combat Echelon into the playpen on T1, the debuff will have worn off. This will let you roam the Playpen with an extra team
- Enter the Tank Pen if it is convenient (i.e. crates along the way so you can keep a high Score:AP ratio)
- If your Hostage is held by a non-Parachute echelon, you can either:
- Leave the Playpen now, so you can capture the Command Tower helipads and rescue the Hostage from there on Turn 4
- You can then re-deploy it back into the Playpen via the Heavy Heliport on the same turn
- Leave the Playpen later (if you don't need to/want to re-enter it)
- Leave the Playpen now, so you can capture the Command Tower helipads and rescue the Hostage from there on Turn 4