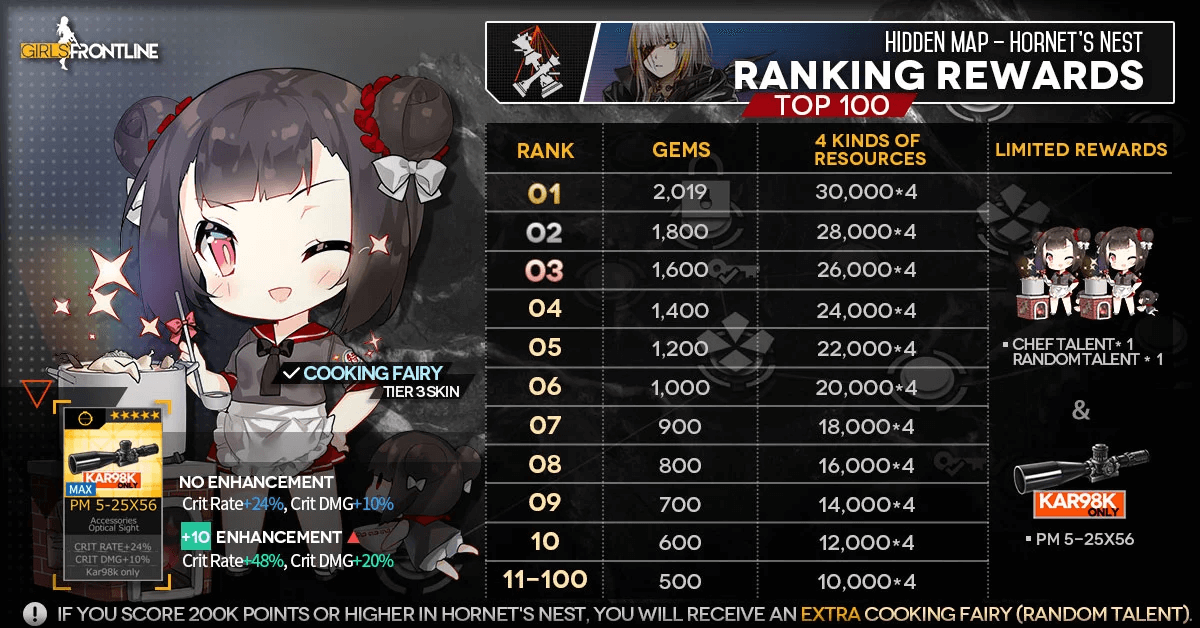
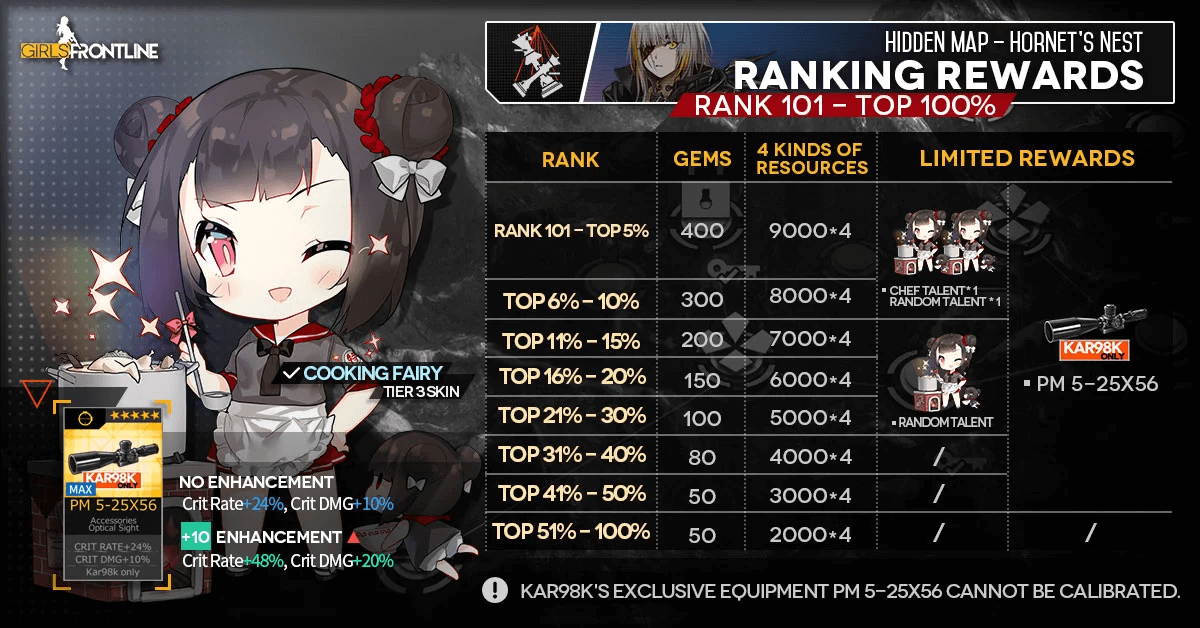
Like Arctic Warfare and Deep Dive before, Singularity features a ranking map, Hornet’s Nest, where Commanders compete against each other for high scores and various rewards. Unlock ranking by clearing the Singularity Story map, E3-6 Endgame (the same map where GFC's Bitter Reunion Speedrun Event takes place).
This time, the special rewards include the unique PM 5-25X56 Special Equipment for Kar98k and the Cooking fairy, awarded by reaching a top 50% percentile score or 200,000 points, respectively. Extra Cooking Fairies are awarded obtainable via placing at higher percents, along with the cosmetic Cooking Talent for those that reach the top 10%.
Ceia from GFC has done an excellent write-up about the ranking map in his Singularity Preparation Guide, which can be found here. It is highly recommended to read this before proceeding, as Ceia has done an excellent job breaking down the mechanics of the map. Reading up on the basics before continuing with the rest of this article will help a lot with understanding its contents.
For newer players who managed to clear Chapter 3 of Singularity but did not previously prepare for Singularity ranking, Ceia’s listed requirements probably appear more than a little daunting, even for a top 50% score. This Guide is intended to provide some budget strategies for achieving at least a top 50% score, to allow players to get the Unique Equipment and Cooking Fairy rewards.
Whether you’re lacking fairies, gunboats, or even large numbers of combat Echelons, a decent score is still well within reach if you play well and maximize points per AP spent. Even during the final week of Singularity, the top 50% cutoff is still significantly under 200,000 points; any player whose teams were strong enough to unlock Hornet's Nest can practically guarantee the ranking rewards by doing a serious run, following the guidelines below.
Are the Ranking Rewards Good?
First, a note that all players, even those who start the ranking map and instantly leave it, will receive a minimum of 50 Gems and 2,000 of each Resource. Players who unlocked the map but don't have time to do a full ranking run should grab this participation reward, since it takes less than 30 seconds.
Aside from the Gems and Resource rewards (that scale up based on player placement), Singularity Ranking rewards include Special Equipment for Kar98k and the Cooking Fairy; their stats are shown below:
+48% Crit Rate
+20% Crit Damage
Since Kar98k is an RF, she always prefers the Optical Sight; therefore, the PM 5-25X56 is best-in-slot for her.
The bamboo rework that came with the new client update has also substantially improved Kar98k by reducing her initial cooldown to 4 seconds and giving her an impressive base multiplier of 2.8x on each of her double shots, for 5.6x total that can be unleashed very early during a fight, or saved until ~6s to benefit from HG Skill buffs.
While this isn't yet very relevant on EN due to the lack of strong enemies that need to be removed ASAP, Kar98k becomes a preferential pick in future content as tougher Elite enemies like Doppelsoldners/Uhlans begin to show up en masse - Carcano M91/38 cannot deal 45x damage to them and other RFs don't have nearly as much upfront burst as Kar98k.
The Cooking Fairy's Skill (at Level 10) randomly applies one of the following effects for 30 seconds in the next battle:
Increase Damage by 20%
Increase RoF by 20%
Increase Accuracy by 30%
Increase Evasion by 25%
Since the buff is not very strong or reliable and her Aura is only notable for its high Evasion boost, the Cooking Fairy is mostly cosmetic since other standard fairies outperform it. The Cooking Fairy is, however, easy to raise to 5★ rarity thanks to the lower Development EXP requirement that it shares with all event reward fairies.
Scoring and Score Thresholds
What are points, and how do you get them?
A Ranking Map's objective is, as usual, maximizing the number of points earned.
In Hornet's Nest, points can be acquired in three different ways. Combat, One-Time Supply Nodes, and Map Control.
Combat
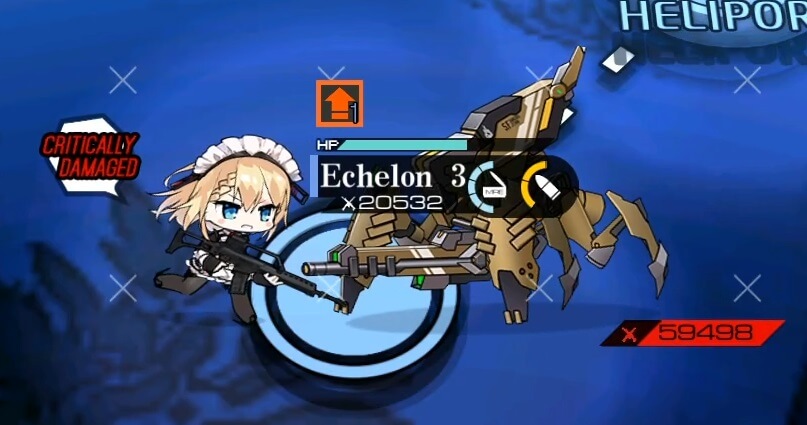
Every enemy you fight will award 10% of it’s Combat Effectiveness (CE) in points, ranging from 1-6k, or about 2-3k on average.
This Manticore has 59,498 CE, so killing it awards 5,950 points.
KCCO and SF units on the map will fight each other, just as they do in 3-Hidden. The enemy unit with the higher original CE will win, meaning most SF units will always lose early game, causing the KCCO unit to take some damage. M16, Agent, and late-game SF spawns with 40k+ CE will win against the KCCO units, with the non-boss SF units taking some damage and CE loss in the process.
Enemy units in Hornet's Nest retain their Expand AI, so their movement is to some extent deterministic for players that want to exploit this. The AI will always prioritize hostile territory over neutral tiles (e.g. KCCO will always expand into adjacent SF nodes before trying to expand into a neutral node), and in the event of multiple adjacent factions, will seemingly prioritize the player's tiles over the other AI faction's.
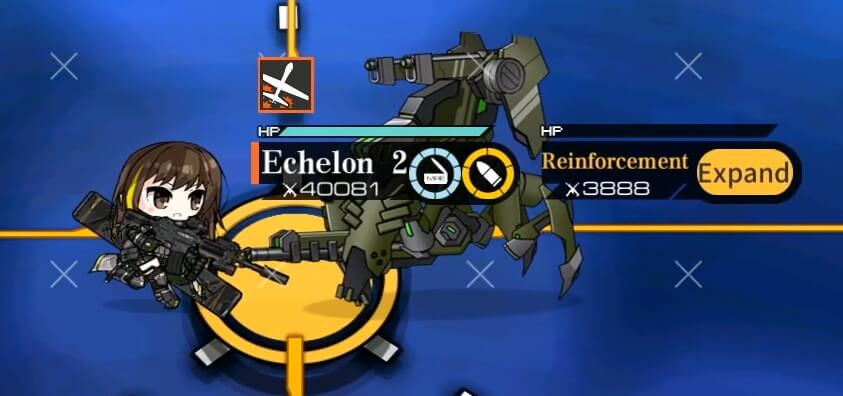
KCCO enemies that have been damaged from walking into SF enemies still yield 10% of their original CE as score, so even heavily damaged KCCO units will still give the full ~3.5k points per kill. This can be used to your advantage in contested areas of the map.
Despite having almost no health left and a reduced CE of 3,888, this Hydra still awards 10% of its original 34,935 CE as score.
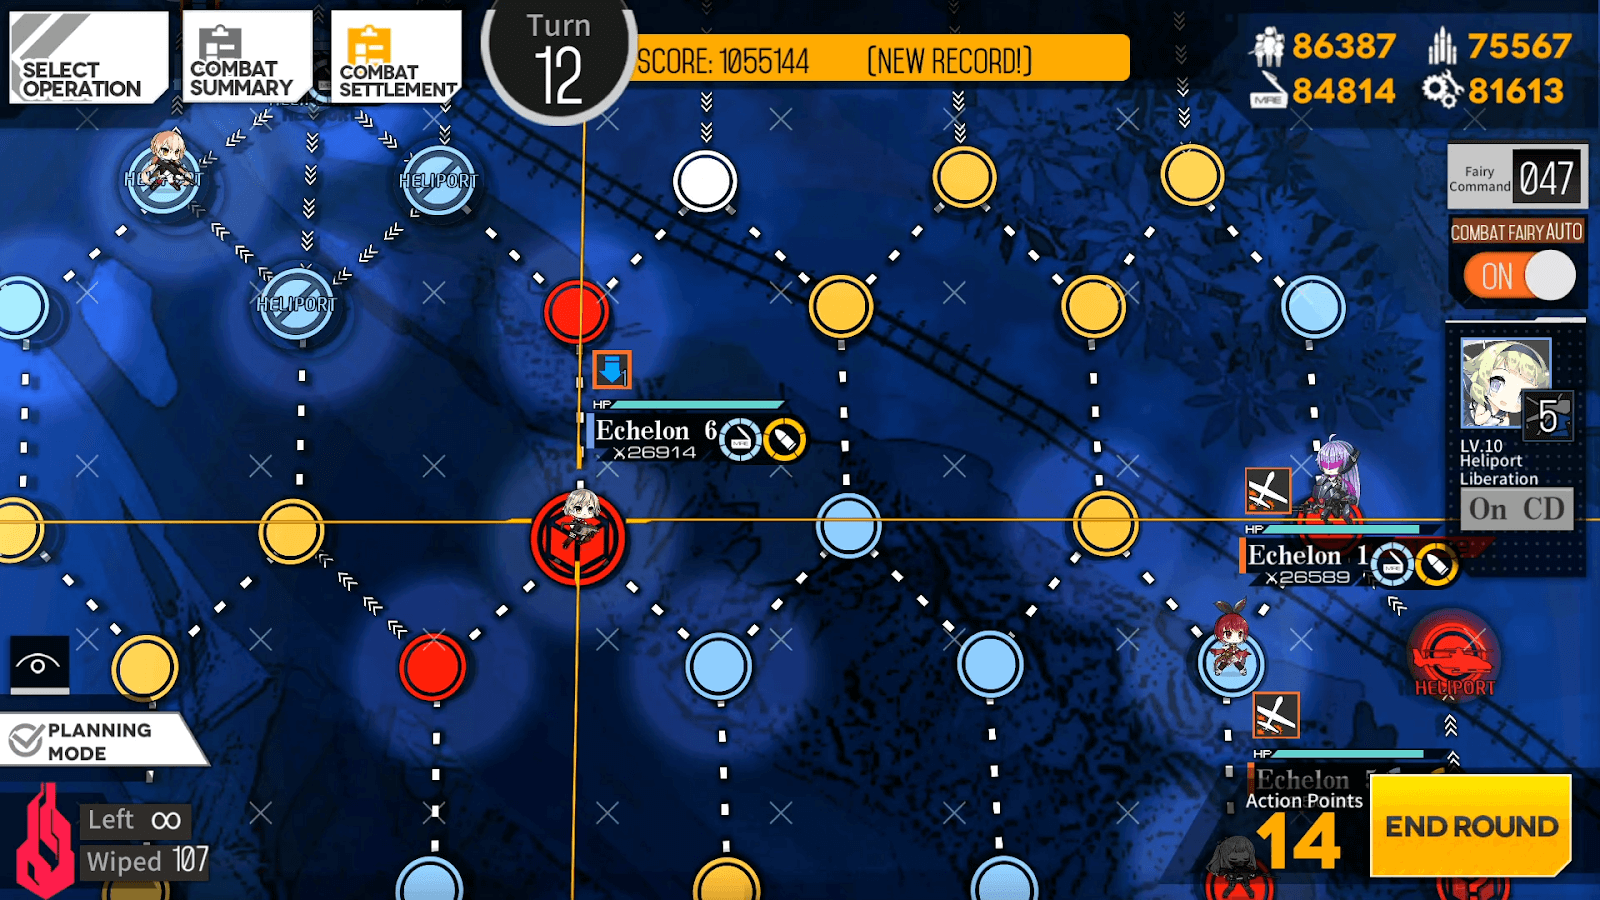
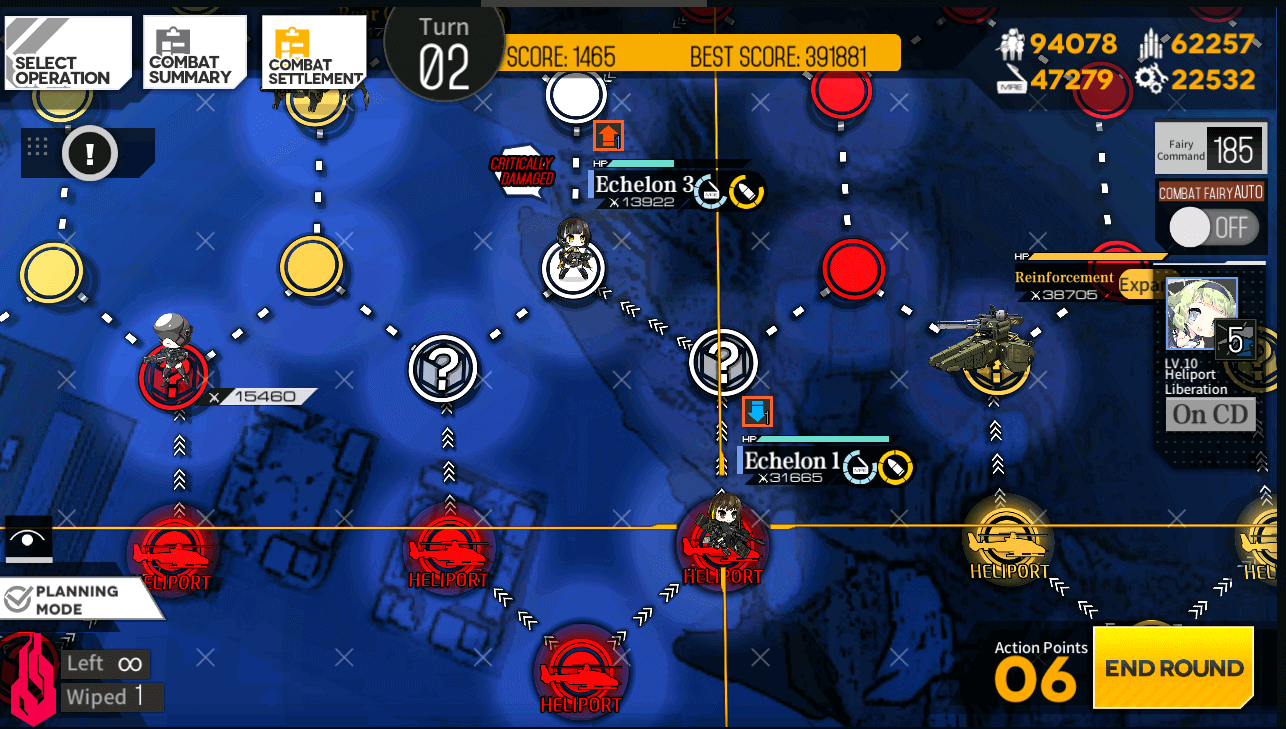
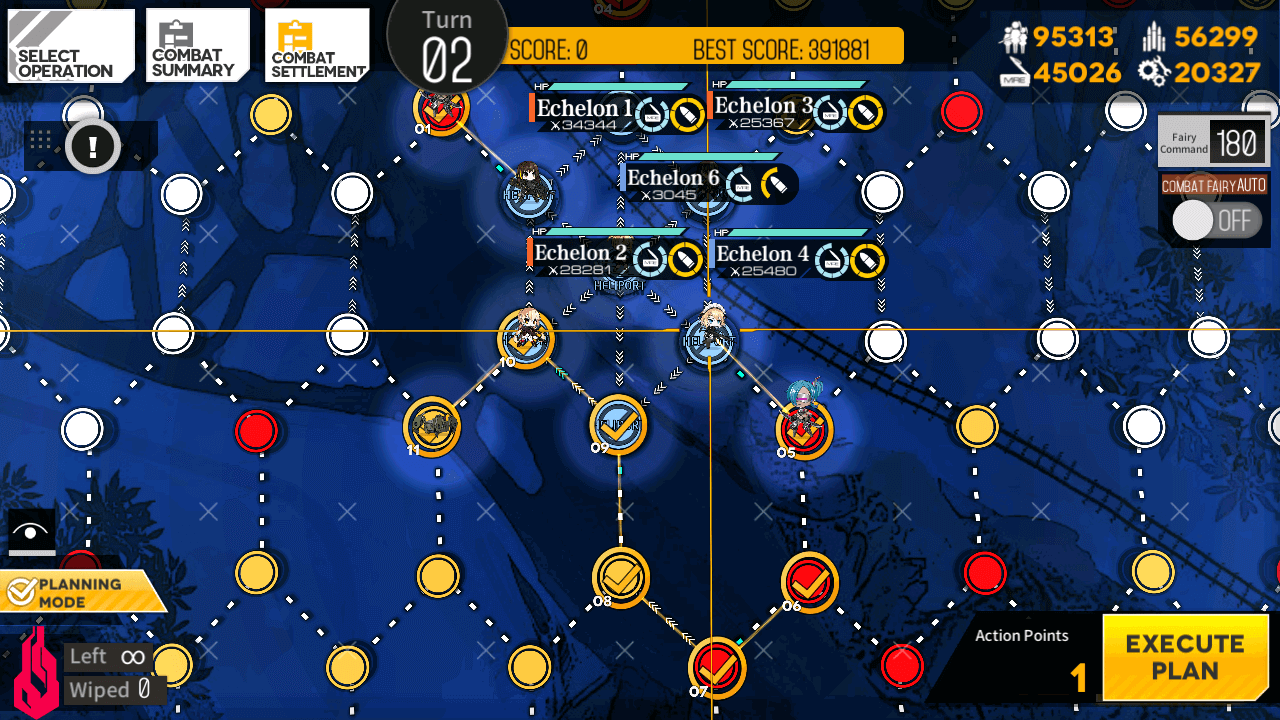
16 total enemies will spawn every turn from the eight sets of helipads shown below and they will move immediately. Bear this in mind when planning your movements.
One-Time Supply Nodes
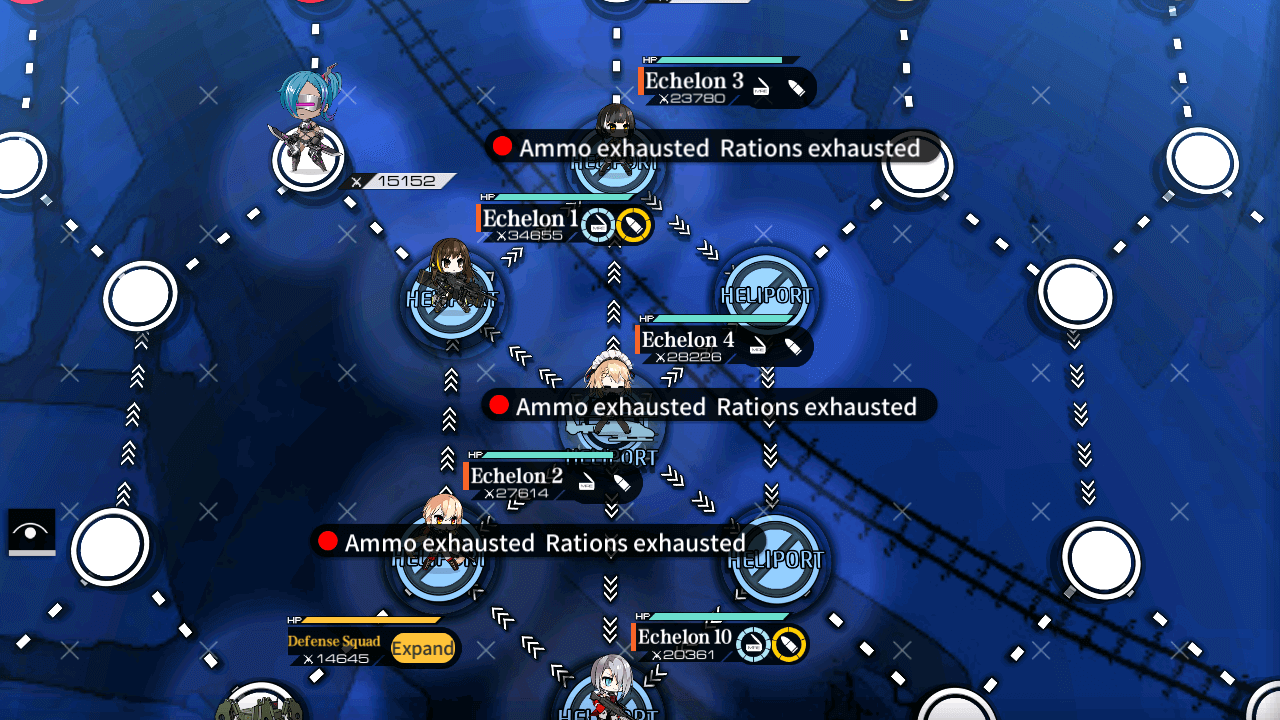
Every turn, a number of One Time Supply Nodes will spawn at random places on the map. Each one of these collected will award 10,000 points, although your echelon must be able to re-supply (i.e. have non-full ammo or rations)!
The number of Supply Boxes spawned per turn starts at 2, and increases by 1 for every 7 enemies killed by the player, rounded down.
This is calculated at the start of each turn: if a player ends their turn with 33 kills but gets 2 kills during the enemy phases, they'll have 35 kills at the start of next turn. This means 2 + (35/7) = 2 + 5 = 7 Supply Boxes will spawn for them.
Farming enemy kills therefore offers a dual benefit of the direct score reward and the increased number of Supply Nodes spawned - making kill accumulation instrumental in improving the player's final score.
The spawned OTSNs are a very high priority for acquiring points if they spawn near your echelons, as each supply node collected is not only equal to at least 3 kills worth of points, but also is the main way to replenish your combat echelon’s ammunition and rations for more fights due to the lack of open heliports.
Indeed, if a commander does nothing but collect two crates per turn for the length of this map, they will easily hit the 200k threshold for the free Cooking Fairy. An actual run would involve a lot of enemy kills and therefore a far higher potential end-of-run point total.
Map Control
Every node controlled by the player by the end of KCCO's Turn 12 will award a certain amount of points. This includes unclaimed One-Time Supply Nodes, which if controlled by the player will still award the full 10k points.
Even though the player Echelon can’t resupply anymore (it’s full), this node will be captured by standing on it, awarding 10,000 points since it’s the final turn.
Regular nodes award 500 points, while Heliports award 2k each. Since kills and supply nodes are worth far more points, it's not worth going out of your way to capture regular nodes or heliports for points.
Losing Points:
Some actions can deduct points. Retreating an echelon costs 1500 points (1000 if done on an open, allied Helipad), while emergency field repairs (which is unlikely to happen in this map) will cost 200 points per unit.
Since the penalties are far lower than the points earned from enemy kills or resupplying from One-Time Supply Nodes, players can take advantage of this to retreat and redeploy echelons to grab more Supply Nodes than they otherwise would have sufficient Action Points for.
Auto-Resupply should be disabled in the Game Settings for this to work, as otherwise a newly deployed echelon will automatically resupply itself and become incapable of resupplying from the One-Time Supply Nodes.
Scoring Thresholds
Unfortunately, MICA only reports top 100 scores directly, so players must estimate the various thresholds for reward cutoffs. Also, as the end of Singularity approaches, an influx of ranking attempts can be expected - therefore, players should simply score as high as they can.
For this Ranking event in Singularity, DMesse is again collecting volunteered data in this form for the score cutoffs, compiled in the spreadsheet shown below. Players can refer to it for a crowdsourced chart of ranking cutoffs, updated daily.
Writers Note: At the time of writing, even a score of ~177k is shockingly within the top 31%, indicating that the 50% cutoff for Kar's Special Equipment may not be that high when Singularity wraps up, and remains easily reachable for most commanders.
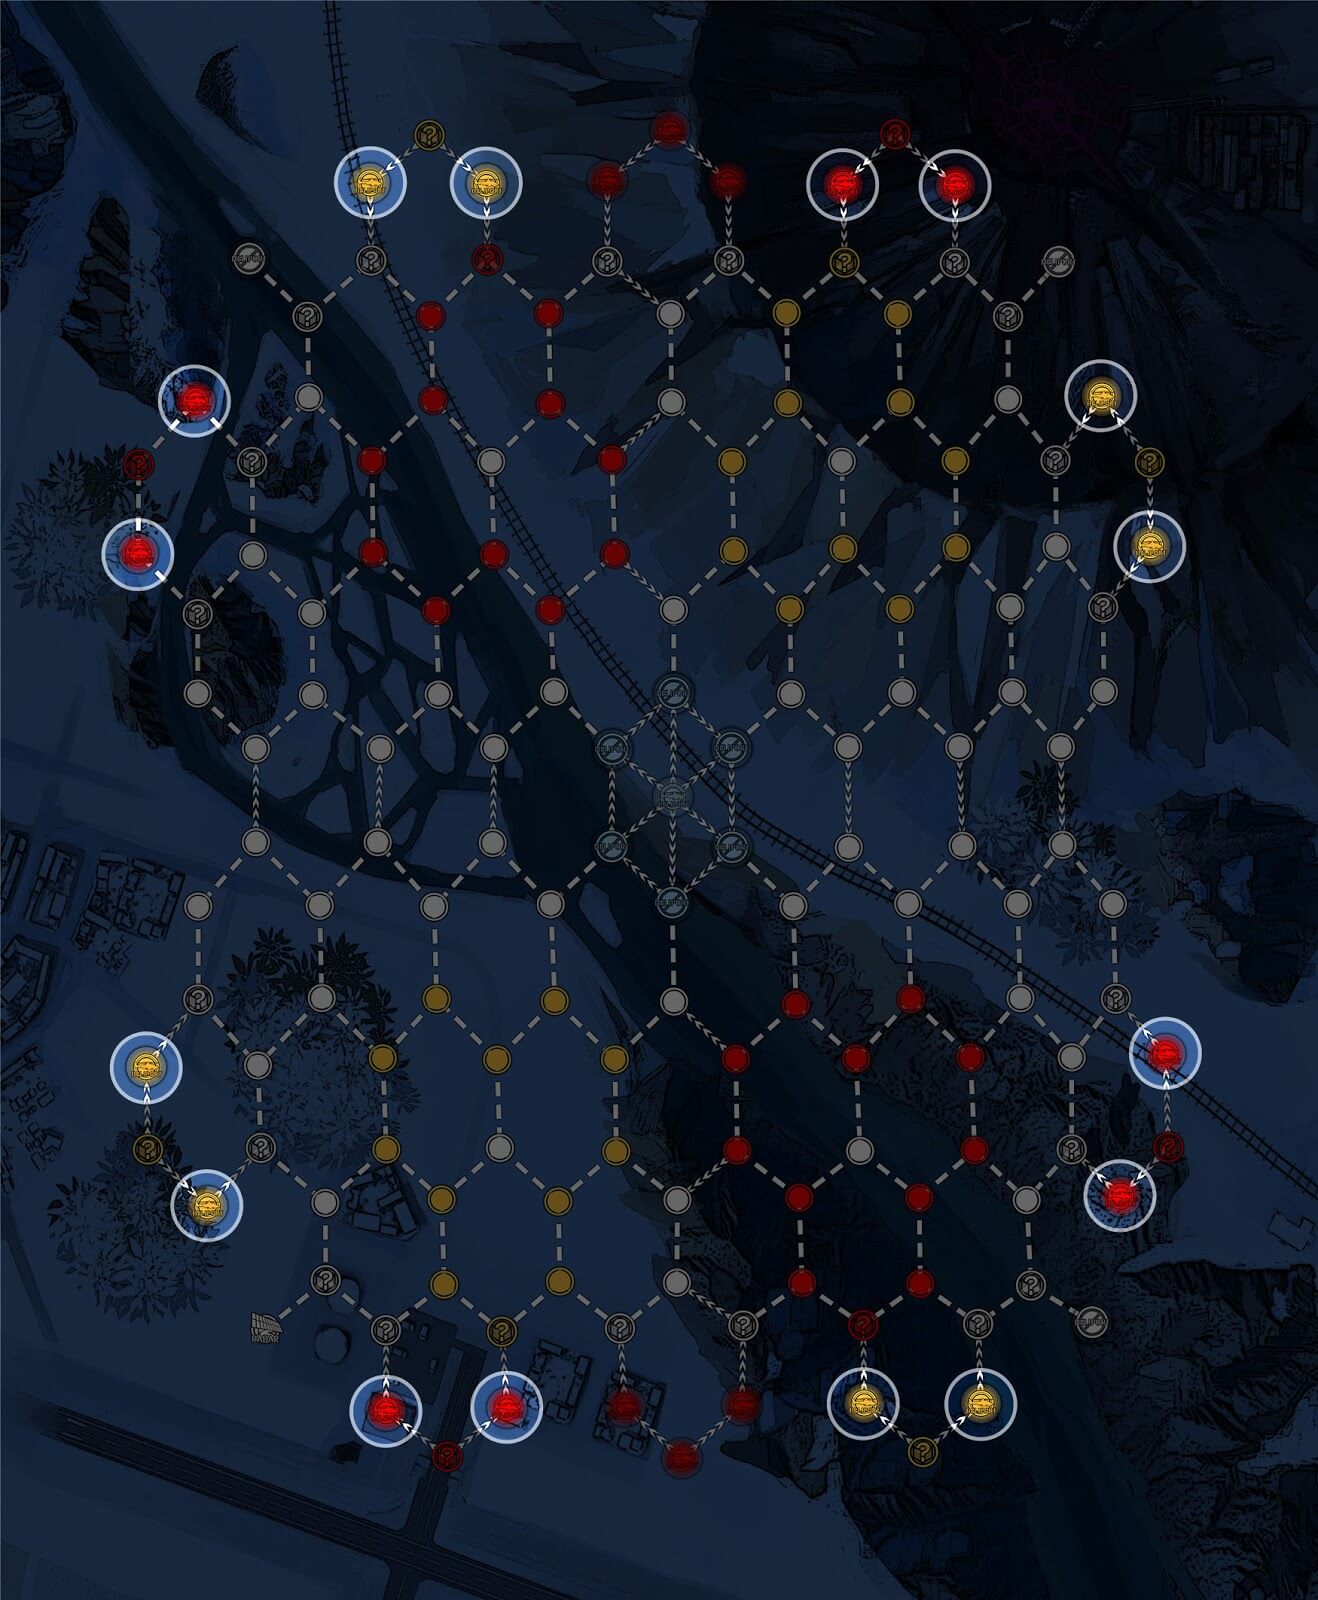
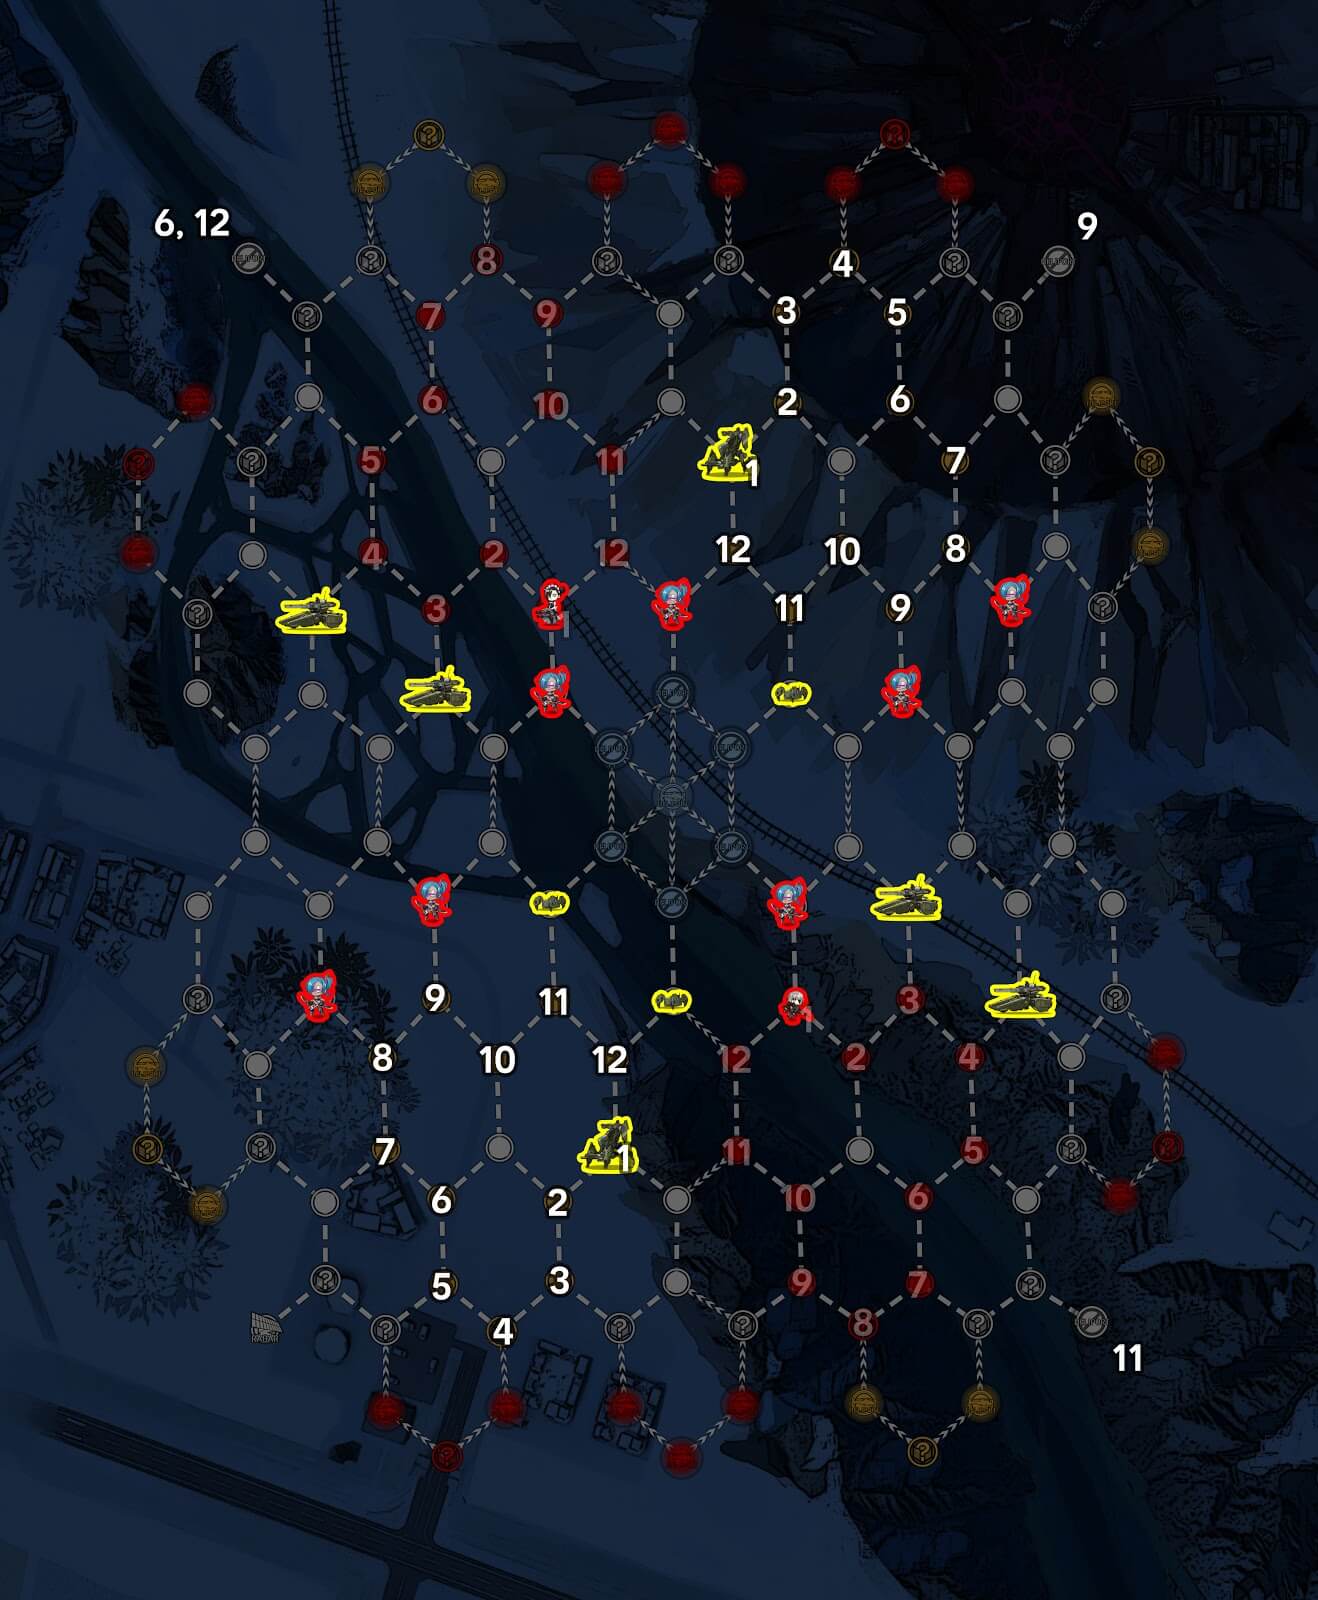
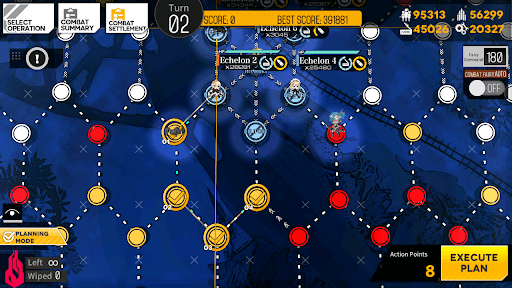
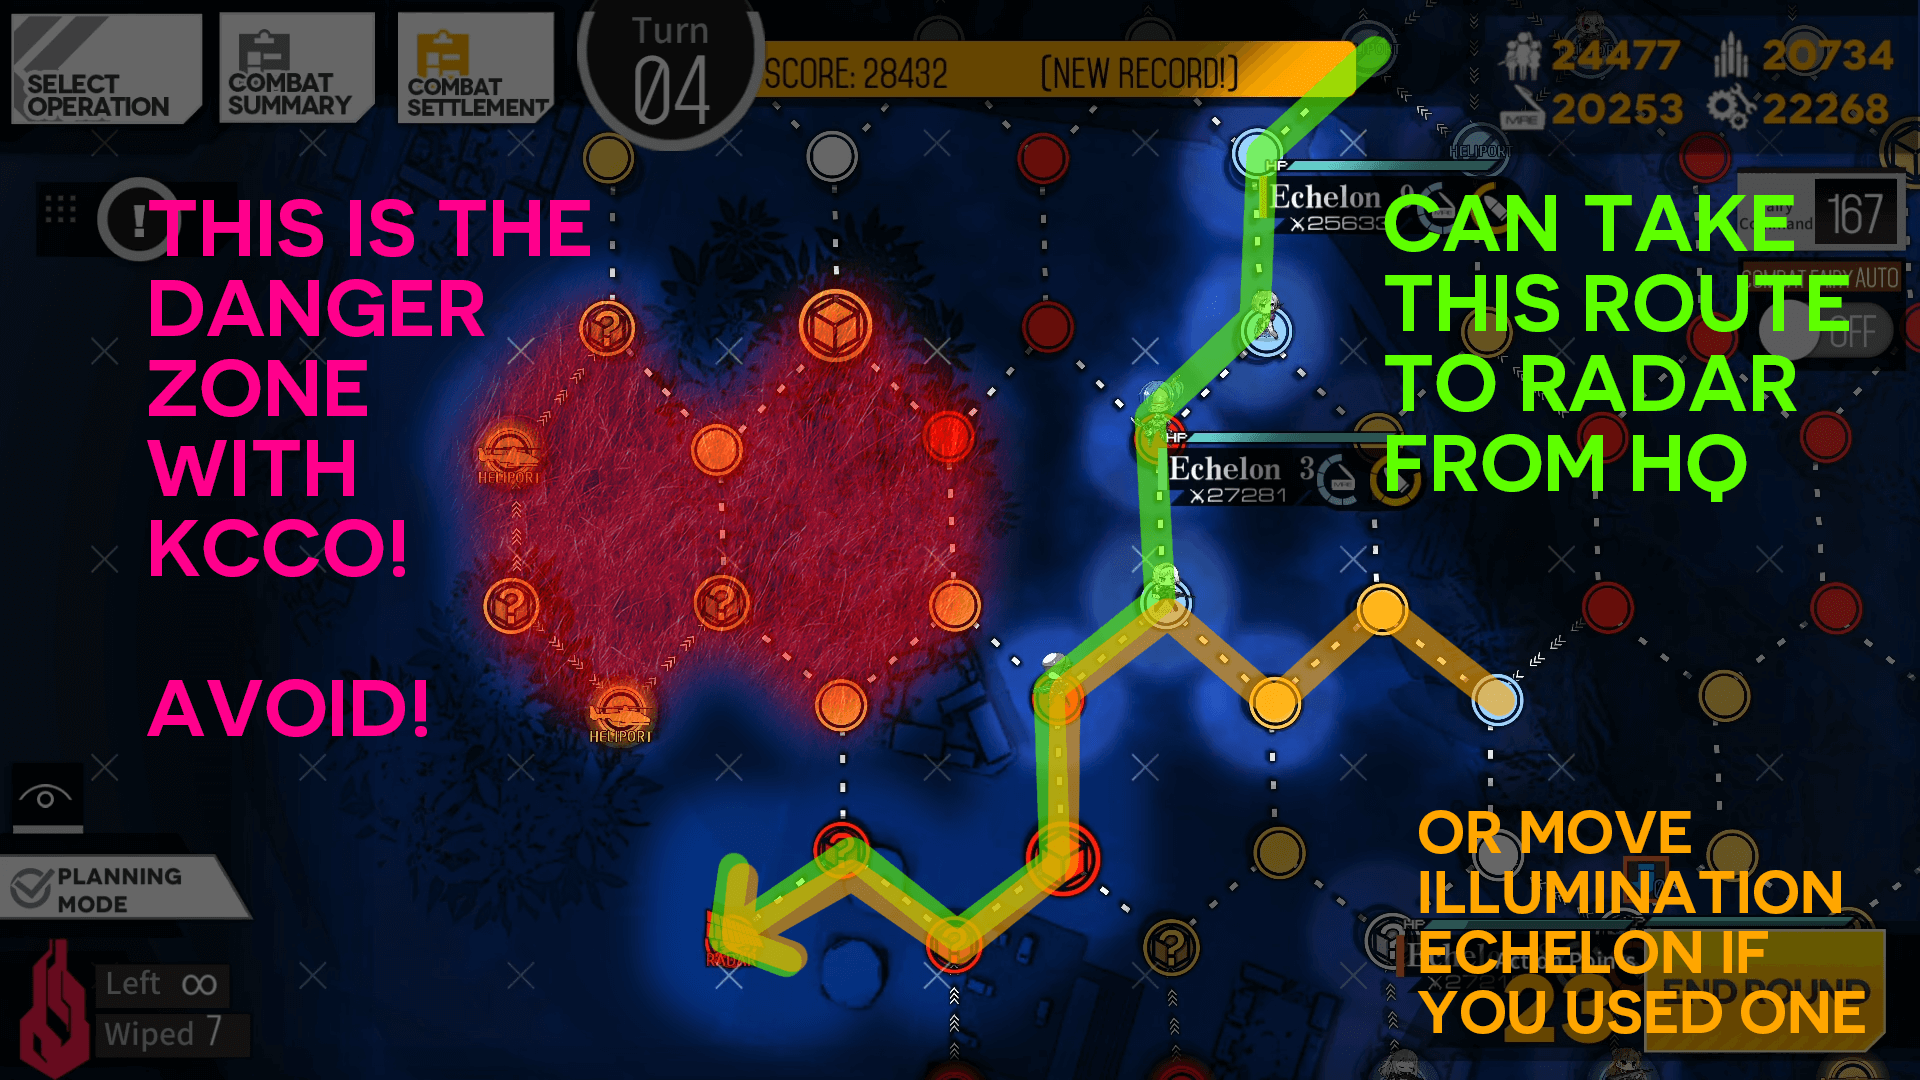
Map Layout
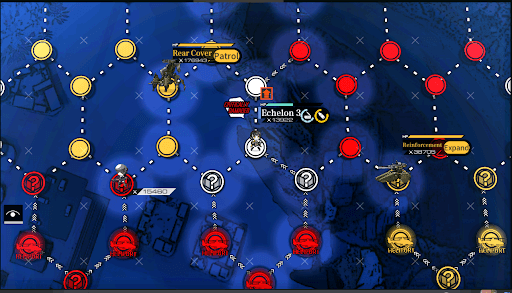
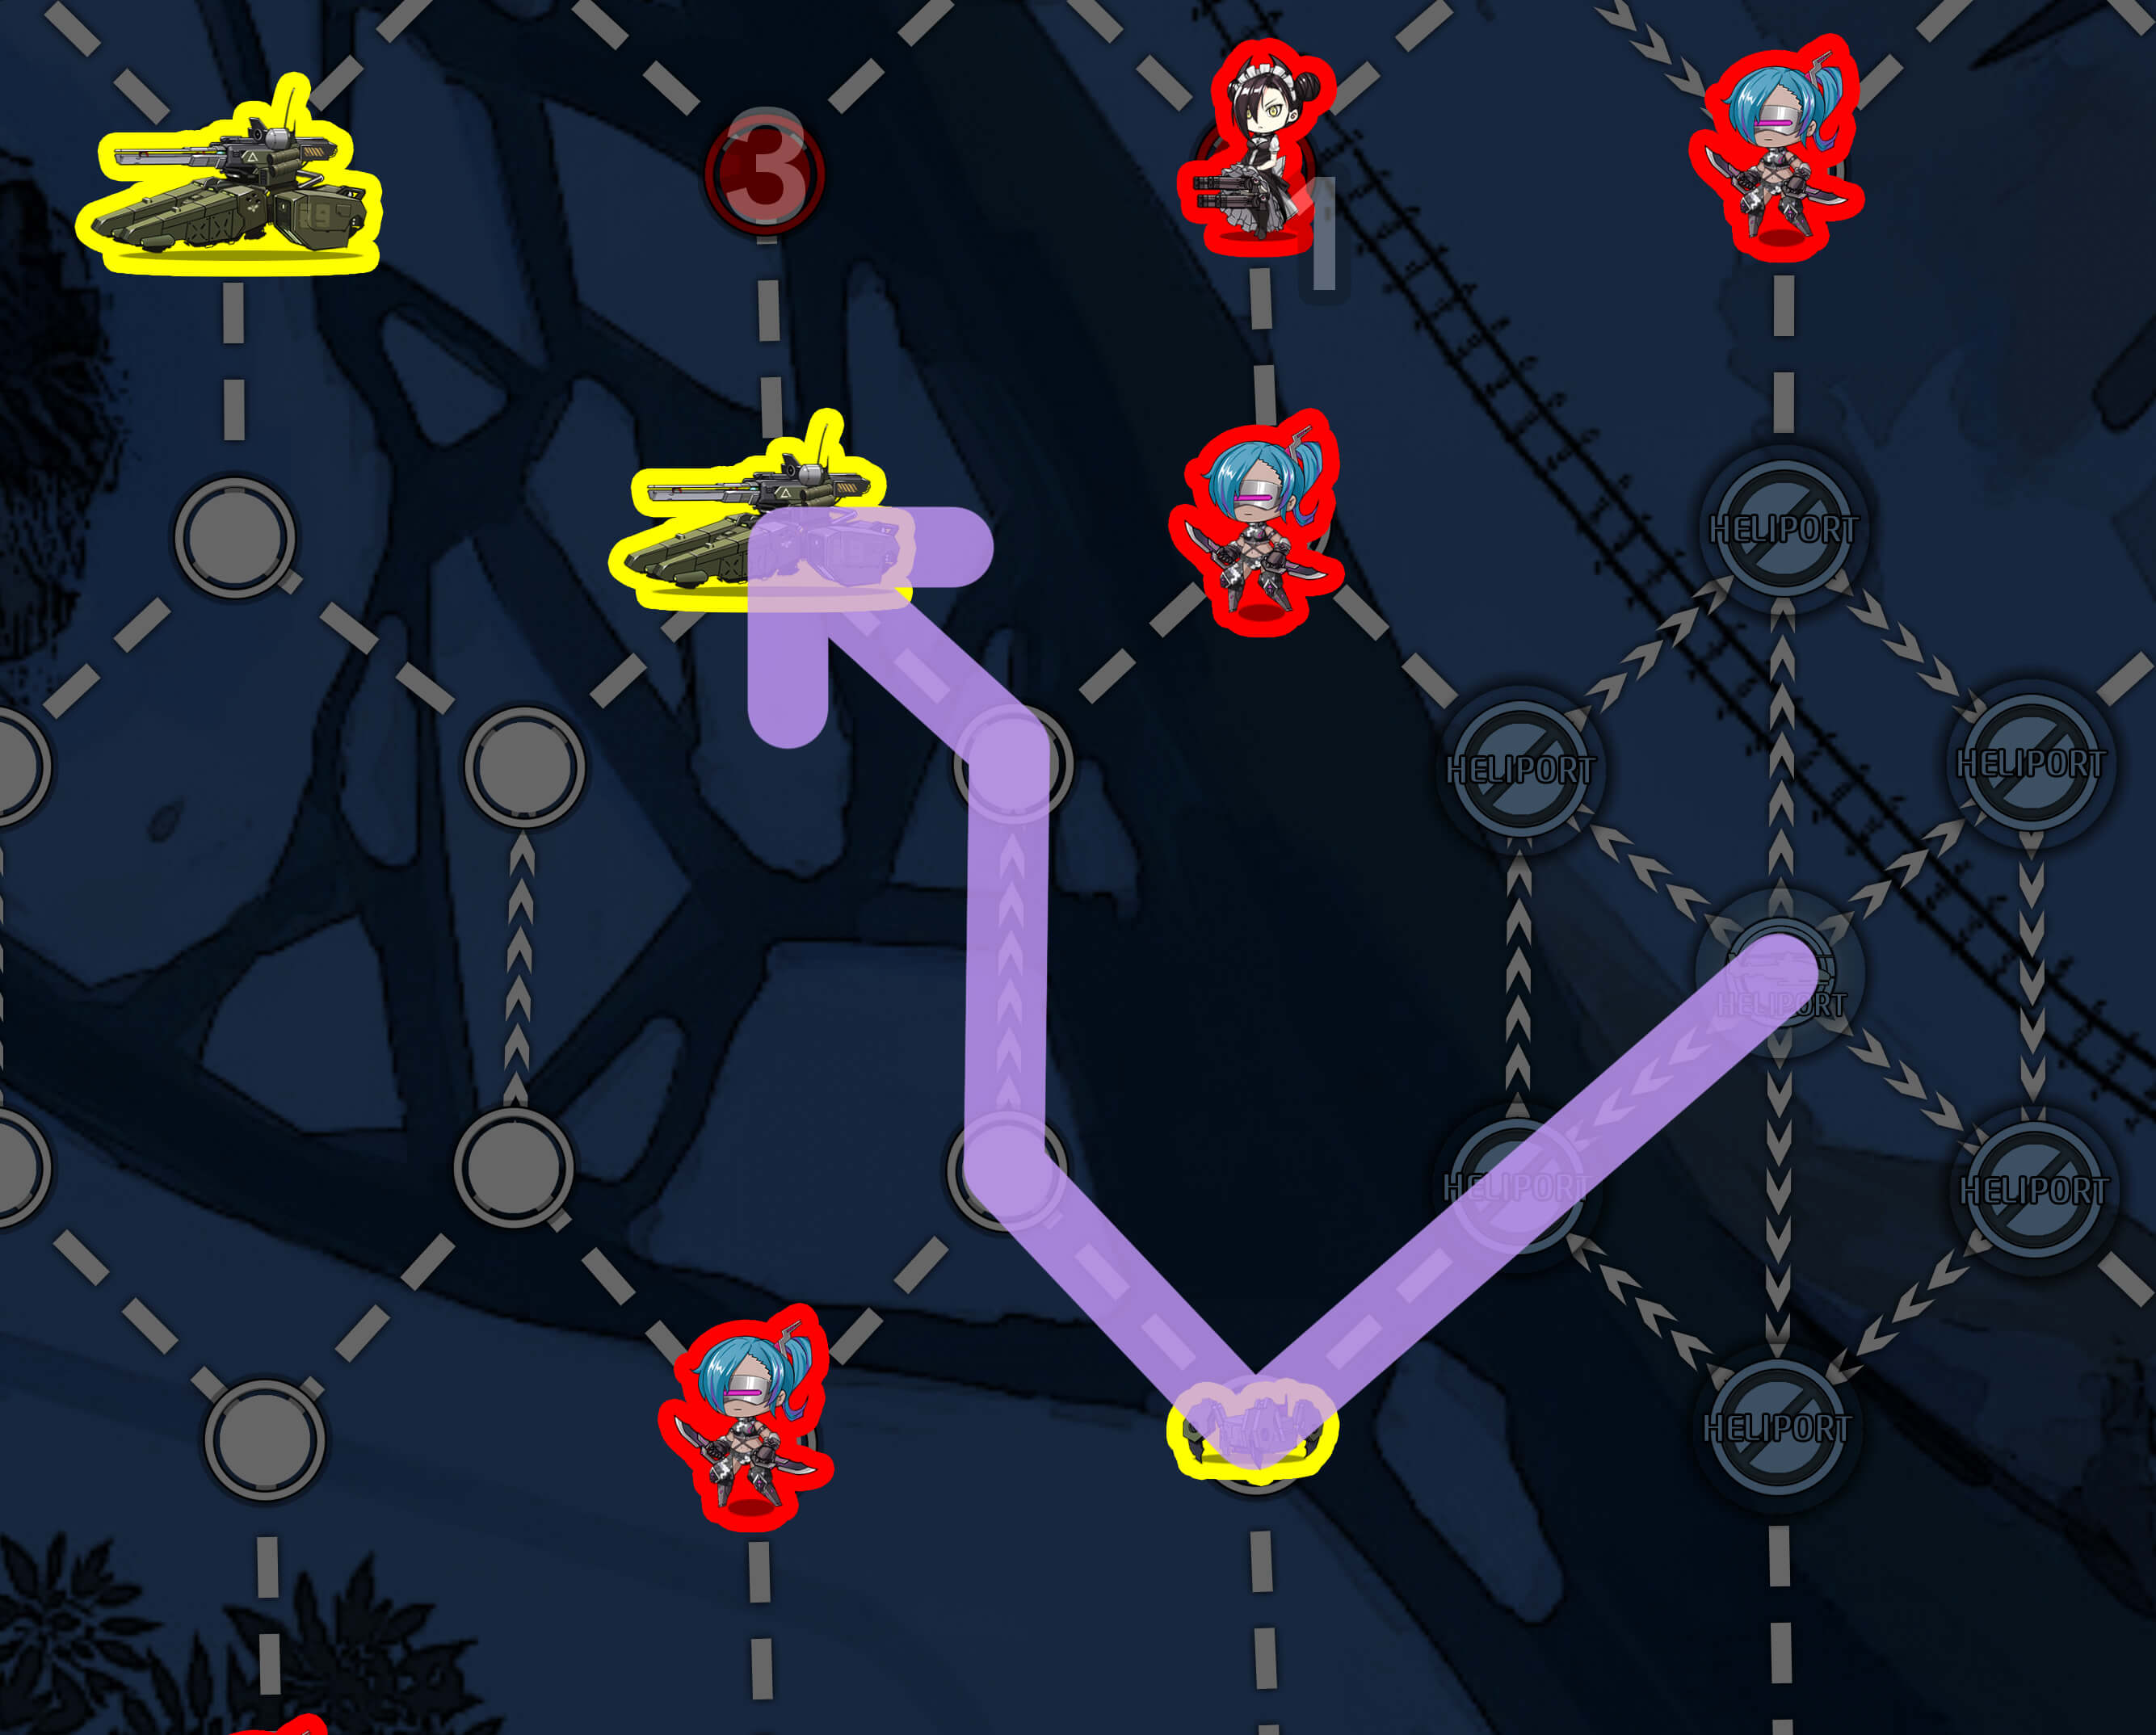
The Hornet’s Nest map above provides the map state on turn one, and is a good place to start building the strategy for a budget run. For a more detailed breakdown of the map, see the document linked in the Singularity Preparation Guide.
It is recommended that you spend a few minutes studying the map, including positions of the Tank/Hydra enemies, Agent, M16, and what Heliports can spawn which enemies.
Note especially the one-way paths that echelons cannot backtrack over, as they delineate each of the four quadrants of the map.
Strategies/Tips and Tricks
Quick Tips
Before diving into team building and resource allocation here are some quick tips and strategies. Keep in mind that Hornet’s Nest is a very challenging map, and you will likely need more than one run, and possibly many incomplete runs to get a full handle on the situation and refine your strategy.
Don't be afraid to try multiple times, as there is no penalty for retrying and the game takes your highest score.
This is a hard map and requires knowledge and planning. If you didn't score as high as you'd have liked, you can refine your strategy and try again (this is why you should start soon! Each run uses a decent amount of Fairy Points, so that may limit the number of remaining attempts you can make.)
Doing a run gives personalized experience that no guide can substitute for, as the performance of team compositions are unique to each player's specific setup and only in-field experimentation can optimize it.
Spend Fairy Commands freely if they'll pay off by saving AP, getting you points/map control, or allowing your team to survive an encounter.
If you have a Parachute Fairy, try and have them capture a new Heliport every turn if possible.
You can parachute from HQ to one of the nearby helipads to save 1 AP while grabbing crates that spawned around the center of the map.
Maximize the points-per-AP ratio for your actions and adapt to the map.
Grabbing a box 3 tiles away without fighting is ~3333 points per AP, but grabbing a box 4 tiles away while killing enemies along the way can be as much as 4000-5000 points per AP.
Points-per-AP should be above 2000 for the average run, with 3000 being a decent minimum to strive for.
Actions that earn AP will indirectly earn points by giving the player more AP to use later. For example, using 2 Parachute Fairies to capture a set of 3 helipads at the North/South end of the map on turn 2 is a net +3 AP per turn for the next 10 turns, or +30 AP - meaning this is equivalent to earning about 90,000 points!
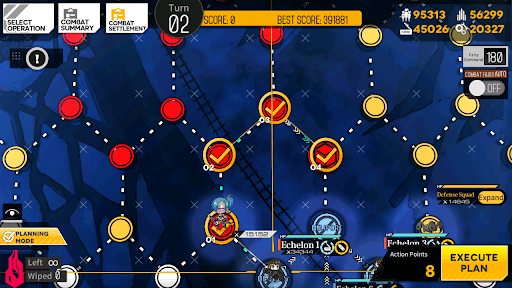
Use Planning Mode to consider your moves at the start of each turn, as it’ll count your AP for you. If your route includes swaps, planning mode will still subtract 1 AP but it will not cost one when actually swapping.
If there are no more Supply Nodes to resupply from or Helipads to capture, repositioning to get kills on enemy phase can be a good use of any remaining AP.
Check the previously included ranking map to ensure your planned route doesn’t pass through one of the 180,000 CE KCCO Hydra units or M16A1, or that they are not standing on one of your Supply Nodes.
Their positioning may be off by a few tiles if you are unlucky, due to clogs.
Killing enemies is often less profitable than grabbing a box, but if the kills push you over the next box spawn threshold (every 7 kills: i.e. 7, 14, 21, 28, 35...) it may be worthwhile to do so.
Getting a box and retreating still nets a profit of +8500 points.
Mind your AP. Keeping control of all the Heliports around your Command Post can be difficult for the first few turns, but should be done if at all possible.
Be willing to liberally retreat to reposition your Echelons. Fielding fewer squads does make map control harder, so be prepared to redeploy your Echelons frequently around the map to capture boxes and kill enemies, or to resupply and repair exhausted echelons.
Be prepared to rush the Radar by Turn 4 if not using a Gunboat, to prevent KCCO from overrunning the map.
Removing KCCO with Radar can allow otherwise unreachable One Time Supply Nodes to become accessible - but be careful to not leave a unit that can't fight KCCO next to the spawner helipads!
You do not need to Capture the Radar, only stand on it to clear out the KCCO.
Retreating and redeploying an Echelon will reset the cooldown on a fairy. Use this to your advantage, especially with parachute fairies.
Be mindful of the overall map state, so that enemies don’t capture the Heliports around your Command Post while you are fighting elsewhere.
Taking a screenshot at the end of each turn can reveal any newly-captured nodes, showing enemy movement through the fog of war.
One-Time Supply Crates that are captured (under player control) after Turn 12 will still award 10,000 points each, even if not resupplied from.
Random nodes mayspawn a Red Goliath. For this reason, try to only move onto Random nodes if an enemy is already present on them.
Advanced players can strategically detonate them for a point gain - this requires at least three surviving T-Dolls, with at least one T-Doll not critically damaged.
(You may need to change your formation.)
Retreat two T-Dolls, preferably your important DPS, and leave 3 behind on positions 8, 5, and 3.
Retreat the T-Doll at tile 3 when the Red Goliath starts its explosion animation, and move the T-Doll at tile 5 forwards to sync the three explosions together during the Heavy Damage Protection invulnerability period.
If you do not have a gunboat, or are not confident in your micro, you can choose to dedicate at least 1 Combat Echelon and 1 Dummy Echelon to swap onto the Radar. This may save AP if the player has insufficient Parachute Fairies to capture KCCO spawners and need to radar frequently.
Exceptionally damaged (CE 3-5k) KCCO Hydras and Typhons can be killed easily by AR/SMG echelons, but will still yield their full points. This can help ease planning your moves, as well as provide a few extra points in a pinch.
Don’t be afraid to reset for better outcomes, especially if an easily winnable fight turned sour due to player mistakes or bad RNG. This costs nothing but time to log back in, but saves at least 1500 points and map control.
Gaining Commander EXP will reset the seed for a Fairy Talent proc - leaving daily quests completed but uncollected can let this be done easily while ranking.
Autobattling 1-1 takes 1 minute and increases Commander EXP, but requires at least one free retreated echelon.
For Commanders lacking gunboats, use any Parachute Fairies you have to capture KCCO Heliports around the map, both to ease map control and provide valuable AP. For Commanders with Gunboats, they can capture the KCCO heliports in sectors of the map that they don't have gunboats in.
Certain SF enemies can be entirely killed using by using an SL10 Airstrike Fairy. Check https://gf.hometehomete.com/en/maps/ for enemy HP and composition to determine if your Airstrike is able to wipe enemies out. This can be done even if your Echelon has no Ammo or Rations, as a way to earn a few more points or to reach a supply node and rearm.
If using a parachute: prioritize capturing the SF boss spawning Heliports to the North and South before moving onto the enemy spawners.
Upon reaching 30, 60, and 90 kills, extremely challenging SF ringleaders Judge/Dreamer (or a combination of both) will spawn from those North/South helipads if they haven't been captured. They are very difficult to defeat if not downright impossible, and can really devastate a run.
Capturing these helipads also give 6 more AP per turn, so players who can capture them should do so ASAP.
Echelons using the Parachute Fairy can consist of weaker units, as they'll be doing proportionally much less fighting than the main forces.
Even a dummy echelon can work - though the dummy echelon should contain at least one HG (for vision) and 5 units, so that it can survive up to two ambushes from Red Goliaths.
When activating the Radar, if the player currently has a gunboat adjacent to free KCCO kills, they should take the kills prior to activating the radar.
SF Boss Heliport Capture
North
South
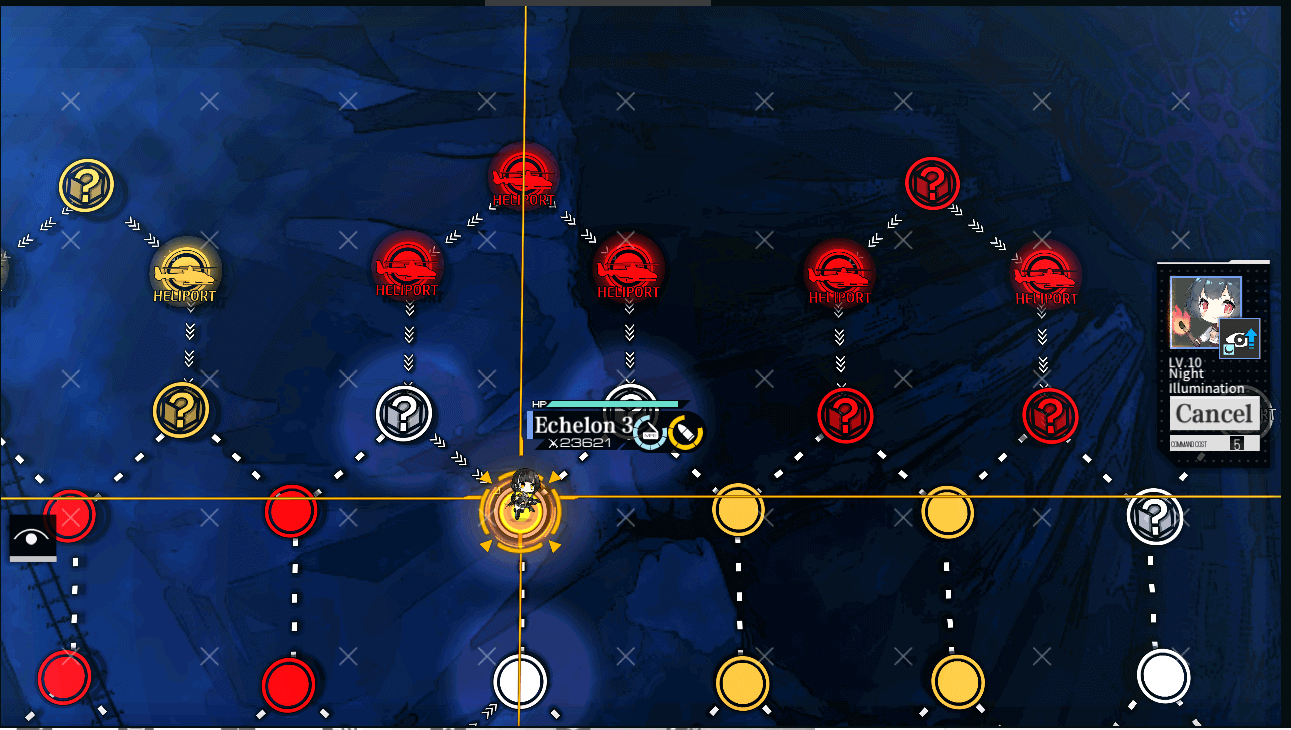
If using an SL 3 Illumination Fairy, position your Echelon on this node, and activate the Fairy Skill. If using SL10, you can be one node farther back.
If using an SL 3 Illumination Fairy, position your Echelon on this node, and activate the Fairy Skill. If using SL10, you can be one node farther up.
This general tactic can be used for every Heliport on the map, and all Commanders with Parachute and Illumination Fairies should take full advantage. If lacking an Illumination Fairy, stand on the random node to gain vision of the Heliport and Parachute as shown, although bear in mind that the random node may spawn a Red Goliath.
Opening: Turns 1-3
Due to the nature of Hornet’s Nest, you will need to improvise and plan every turn carefully, and no step by step guides can be provided, as the position of your crates will be different, and your individual echelons will differ. A few broad opening strategies are provided below, but Commanders should consider them as options, not as a surefire solution to opening turns.
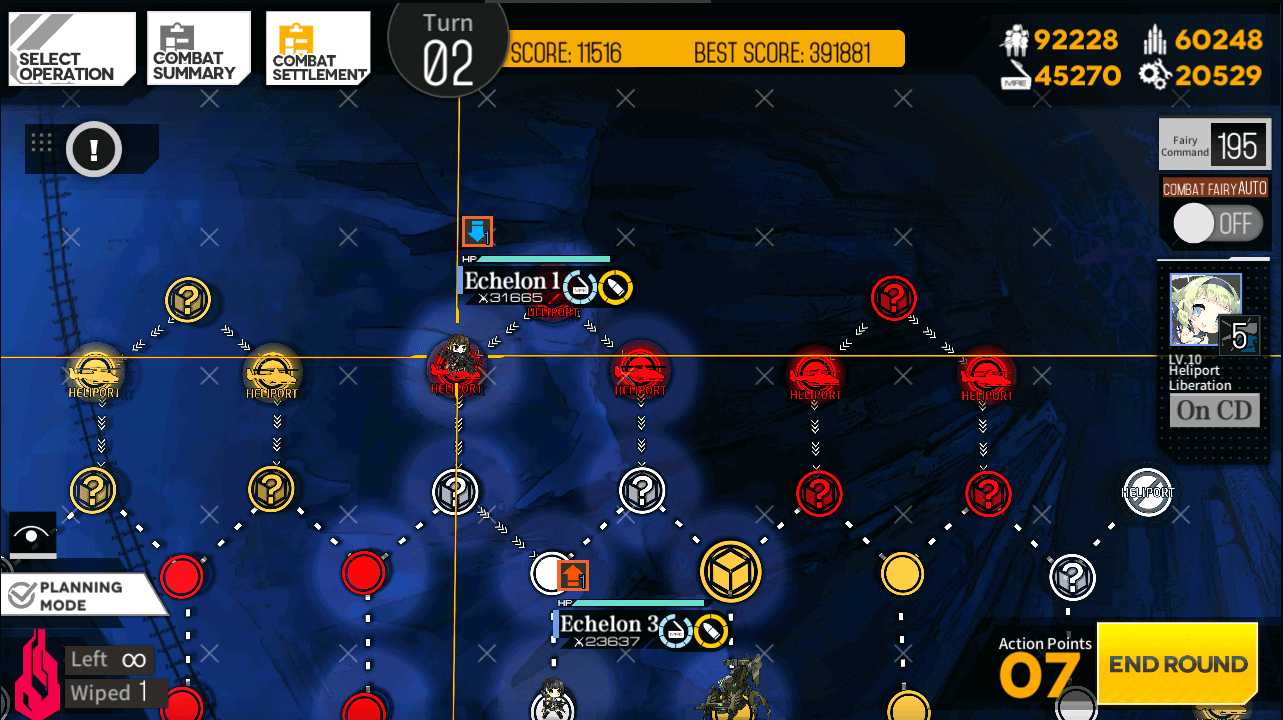
All Central Heliports Protected
When playing with a lower number of Echelons, maintaining control of the central 6 Heliports is more difficult than usual but is doable. Depending on the placement of boxes, it may be more profitable to rush the capture of the northern or southern SF Heliports via parachute. A rush to the Radar, to step on it turn 2 is also an option but will cost you Heliports and AP on Turn 3 and 4 while recovering. Carefully consider how to proceed on turn 2 to maximize both points and AP. Fewer points earned but more AP saved may be more valuable than more points now, and less AP later. The rush to the Radar will be discussed below.
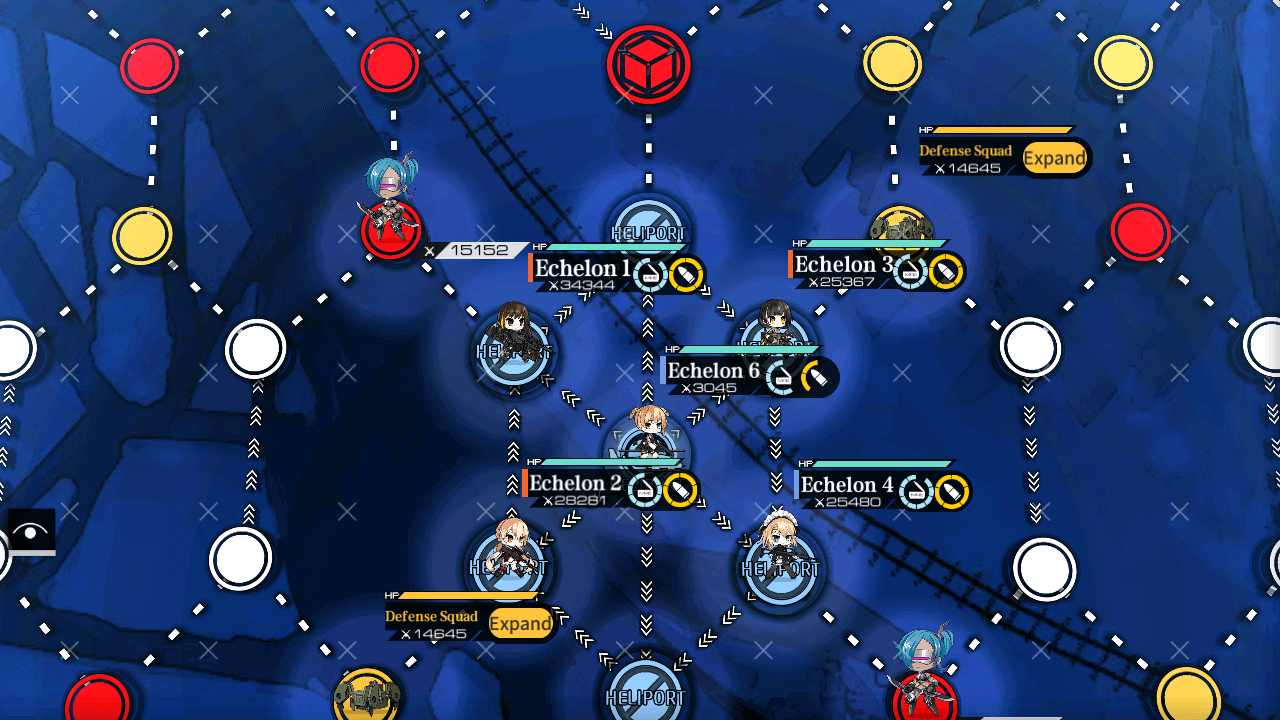
With more than 5-6 Combat Echelons, the control of the center of the map becomes much less of a concern. Below is a method to protect all the central Heliports with both three and four combat Echelons, or only that many who can engage general enemies.
Your Echelons should be deployed in an X formation, with a Dummy Echelon in the center position.
The Echelon going North-West needs to be able to engage two Brute/Ripper squads along the shown route.
The Echelon moving North-East needs to be able to engage the Dactyl group on Enemy Phase Turn 2. It does not move.
The number of deployed Combat Echelons will determine the southern moves.
Four Combat Echelons
Three Combat Echelons
The South-Western Echelon should be capable of engaging two Dactyl’s without needing to retreat or repair.
The South-Eastern Echelon is a good candidate for an Illumination Fairy Echelon, as it only needs to engage a Brute/Ripper enemy. This Echelon can either move down to kill the Brute, shortening it's movement next turn, or stay in place to converse AP for other uses.
If you can only field three Combat Echelons, the third should be placed to the South-East and must fight the Brute, as well as two Dactyls along the route shown here.
The second Dummy Echelon can be deployed directly South, instead of South-West, and swapped with while the other Echelon is clearing a path. This saves an AP to allow for a second Dummy to be deployed.
The final formation at the end of your turn should look something like this. Welrod and PPK are both Dummy Echelons, can be positioned as desired.
2 Combat Echelons:
Even on an extreme budget it is quite possible to maintain control of the center of the map. See the Community Resources section for a video guide including this opening by CosmicArcher.
Your Echelons should be Deployed as shown. 1 Combat Echelon should move North-West, while a second should be send directly South.
1 Dummy will go South-West, 1 Dummy is sent North, and the final Dummy camps on the Command post.
Combat Echelon 1
The first Combat Echelon is going to take a rather long route, killing 2 Brutes, 1 Dactyl, and finally engaging a third Brute on the SF phase. If you are laying this out in planning mode, bear in mind that Planning mode doesn't count the AP saved by swapping with the Northern Dummy.
Combat Echelon 2
Move the South-Western Dummy up one node, into the space previously occupied by the first Combat Echelon. The southern Combat Echelon moves down, then back and one step around the Heliport Circle to fight the Dactyl on KCCO phase.
Radar Rush:
The Radar node, when stepped on, removes all KCCO units (except for the 180k CE patrolling hydras) from the map.
Rushing the radar is imperative for budget Ranking runs, especially ones lacking gunboats. Without doing so, the KCCO will overrun the map and cause a de facto game over as players cannot defeat them.
While reaching the Radar on Turn 2 is possible, this is not required, as the radar is not blocked off until after Turn 4.
Turn 3/4 Rush:
Reaching the Radar on turn 3 or turn 4 is recommended, following the below path. While spawned KCCO units will get close to it on turn 3, they will always prioritize moving northeast to kill SF Brutes over blocking off the radar, so it's safe to go for the Radar on Turn 4 if more important actions (such as capturing spawner helipads with Parachute Fairy) need to be done earlier.
The KCCO will start making capturing the Heliport very difficult if not impossible after Turn 4, so it is imperative to go for it now.
Mid-game: Turn 4-10
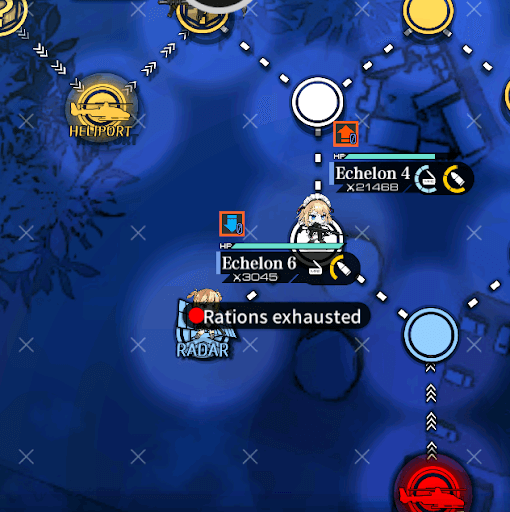
After securing Radar, the player can start working their way around the map, clearing out stray mobs and grabbing supply crates while capturing Helipads.
Players without Parachute Fairies will have limited AP. To minimize AP loss from stepping on the Radar, they have the option of securing the area around Radar and getting another echelon in position as follows:
Every turn, swap their positions to remove the KCCO from the map as needed - this will cost zero AP. (Make sure to select the outer echelon and swap it onto the radar - the KCCO removal does not occur if selecting the echelon on radar and swapping it out.)
If running at least one Gunboat, Radar usage should occur only after the Gunboat echelons have farmed any easily reachable KCCO.
Tip: Divide your limited AP between Supply Nodes, enemy killing, and capturing every Heliport you can (if you have a Parachute), starting with the KCCO Spawner Heliports. Capturing SF heliports are optional, though players without a Parachute Fairy should capture the Northwestern SF helipads - they can be reached without a Parachute Fairy.
Note that this may not be cost-efficient, especially if you have an RFHG capable of dealing with Hydras; more on that in this explanation by CosmicArcher#3214 below:
Why not bring a dummy to the radar to use the 0 AP radar stepping trick?
Bringing a dummy to the radar from the center helipad eats 10 AP, not counting spawning the dummy itself nor any AP saved from swaps with the teams along the way.
Stepping on the radar and stepping back out costs 2 AP; to break even from bringing the dummy all the way from the center heli, I'd need to step on the radar at least 5 times once the dummy is in position during the run. As seen in my runs, I barely stepped on the radar even without gunboats thanks to lucky streams of hydras as offerings for my RFHG, making the option of bringing a dummy to the radar way less attractive.
Also, I could use the RFHG and ARSMG there to do the swap trick, further discouraging me from bringing a dummy over as it is not necessary.
Late game: Turn 10-End
Late game, your focus is likely to be more on crates than killing SF, as many late-game SF spawns are difficult to kill without SL10 Airstrike Fairy or very endgame ARSMG squads. By this point, at least half a dozen crates should spawn every turn, ideally more, and you should try to get as many of these as possible every turn. At least one Combat Echelon should be present in each quadrant of the map to facilitate easy crate gathering.
Players with access to Parachute Fairy that do not have strong teams to face down endgame SF units may find it beneficial to capture the SF spawner helipads during this time.
At this point, if you have not done so already, kill Agent if possible. She rewards 20k points all by herself, so killing her is quite worthwhile. If you are not confident you can kill Agent without one or more dolls dying, killing her turn 12 can prevent the need to lose points retreating and repairing afterwards.
Echelon Composition
For Hornets Nest, a Commander should field as many lvl 90 5x Linked night-capable Echelons as they can. This aids with map control, provides AP, and increases the number of potential kills per turn. Deployed Echelons can be broken into several broad categories, detailed below.
Agent:
Agent returns for ranking, identical to her Chapter 2 Hidden self. Luckily for players wishing to test their Echelons against her, Agent can be reached on turn one on Hornet’s Nest, and can be fought with very little resource expenditure, should Commanders wish to test the viability of their Agent teams. Closing the game during the Agent battle then Terminating the battle doesn’t cost resources for the Agent fight, so testing costs a small amount of Manpower and 1 fight against the Brute.
For a more in-depth discussion of the Agent Boss, please see the below video guide for the Chapter 2-Hidden Agent, whose stats and mechanics are identical to the Hornet's Nest Agent.
One important note about fighting Agent is that with lower rarity Fairies, Equipment, or low Skill Levels is that you may need to ‘reset’ the fight to try and fish for better RNG for Evasion. This is done by force closing the game, and rejoining the battle when booting back up.
If your Dolls take too much damage during the first engagement with Agent, doing this is recommended to avoid the need for an immediate retreat and repair. This method can also be used in other battles.
On a budget run, the Agent kill team can be skipped in favor of another traditional AR/SMG Echelon, as Agent can be avoided. Killing her does, however, award 20k points and also removes a dangerous boss from the top left quadrant.
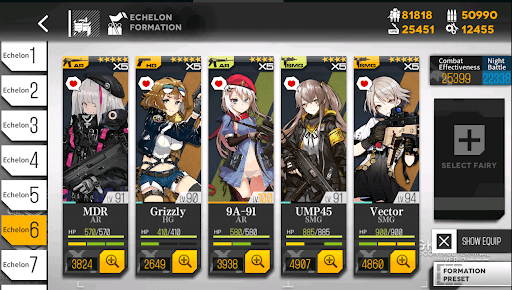
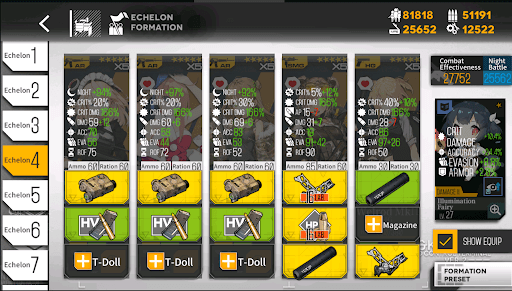
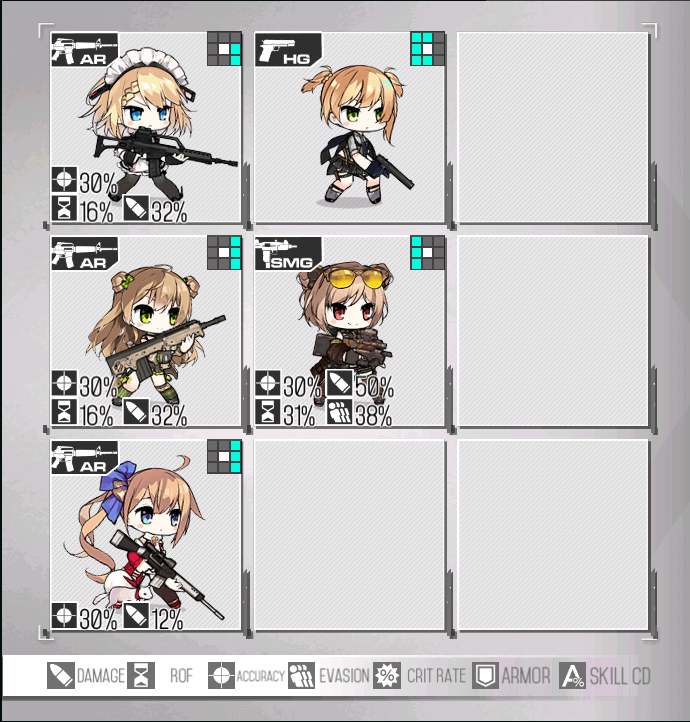
Standard AR:
Standard Night AR/SMG teams are generally sufficient for Singularity ranking, although Commanders should place a Grenadier such as FAL/416/SOPMOD, or a Molotov such as Vector or Skorpion into each team to better handle Scouts. If possible, both a Molotov and Grenadier should be used, but without prior duping this is not always feasible.
Example Team:
Echelon Overview
Echelon Formation
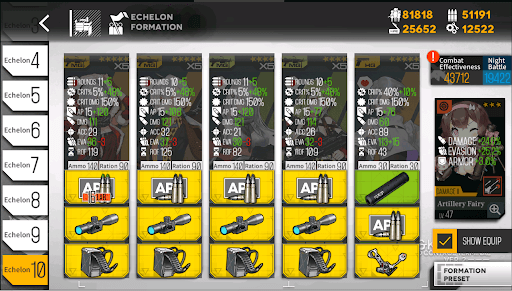
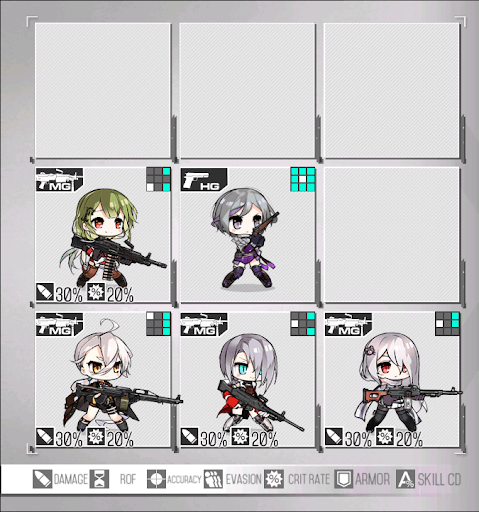
Gunboats (4MG/1HG):
The biggest quality of life improvement for a run of ranking will be at least 1 Gunboat to clear out the large number of Typhons spawning about the map. Without a Gunboat you will need to dedicate at least one Echelon to stepping on the Radar at the bottom left, and even players who have multiple gunboats may need to step on the radar occasionally to regain map control.
Any gunboat composition will need to deal at least 75k Damage to enemies with 109 armor during the first volley. Big 4 MGs, or Hunting Impulse MGs are recommended for this, and the HGs required are either Contender(With AP Ammo), Thunder, or CZ-75. Fairy requirements start at a 2* Command with a Damage Talent if using a maxed out Big 4/Contender setup, and only rise from there. Budget gunboats are not viable due to the fact that this is a hard DPS check, and a gunboat should receive stat-stick fairy priority over other Echelons if it’s needed to pass the threshold.
Editor’s Note: Typhons spawn on the Hornet’s Nest map on turn 1, at the locations shown in the previously included image. Players can easily test their gunboat echelons against those tanks on the first turn of the ranking map, to double check their in-game viability.
Going this way is recommended, as your gunboat will likely be severely damaged by the SF Brute node.
If a test fails, restarting the Girls’ Frontline app and selecting “Terminate Mission” from the Singularity Chapter 3 mission select screen will let your echelon keep all of its ammunition/rations (this does not work for maps other than Hornet’s Nest).
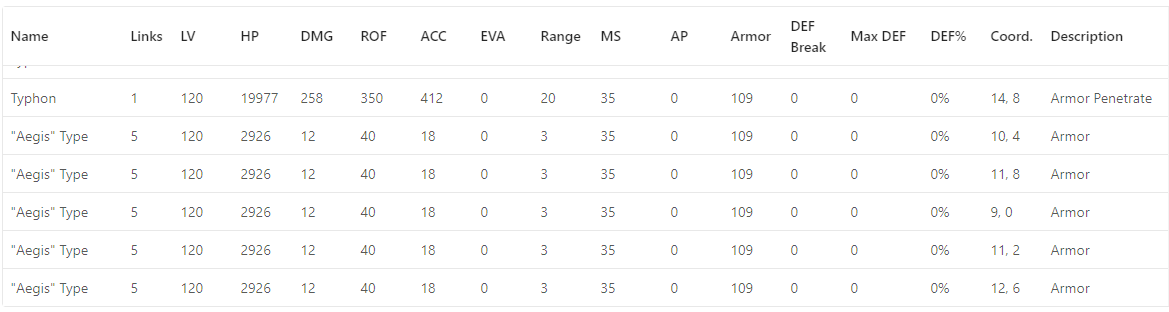
For anyone looking to check of their specific team can handle the Typhons, the Echelon Formation Simulator found here will allow you see the first-volley DPS of your MGs against the Aegis enemies with the Typhons, whose statblock is shown below (taken from https://gf.hometehomete.com/en/maps/). When doing these tests make sure to check with and without Fairy Talent (set the talent to Golden to simulate this) unless you have a 5★ fairy.
A typical gunboat will look something like this:
Gunboat Overview
Gunboat Formation
For the in-battle unit movement involved to use gunboats against Typhone, the video clip below can serve as a good reference.
Writers Note: While killing a Typhon and retreating to repair is a net positive in points, the loss of positioning, AP and map control makes ‘single use’ gunboating not worthwhile. If your gunboat is on the threshold of viable, or you are struggling to micro them effectively, I would suggest camping the radar and limiting their usage.
RF/HG:
Generally, RF/HG teams are not recommended for Hornets Nest, but should commander be lacking for either Armor Penetration or AR teams, they can be used in a pinch. Any standard RF/HG team will suffice if one is being pressed into service, though Damage buffs are preferred so as to enable these teams to fight the KCCO Hydra spawns - more on that below.
Any leftover stat stick fairies not used by a gunboat, such as the Command Fairy or Artillery Fairy, as well as Combat Fairies like the Warrior Fairy or Fury Fairy can benefit RFHG echelons. The Taunt Fairy and Anna Graem are also passable options if none of the above are available.
If the player has any Airstrike Fairies with low Skill Level, they can be placed on the RFHG teams to counter the Tarantula swarms.
SL10 Airstrike Fairies are far more beneficial when placed on a strong Night AR team, as the 500 damage severely weakens a lot of late-game SF spawns, especially the nodes with a large number of Jaegers.
RFHG echelons can successfully fight a limited number of SF enemies, including most Armored nodes as well as nodes containing unarmored foes with low evasion (such as the node with only Guards and a small number of Jaegers). SF enemies with a lot of Rippers/Vespids as well as larger swarms should be completely avoided by RFHG echelons.
Hydra Hunter:
Another dedicated squad, the Hydra Hunter is not expressly required, but for players lacking Gunboats, can be used to earn points off the Hydras before clearing out the Typhons via the Radar, and it can pull double duty killing late turn Manticore spawns.
For those unfamiliar, a Hydra Hunting team pairs IWS/M200/Carcano M91/38 with a general RF, often Lee Enfield/M14/WA2000 to defeat Hydras in spite of their massive 199 armor and large HP Pools. The second RF deals with the trash that spawns with the Hydra, while the nuke RF handles the Hydras. These squads should be careful what battles they pick to minimize damage, as well as avoid battles with high Evasion enemies that RFs are unable to hit easily. An Airstrike Fairy can help mitigate this, should one be available. Still, positioning for a Hydra Hunter should be carefully monitored.
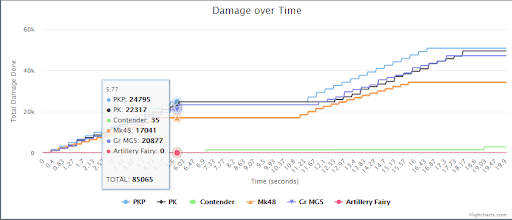
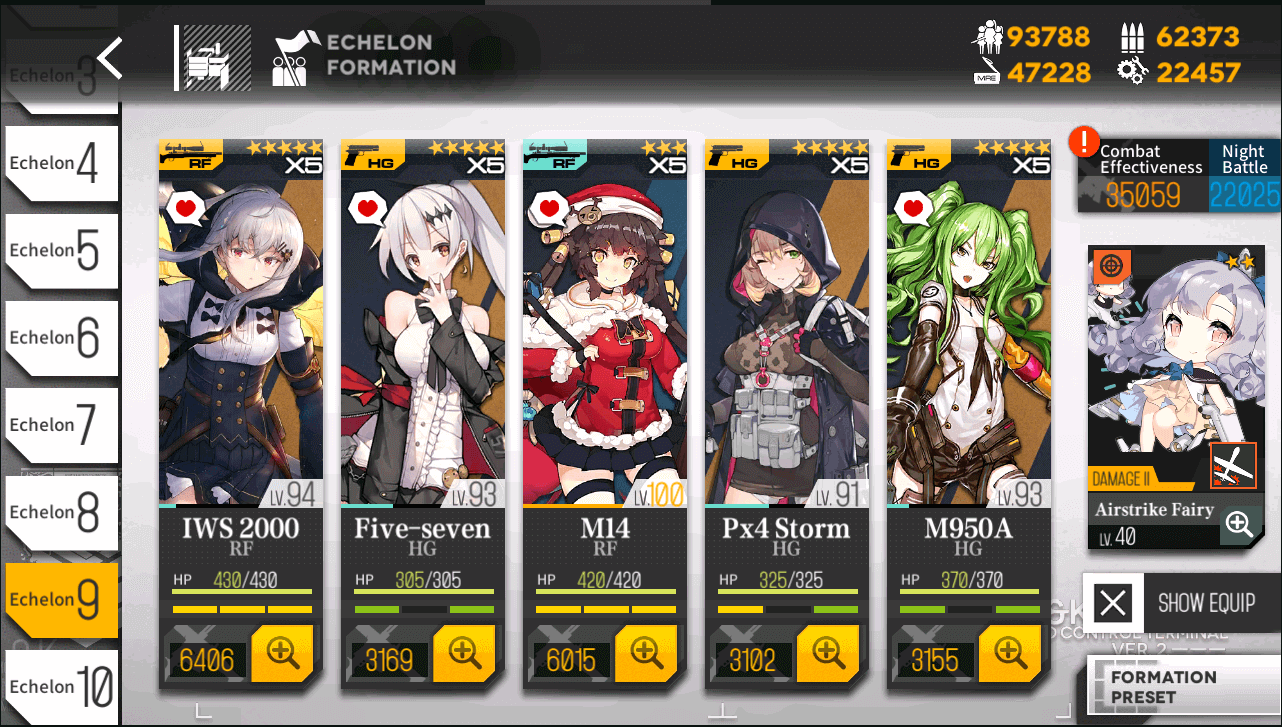
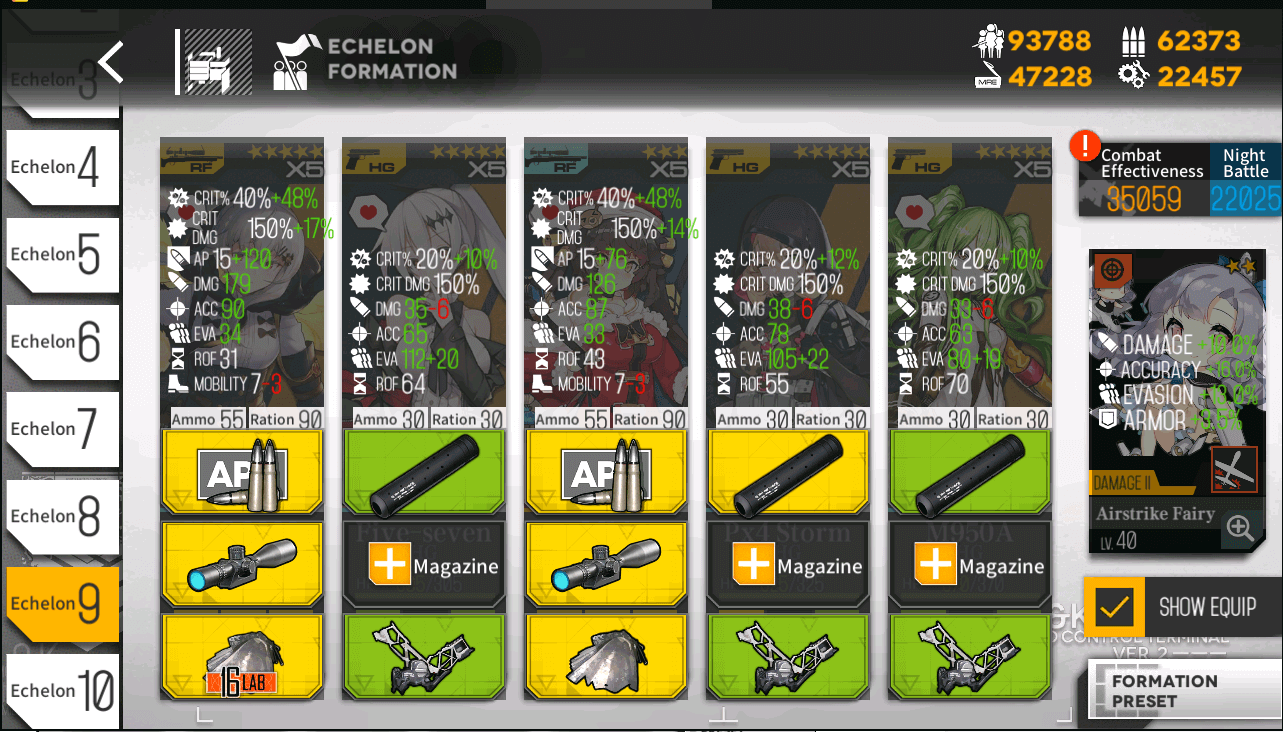
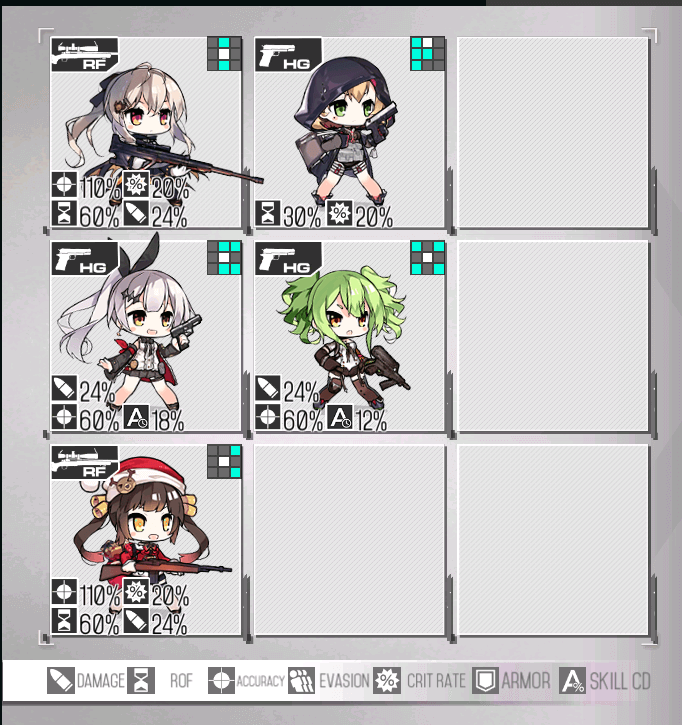
Sample Hydra Hunting Echelon:
Hydra Hunter Overview
Hydra Hunter Formation
For players willing to kite, any RFHG team with decent FP can kill the Hydras given sufficient unit micro-control. See the below video for an example of how to do it:
Finally, any spare Echelon slots that cannot be filled with Combat capable Echelons should be filled with Dummies to provide extra AP, or occasionally grab a Supply Node.
Dummy Echelons should contain 5 T-Dolls, so that they can detonate the Red Goliaths spawning from ambush "?" nodes.
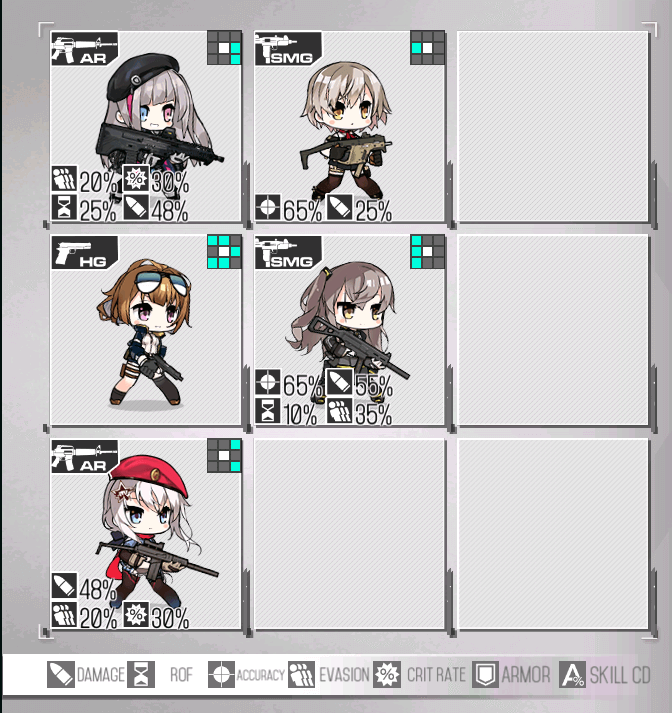
Equipment Distribution
As it is recommended to field as may Echelons as possible for Hornet’s Nest, the distribution of Equipment amongst your Echelons is an important consideration. Below are some tips to maximize the value from your equipment.
Green PEQs are more than enough.
Outside of Scouts, enemies are not evasive, many with no evasion at all or only 15. Because of this, so long as an echelon has Grenadiers to handle Scouts and densely-packed SF in the late game, lower rarity PEQs are more than sufficient.
Any Gold rarity PEQs should be given to the Agent Team first, then the team that will be helping to defend the Radar node, then as needed.
It’s okay to be stingy about your Equipment
The keen eyed may have noticed that AR squad shown above had a number of empty Equipment slots. Depending on the positions of your HGs, they can often be left with little Equipment, as their primary value is usually Tiles and Skill, not DPS.
To use our sample AR/SMG team, all three back row Dolls are without Exoskeletons. Grizzly only has a Suppressor equipped, and UMP 45 doesn’t have Ammo, to save them for Vector/Scorpion in other Echelons. Offtanks such as Vector can get away with lower rarity Exos if needed, although you will need to retreat them in some fights to limit damage they take, but should be prioritized for HP Ammo. a
A general rule of thumb for each type of Equipments priority should be as follows (unlisted Equips only apply to a single Doll type, such as HV Ammo):
Special Equipment should general be used to free up slots, except for the Accessory slot which should always contain Night battle equipment (PEQs or 9A91’s Special Equipment).
Exoskeletons
Ammo
Accessories
T4 Exoskeletons:
Main tank SMGs
Offtank HGs.
Backline HGs
X4 ExoSkeletons
Off Tank SMGs
Backline Dolls
AP Ammo:
Gunboat Members Including Contender
Hydra Hunting RFs
Other RFs
HP Ammo
Offtank SMGs
Main Tank SMGs
All HGs
Suppressors:
Main Tank SMGs
Main Tank HGs (RF/Hydra Teams)
Offtank HGs
Backline HGs
Crit Scopes:
Gunboats
Hydra Hunter
Standard RF
Equip Pills are Your Friend
The introduction of the Expedition System is a gamechanger for GFL in many ways, including preparing for a ranking Run. Previously leveling equipment was a time consuming process but now can be done at the press of a button. A brief priority list of for enhancement/calibration for a low budget ranked run if given here, but first priority should be filling in missing high priority equipment for you Echelons.
What is needed to fill any gaps in your equipment lineup
T4 Exo
HV Ammo
AP Ammo
Ammo Boxes (Calibrating these can get an extra round in the mag as well)
HP Ammo
X4 Exo
Crit Scopes
Cloaks
Suppressors
Everything else
Fairies
The elephant in the room for this map truly is Fairies. Unlike Deep Dive where fairies were mostly a luxury item, for Hornet’s Nest, Fairies are strategically valuable for a variety of situations, including capping Heliports to prevent Boss Spawns, vision to improve map control, clearing out enemy swarms, and more. Fairies also enable gunboat echelons to function, giving the final Damage push.
First, some general guidelines for a variety of Fairies. None of these Fairies are required, but all of them will improve quality of life in some way. Fairy usage will be discussed later on.
Parachute Fairy: This is perhaps the most game-changing fairy for Singularity Ranking, as a parachute fairy enables the player to capture the top and bottom Sangvis Ferri helipads for an additional 6AP per turn on top of being able to deploy echelons from there to save even more AP.
Skill Level 10 is required for Parachute fairies to reach their fullest, giving them full map coverage. If you have one or two, it is highly recommended to prioritize this Skill, although it is relatively expensive (the December Daily Offer Package can help alleviate the Data cost for commanders who don’t mind spending).
Illumination Fairy: At least Skill Level 3 is needed for the Illumination Fairy to be useful, as this is the first level at which the illumination fairy begins to provide extra vision for your Echelons. SL3 is worthwhile for a budget setup and SL10 is even better as it provides two tiles of vision, but SL10 Illumination should not take priority over raising T-Doll skill levels to at least 4 and important DPS skill levels to 6 or higher.
Airstrike Fairy: SL10 is a must if this fairy is fielded, as the late turn Jaeger spawns have 500 health, matching the damage of the Airstrike perfectly. Many late-game SF spawns will completely obliterate even the strongest ARSMG teams if not softened up by Airstrike Fairy, and having at least one at Skill Level 10 can help tremendously and will save Commanders AP and repair tickets on later turns.
If the player has high Skill Level Airstrike fairies, their strongest ARs and SMGs should be focused onto the Airstrike echelons.
It is far more useful to have a small number of very stacked teams as opposed to spreading the power budget out among a large number of echelons, as the weaker teams will mostly be collecting One Time Supply Nodes without partaking in much fighting.
Taunt Fairy: Taunt Fairy is useful, although it does require a few Skill Levels to pad its own health to acceptable levels due to the dummy’s 0 Evasion. A Taunt Fairy can help soak up Damage and reduce the need to retreat and redeploy your echelons, saving AP, and positioning.
Artillery Fairy: While featuring an almost useless Skill, the Artillery Fairy sports a massive Damage and Evasion Aura, making it highly valuable for a Gunboat Echelon or any other team that needs a raw kick for Damage. The Skill should be ignored for training purposes.
Warrior Fairy: While costing Fairy Commands to reach full potential, the Warrior Fairy can be used situationally boost DPS while also being an alright stat stick. For players with lower rarity fairies, the Warrior Fairy can be their most powerful combat fairy option as long as its Skill is leveled to some degree.
Command Fairy: A fantastic Stat stick with a useless Skill for Combat. All players should have received one for free after unlocking Heavy Equipment Production and it is best used in Gunboat or RFHG teams, though still decently strong for ARSMG teams, especially one that contains ST AR-15.
Shield Fairy: An Evasion Stat stick with a decent skill for attrition-based maps like ranking, Shield fairies can be used to great effect for the Agent Fight. At SL 10, the Shield can soak a decent amount of Damage, but this is not a priority to train.
Anna Graem: Anna is a good stat stick with a fairly useful Skill. She’s one of the safest general-use combat fairies around thanks to boosting the Evasion of frontline units and the Damage of backline units, but her limited nature means that not all players will have a copy of her.
TL:DR Skill priority
T-Dolls to SL4 and DPS T-Dolls to 6 if possible
Illumination Fairy (SL3)
Parachute Fairy (SL10, one or two)
Warrior Fairy/Anna Graem (SL4)
Airstrike Fairy (SL10)
Taunt Fairy (SL 4-6)
The rest of them
Team Examples
Now it’s time to put a lot of the preceding information together. I will be providing a 5 Echelon squad for ranking, including short write-ups for all squads including Fairy choices and alternative team options. These are not intended to be gospel, merely examples. (Any extra Echelon slots should be dedicated at least to dummies for AP, and the occasional box grab.)
Also, I will do my best to avoid using dupes when doing this.
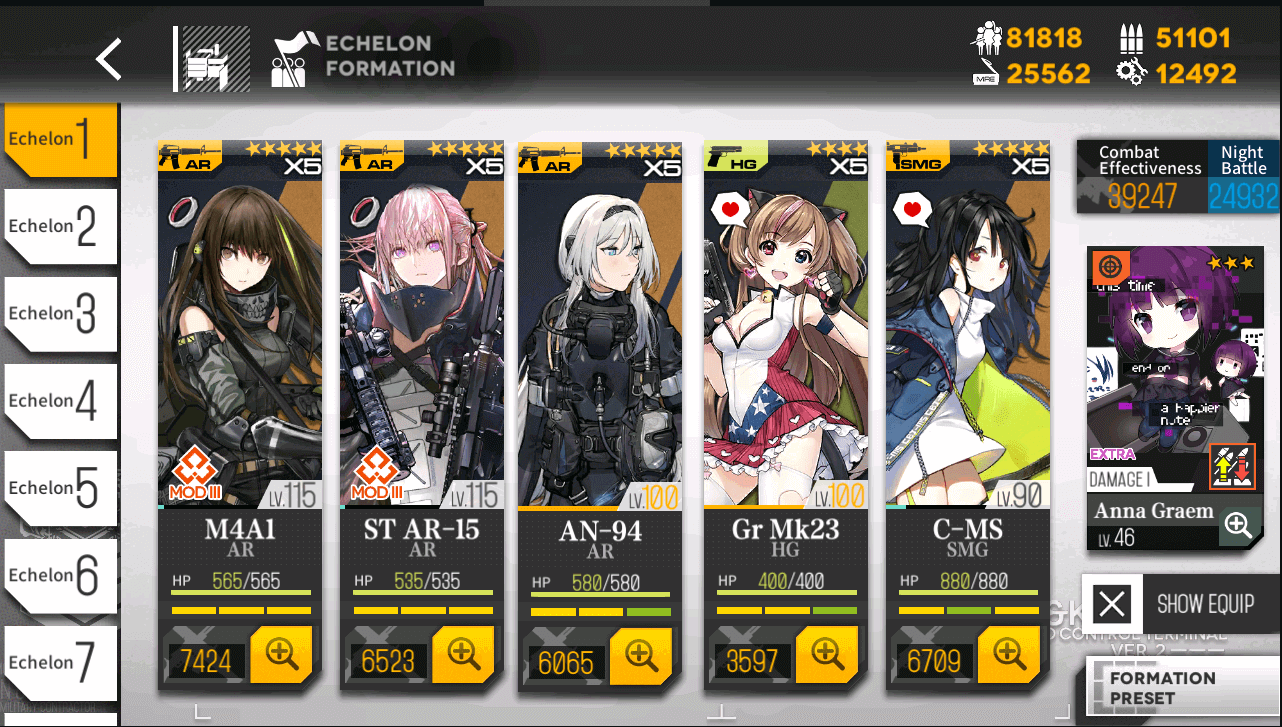
Agent
Example Agent Team Overview
Example Agent Team Equipment
Example Agent Team Formation
This team is somewhat less than budget, featuring both M4 Mod and AR15 Mod, and the rather rare AN94, but any high Damage AR can swap for AN94,and both M4 and AR15 can be used pre-Mod.
In terms of Equipment this team is fitted with the best I have. AR15’s Equipment is a matter of some debate, as either her Special Equip or a Crit Scope can be used alongside the PEQ, depending on if Commanders have AR-15 MOD or available equipment. A VFL scope does provide higher DPS, should options be available. Mk23 is fitting with a T3 Exo to free up T4’s for other squads, and having tested this formation I know she shouldn’t need to do much tanking. All Commanders are encouraged to test their Agent kill teams a few times to get a feel for how the battle should go prior to a full ranking attempt.
Other options:
ARs: M4A1 and AR-15 (Non-Modded), G11, OTs-14, G41, high uptime DPS ARs
SMGs: MP7, Suomi. RO635 may be used, but will require heavy resetting to ensure her survival.
HG: Welrod, PPK, K5, SAA, etc.
Fairy: Warrior, Command, Rescue, Shield, Anna
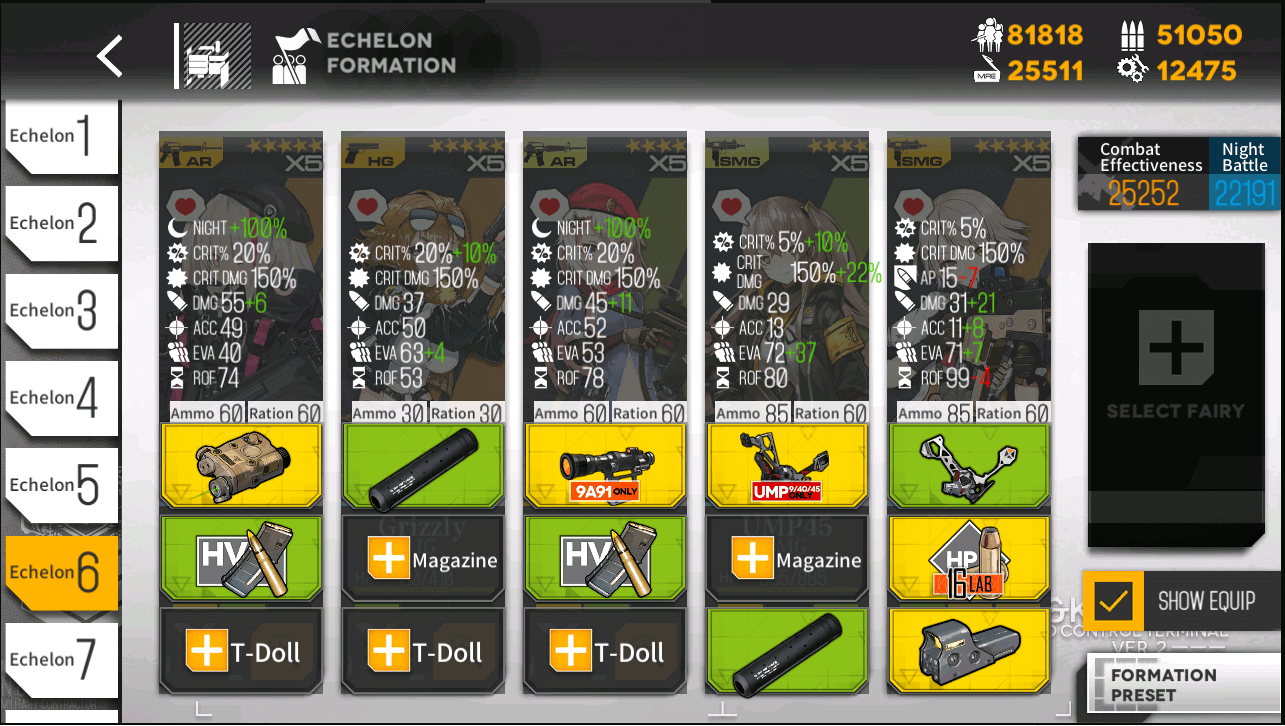
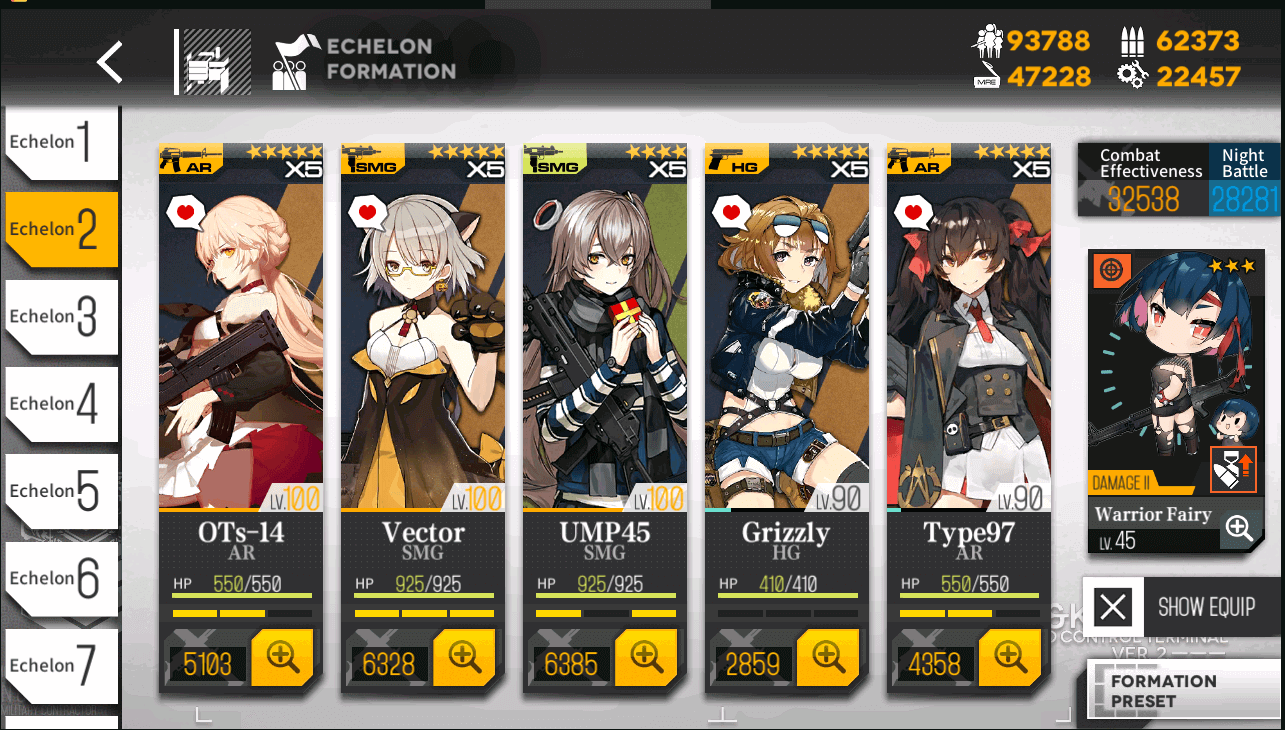
AR/SMG 1
Example AR/SMG 1 Overview
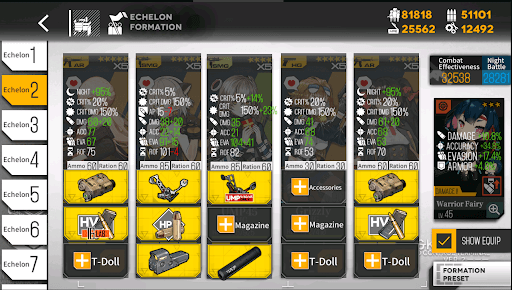
Example AR/SMG 1 Equipment
Example AR/SMG 1 Formation
The first AR/SMG Echelon is a fairly standard one. UMP 45 and Vector are a solid pairing, with 45 slowing down and clumping enemies and then Vector setting them alight. Groza and Type 97 handle regular DPS duties, with Groza able to smash through armor if needed, with Grizzly bumping up the overall Damage, while giving UMP 45 a bit more Evasion to sweeten the deal.
Equipment wise, I choose to leave Exo’s off the backline Dolls and left Grizzly without any equips at all. As I have them kicking around, UMP 45 is using a UMP Exo to save T-Exos for other dolls, but a T4 Exo can be used for her if lacking the UMP one. Vector is fully equipped for as much Damage as possible, and a Warrior fairy is used for the potential of it’s Skill.
Other options:
ARs: AR-15, 9A-91, Type 95, G41, Tar 21
SMGs:
Main Tank: RO635, Type 79, UMP 9, Ingram
Off Tank: Skorpion, PP-19 SR-3MP
HG: Welrod, PPK, K5, SAA, etc.
Fairy: Airstrike, Anna, Rescue, Artillery, Shield
AR/SMG 2
Example AR/SMG 2 Overview
Example AR/SMG 2 Equipment
Example AR/SMG 2 Formation
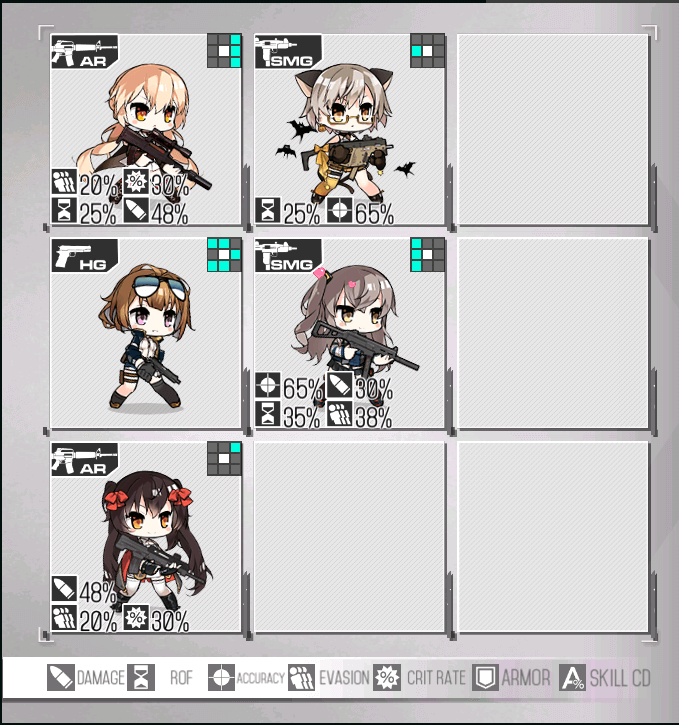
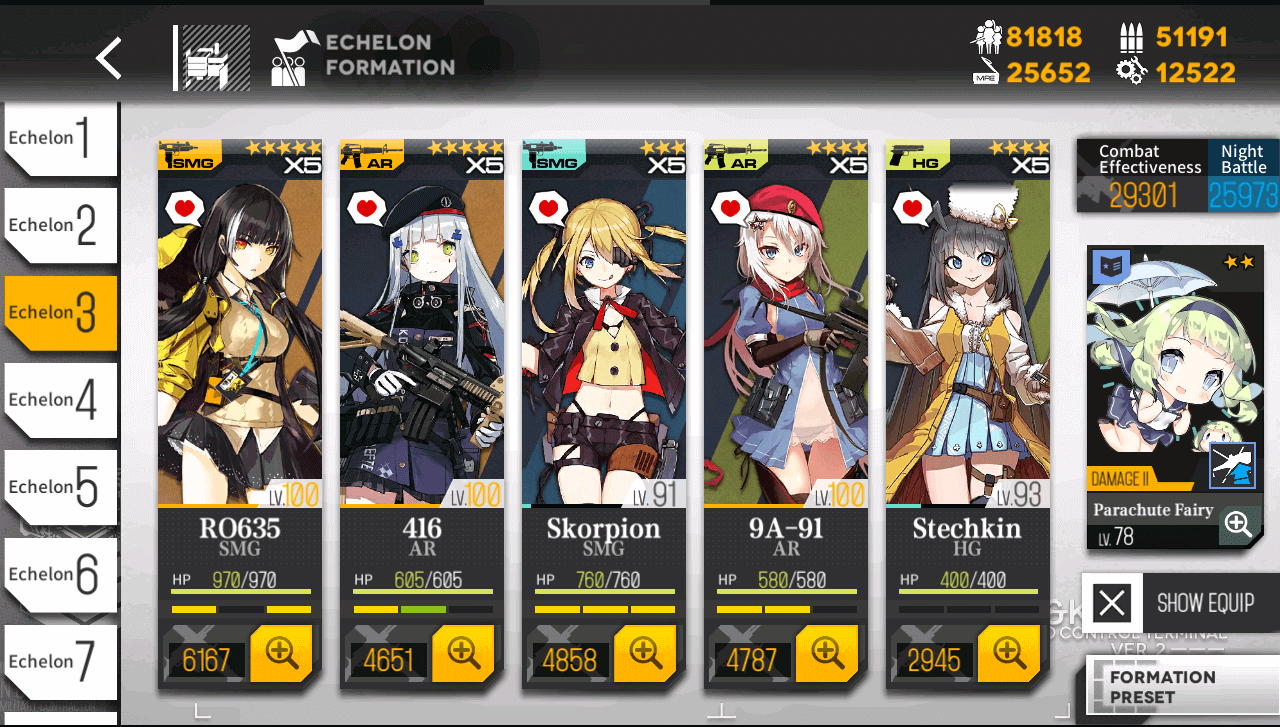
The second AR/SMG Echelon will also pull duty as a Parachute Echelon. In terms of T-Doll picks, Skorpion and 416 compliment each other well, and provide more than enough AoE DPS to clear out enemies, even potentially under Parachute Debuff if absolutely needed. 9A-91 fills the role of raw DPS, and with her Special Equip lives up to her Night Princes Title. Stetchkin helps kick up the RoF for both ARs, while giving some more Damage to help along the way.
Equipment wise this is more of the same. 9A-91’s Special Equipment is just a PEQ with Damage added on, so no reason not to use it, but if lacking, a regular PEQ is fine. 416’s Special Equipment should not be used. At this point, I’ve run dry on 5* HV Ammo, so green HV Ammo will be used. Skorpion, like Vector in the previous Echelon, is given a full kit to ensure she stays alive as long as possible and puts out the most Damage she can. RO gets all the Evasion gear, but no Ammo once again.
Other options:
ARs: AR-15, 9A-91, Type 95, G41, Tar 21, FAL, K11
SMGs:
Main Tank: RO635, Type 79, UMP 9, Ingram
Off Tank: Vector, PP-19 SR-3MP
HG: Welrod, PPK, K5, SAA, Grizzly, 5-7, etc.
Fairy: If possible at least 1 Parachute should be used. If you don’t have a Parachute, Airstrike, Warrior, Command, Shield, Taunt, and Fury Fairies can be used. Parachute duty can also be passed off to a Dummy if need be.
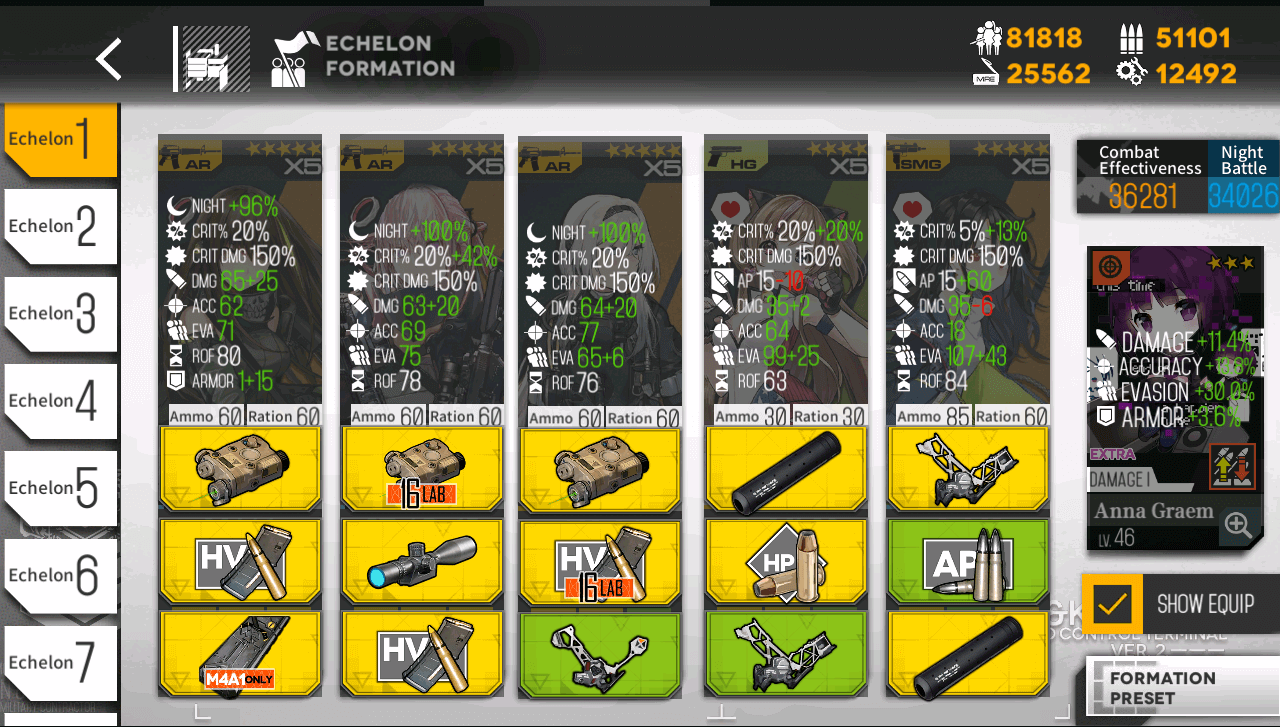
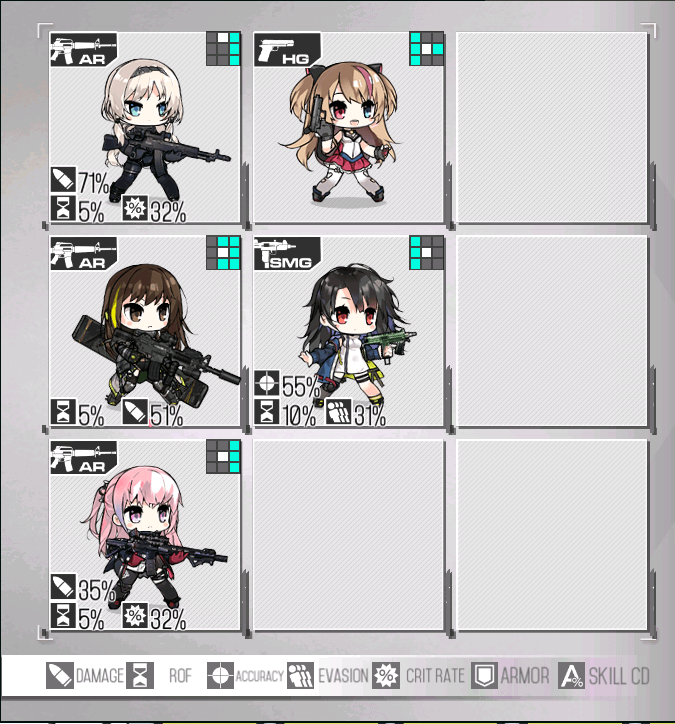
AR/SMG 3
Example AR/SMG 3 Overview
Example AR/SMG 3 Equipment
Example AR/SMG 3 Formation
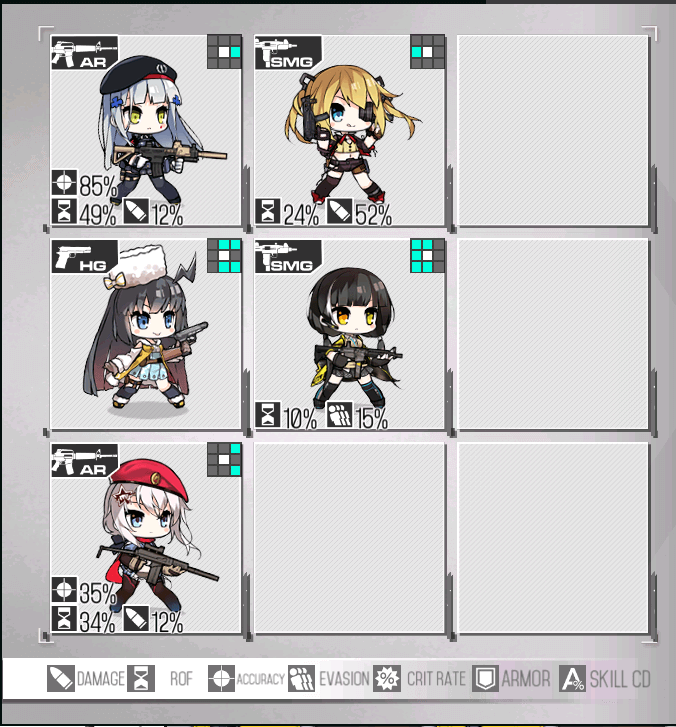
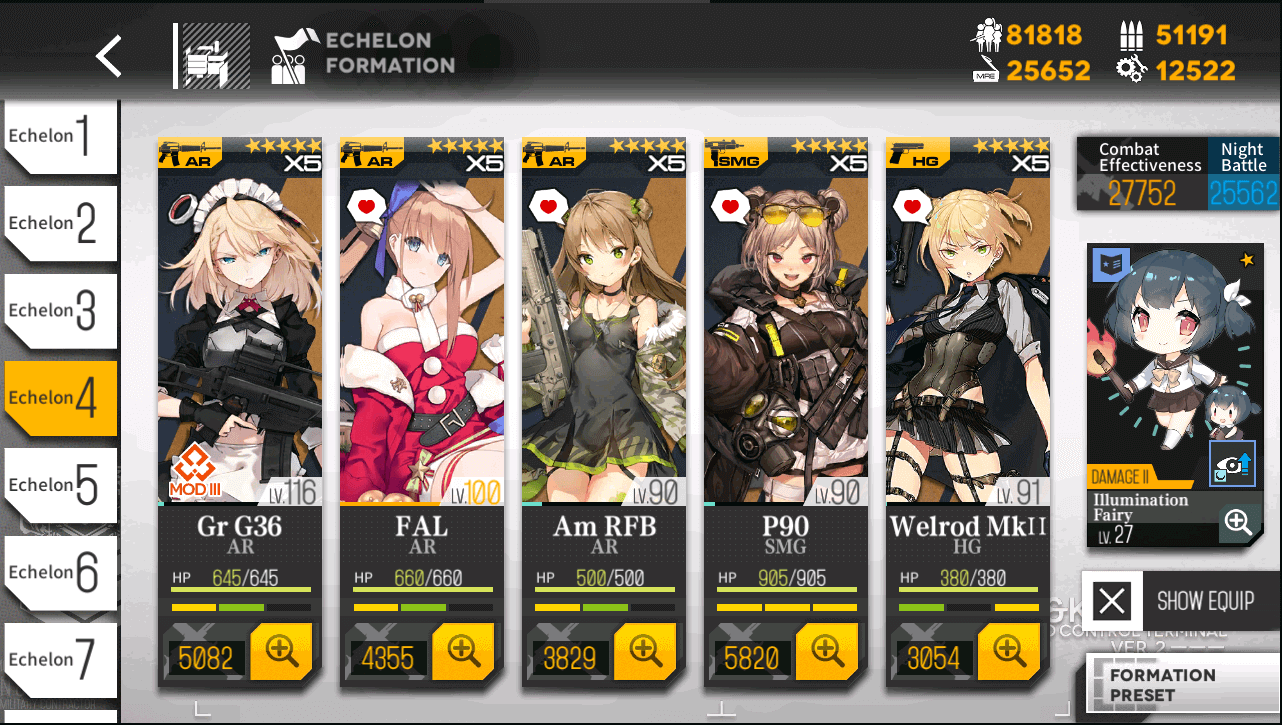
Our third general purpose AR team features a bit of a different mix of units. This team isn’t entirely built to take advantage of P90’s Skill, but has decent synergy nonetheless. As the Illumination Fairy isn’t a fantastic Stat Stick, some extra survivability measures, such as Welrod, and lots of Evasion Buffs on P90 will help to keep this team if and when it ends up in fights.
Equips wise, we’re more of the same. G36 Mod 3 doesn’t have her Special Equip due to a night battle, but does have an enhanced HV Ammo to compliment her primary DPS role. FAL could perhaps be given an Exo this time, as battles may last long enough for FAL to get attacked by Guards. Unlike some of the previous teams, P90 is given Ammo as her skill does give a bit of Damage, and there is no reason not to take advantage of the opportunity when it is presented.
Other options:
ARs: G36 Non-Mod, 9A-91, Type 95, G41, Tar 21, SOPMOD, K11, Zas M21
SMGs:
Main Tank: RO635, Type 79, UMP 9, Ingram,
Off Tank: Vector, PP-19 SR-3MP
HG: K5, SAA, Grizzly, 5-7
Fairy: If possible at least 1 Illumination Fairy should be used. If you lack an Illumination Fairy, or your Illumination Fairy doesn’t have high enough Skill Level, Warrior, Fury, Anna Gream, Taunt, Airstrike, or Command Fairies can be used.
Echelon 5 will be a flexible one, and will be exchanged between a Hydra Hunting Echelon, a Gunboat, and a 4th General Purpose Echelon for the ‘Test’ runs.
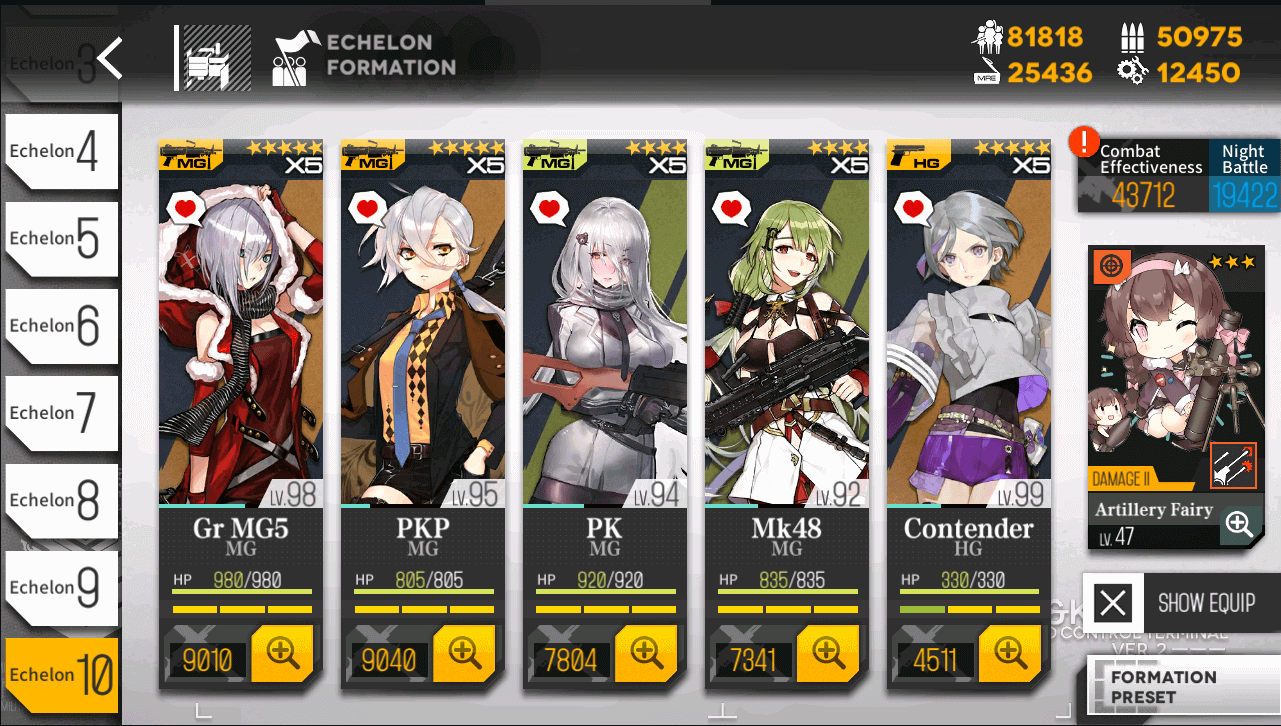
Gunboat
Example Gunboat Overview
Example Gunboat Equipment
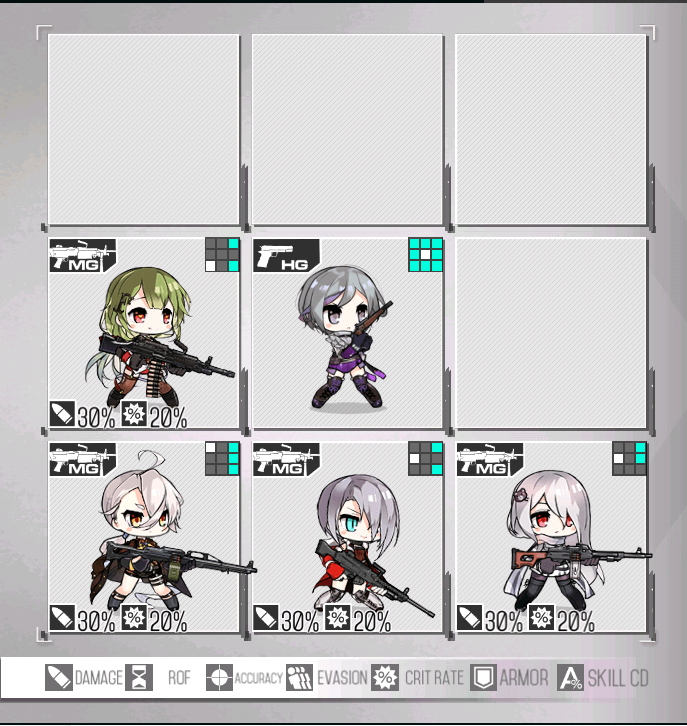
Example Gunboat Formation
This will be our Gunboat, with the following as it’s DPS through first reload:
As I have discussed Gunboats in depth above, I will not be doing as thorough a breakdown of this Echelon.
Or:
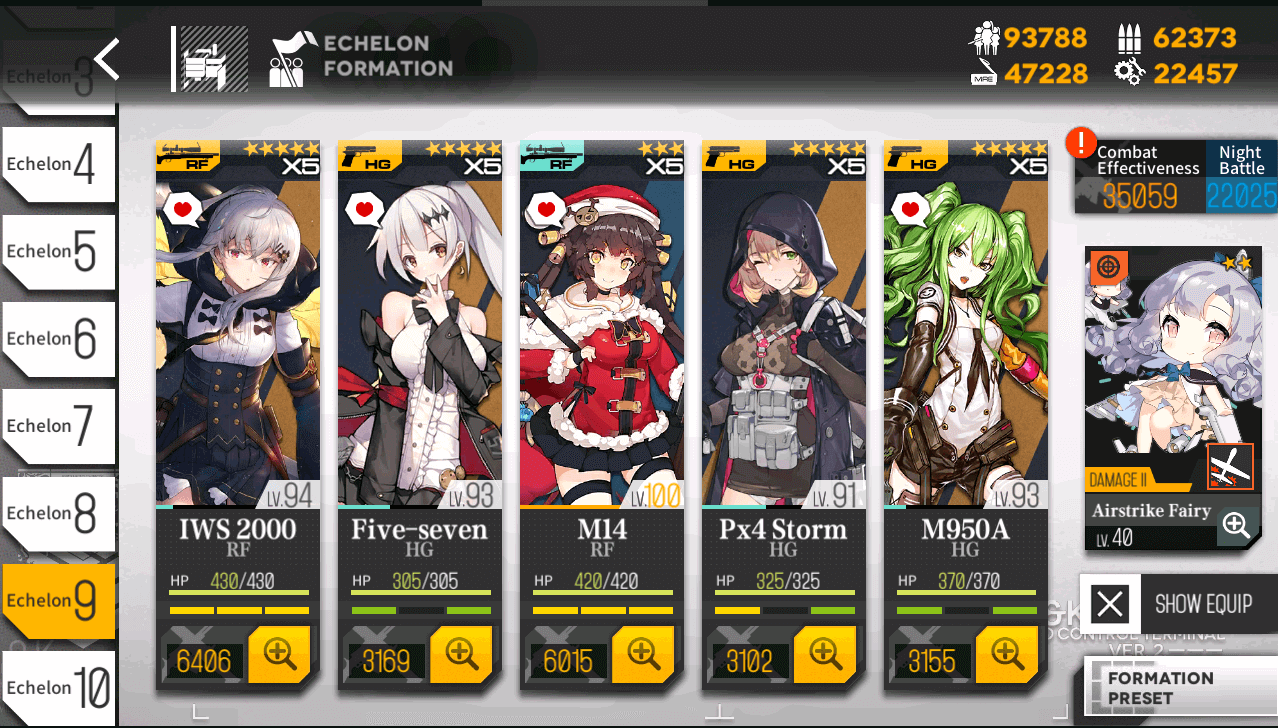
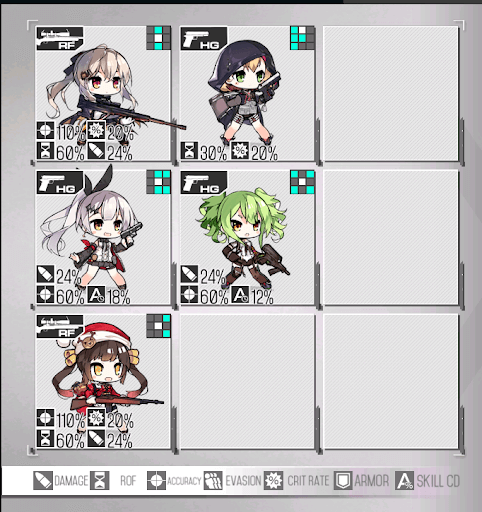
Hydra Hunter
Example Hydra Hunter Overview
Example Hydra Hunter Equipment
Example Hydra Hunter Formation
M14 can be swapped for a variety of other RFs, including Lee, WA2000, SVD and others. Welrod should be replaced with Px4 for more raw Damage.
Community Ranking Resources
272k by CosmicArcher (1 ARSMG/1 RFHG/4 Dummy)
417k by CosmicArcher (3 ARSMG/1 RFHG)
494k/522k by FantastGRD (No Gunboat/Para/Illu)
200-300k by Ceia (3 echelons, 3 dummies)
630k by Assassin Eclipse (8 Echelons, 1 Parachute)
Acknowledgements
Ceia for his many, many text and video guides for Singularity story and ranking and his feedback.
FantastGRD for showing how to handle this map with no Gunboat/Parachute/Illumination echelons.
Assassin Eclipse for his 1 Parachute run and the many suggestions and tips made to improve this guide.
Cosmic Archer for sharing his two very budget ranking runs with decent scores.
Enjoyed the article?
Consider supporting GamePress and the author of this article by joining GamePress Boost!
Guide writer for Girls Frontline. KSG and G3 Propagandist. Writes the occasional fanfic.
Feel free to send guide suggestions and feedback via DM on Discord or Reddit. You can also find me in the GFL section of the community discord. Also on twitter