


Guide adapted with permission from the Bears Playbook for Azmakalis Raid, presented by the Airbears guild on the Global server. This guide was originally posted on Reddit and hosted on Google Slides. Many thanks to u/tlpachi for sharing!
General Tips
Team Composition
Each raid boss fight has mechanics that might need favour a certain party composition. Doing some prep work and planning before entering the raid can make fights much easier.
-
Immune and/or Cleanse effects (Skill or Wonderous Potion Vial) are a requirement as nearly every fight will have some kind of nasty debuff that you want to avoid.
-
Defense Break can be used in every boss fight and is extremely valuable debuff. Include at least one way in your party to apply this.
-
All bosses are immune to poison. This is both good and bad as damage skills that inflict poison can be used on bosses that punish debuffs.
Mini Bosses
-
While most of the trash mobs are fairly easy, the mini bosses can cause problems because they can deal a large amount of burst damage. Be careful not to lose party members before you even get to the boss.
It doesn’t have to be over if you don’t want it to be
-
If you are defeated in a fight during the Raid, you will have the option to:
-
Try Again - Same as yielding. Refunds your entry and restarts from when you entered the raid.
-
Retry (Free for the first time per raid, 10 Skystones after that) - Respawns your party in the square before the fight. Keeps your morale and Souls from when you died.
-
-
If your run isn’t going well, abandon the run by yielding in the menu.
Any current progress will be lost but your your entry fee is refunded.
Sap-Covered Items
-
All equipment drops are hidden as Sap-Covered Items. These are only revealed when you exit the Raid.
Morale

Calculating Morale
-
Plan ahead by routing your path in the Raid based on your team’s potential morale.
-
Use a morale/friendship calculator to maximise your team’s morale and better understand your pathing limitations.

Morale Management
-
Clearing the Raid requires multiple entries per week due to the limitations of the Morale mechanic. Planning ahead and using your morale efficiently will let you maximize each trip.
-
Look for reoute opportunities where you can kill multiple bosses in a single run. This will reduce the number of trips and entry fees needed to clear the entire raid.
Maximize The Killing
-
After killing a raid boss, while your morale is still above -31, you can teleport back to the waypoint and kill additional trash mobs and mini bosses.
-
Clearing the trash now, will save you morale in future runs and allow you to attempt bosses at higher levels of Morale for the Health bonus.
Raid Layout

Click to expand; map provided by Bears Playbook. Printable version available here.
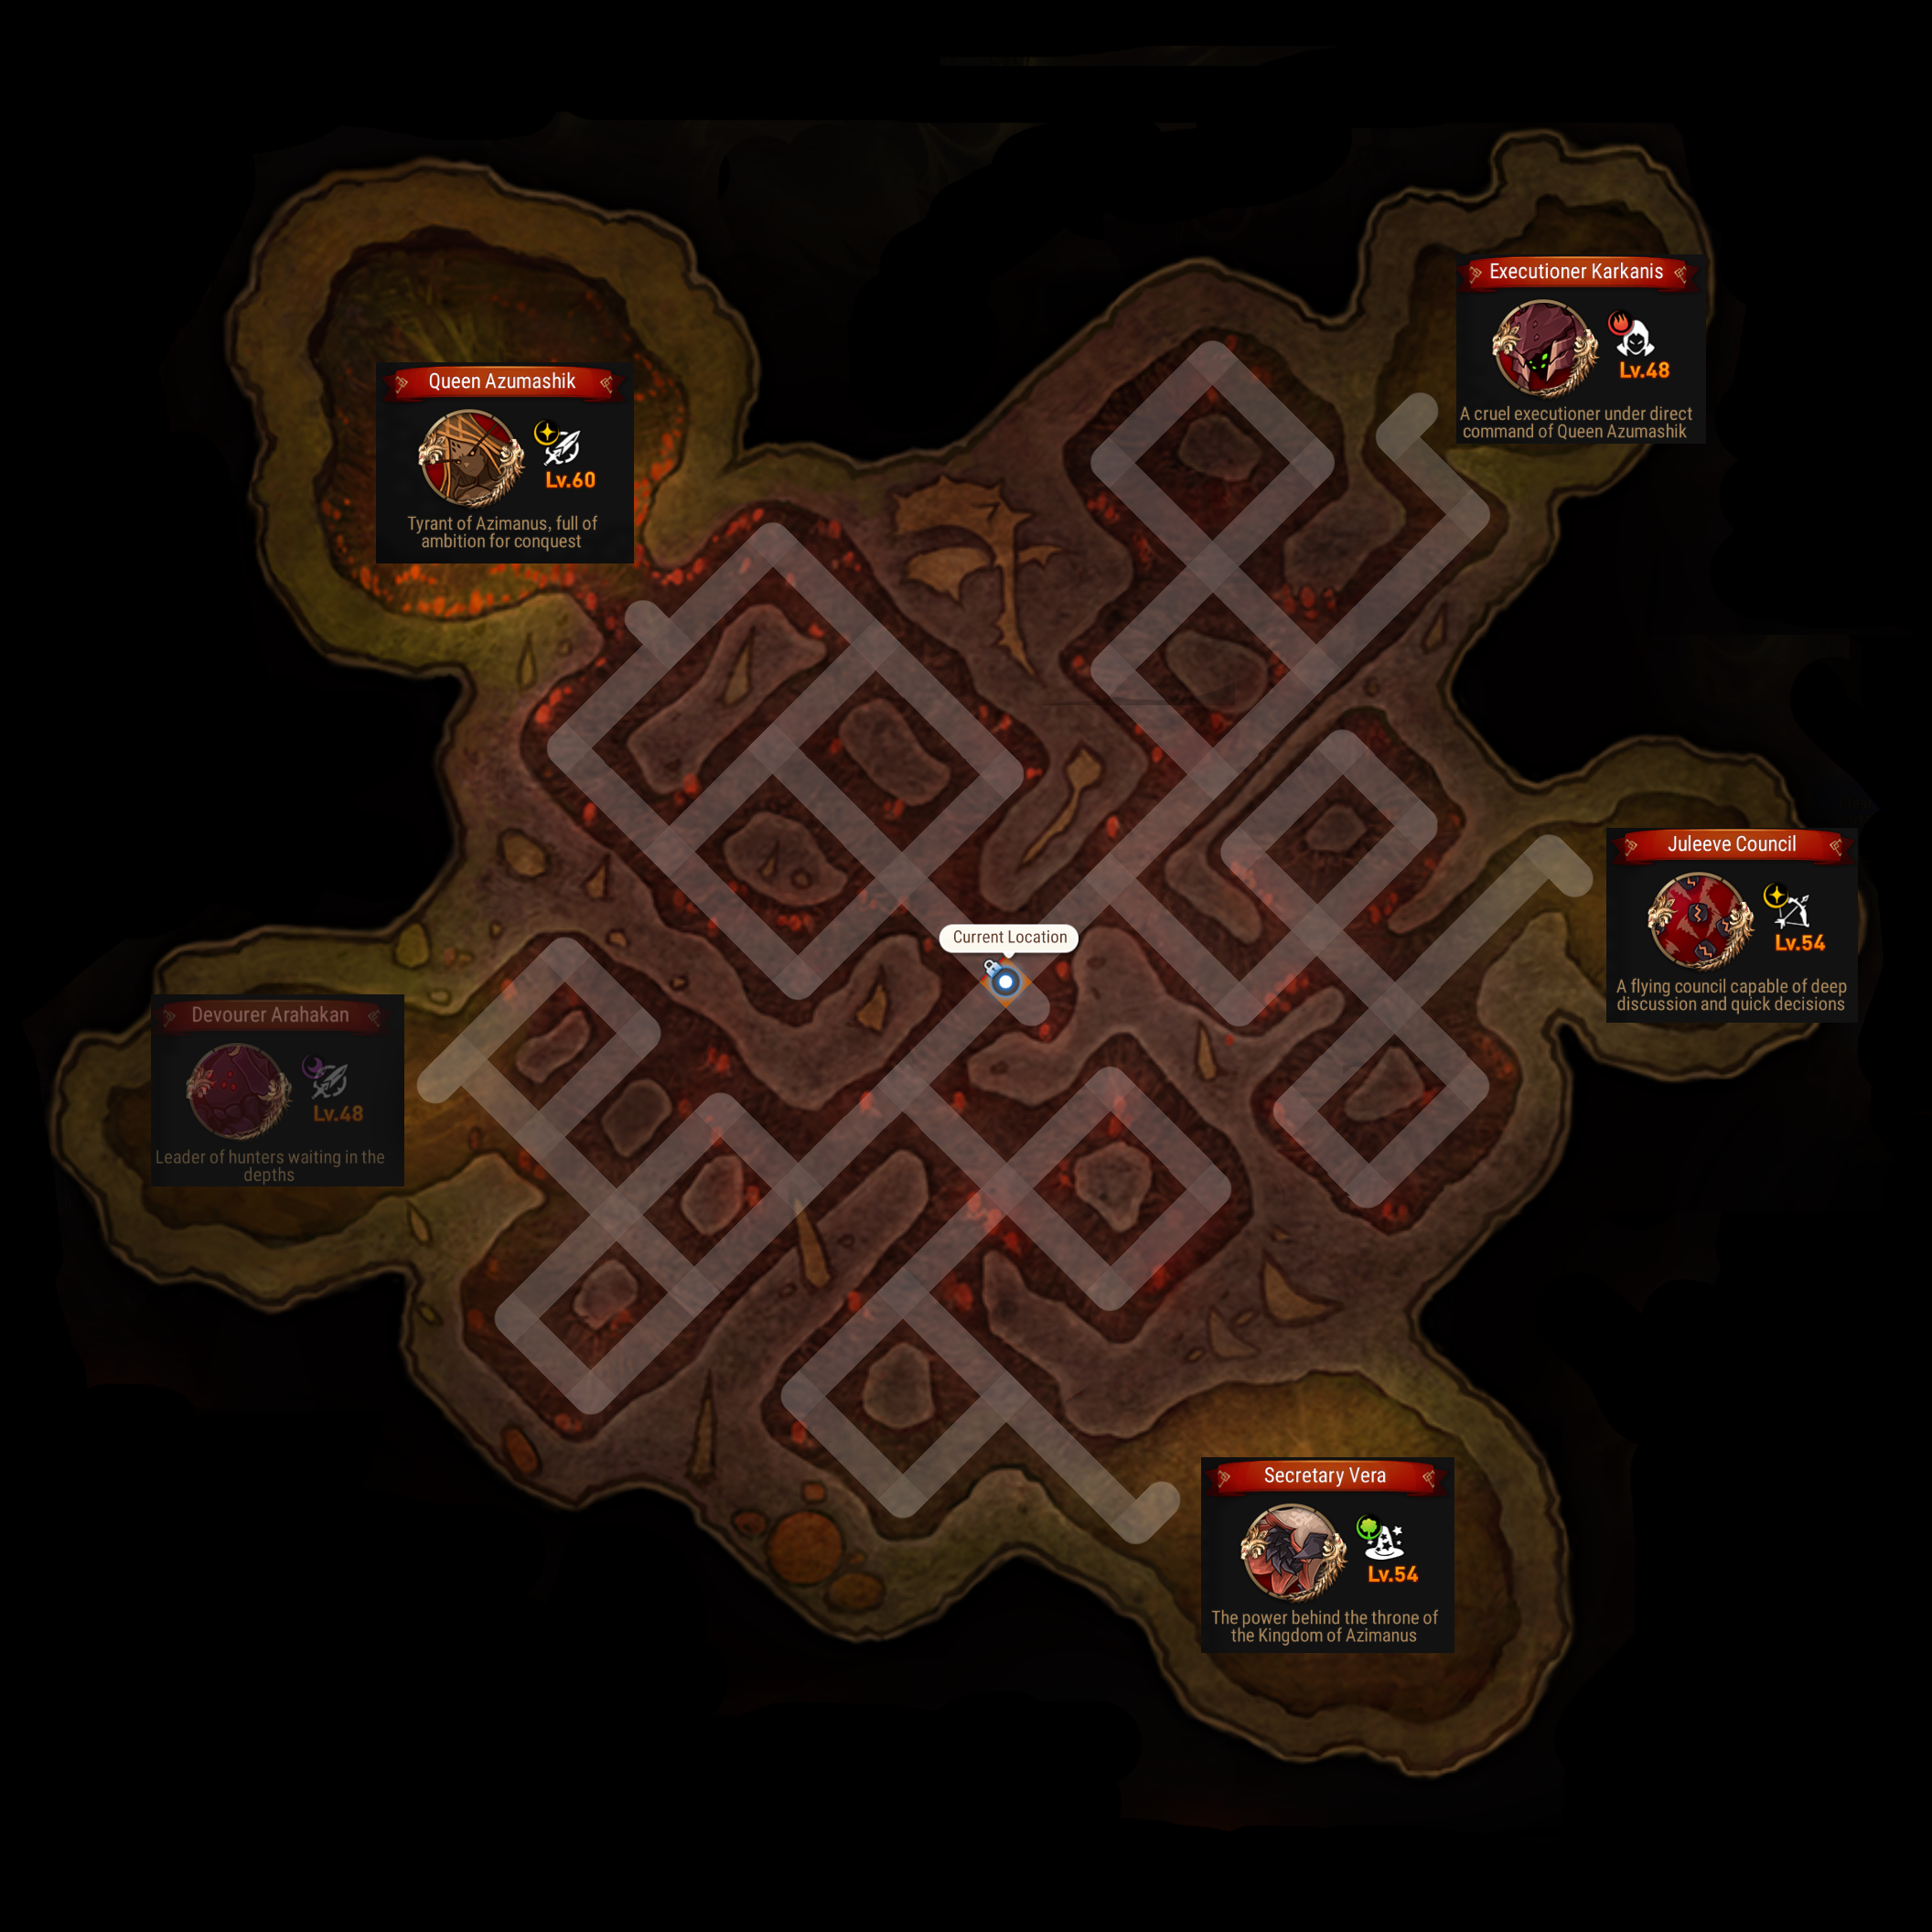
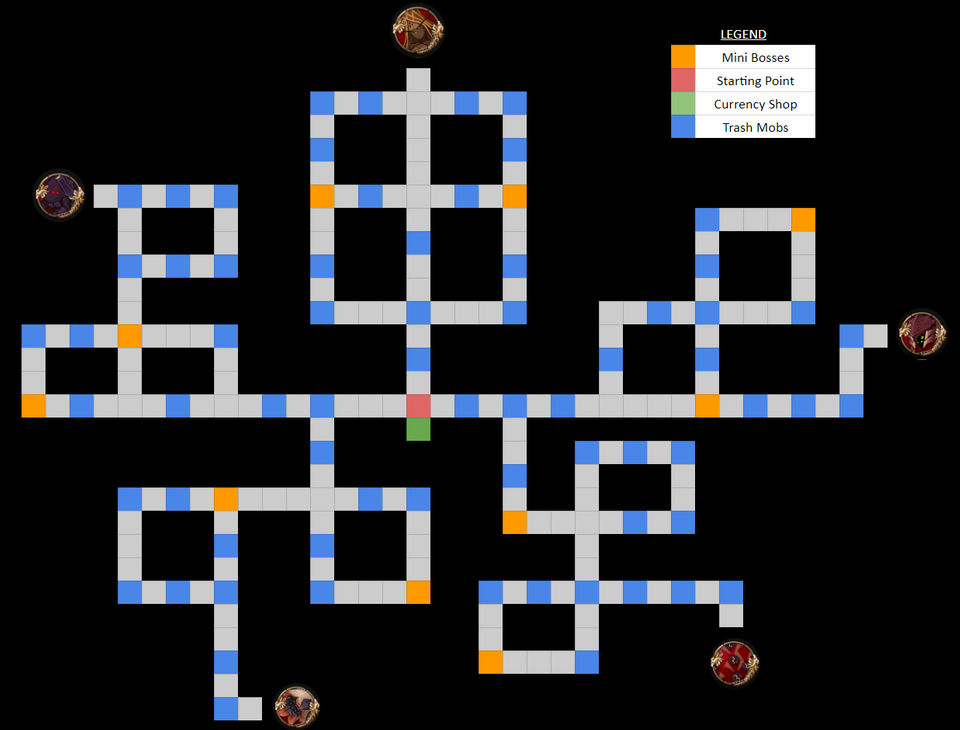
Who Do I Kill?
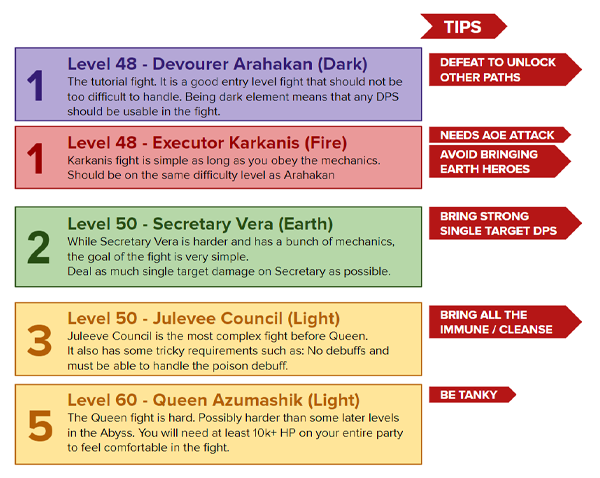
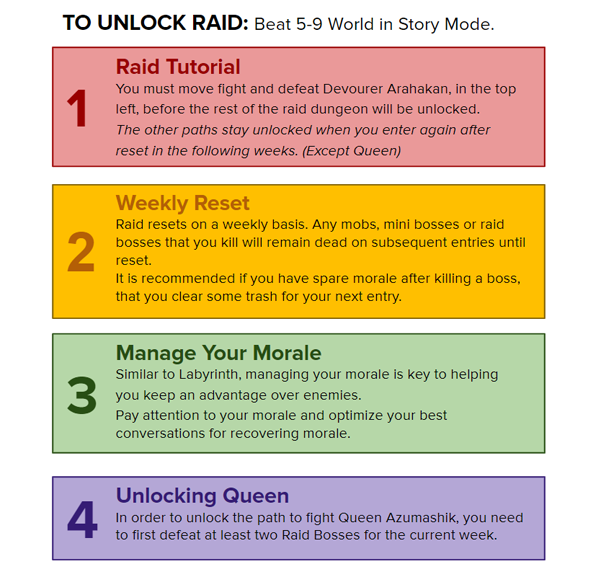
When you first enter Azmakalis Raid, you will need to do the Raid Tutorial. Only the path to Devourer Arahakan will be open. You will need to kill him before the other paths will unlock.
After that initial kill, and every week after, the paths to the four non-Queen bosses will be unlocked and you can plan which bosses you want to to tackle.
There is no set order to fight the bosses. The choice heavily depends on your team comp and current investment into heroes.
The Raid Bosses have a monster level that gives a general estimate of their relative difficulty and complexity.
If you can’t beat a boss, feel free to attempt any other boss. There is no requirement to kill all the bosses. Defeating at least two bosses is enough to unlock the path to fight Queen.
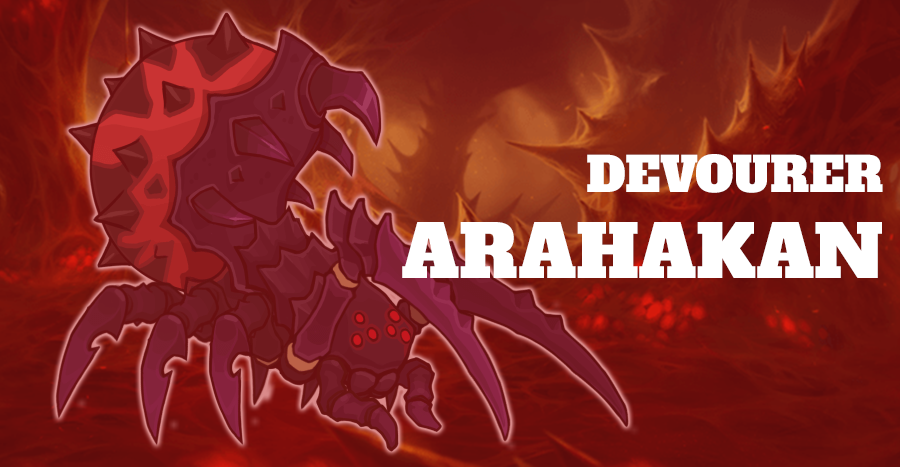
Devourer Arahakan
Enemies
-
Devourer Arahakan
48 Dark Warrior (90k HP)
-
Azimanmus Hunter (2)
48 Fire Warrior (11k HP Initial)
48 Fire Warrior (7k HP Summoned)
 Skill Cooldown Increase
 Decrease Defense
 Immunity
 Healing: Cleanse
 Increase Attack
 Increase Attack (Greater)
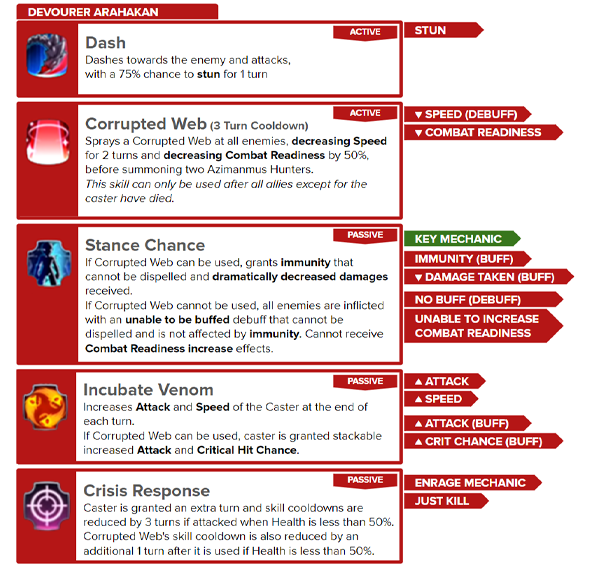
Strategy
Team Composition
-
Recommended to have Immunity or Cleanse to fight the Speed debuff
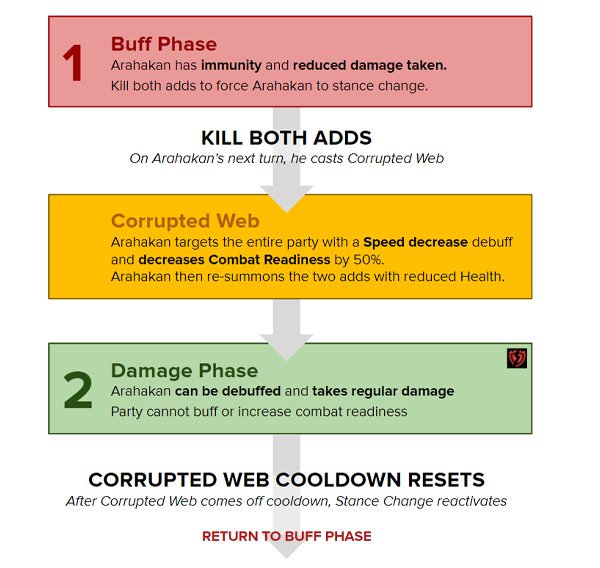
Fight around the Corrupted Web cast
-
Timing your buffs and debuffs so they that can land is the key to the fight.
-
Buff up before the turn where Arahakan casts Corrupted Web. Have debuffs ready to cast afterwards.
-
Avoid the Speed debuff if possible by using Immunity to block, or Cleanse.
Burn everything during Damage Phase
-
Cast defense break in Damage Phase when Arahakan can be debuffed.
-
Since phase duration is based on Corrupted Web’s cooldown, Kise / Judge Kise cooldown push can extend the Damage Phase.
-
Cleave the adds during this phase if you want to trigger Corrupted Web for another Damage Phase
Executioner Karkanis
Enemies
-
Executioner Karkanis
48 Fire Thief (108.9K HP) -
Karax Scout (2)
54 Earth Ranger (71.1K HP)


Team Composition
-
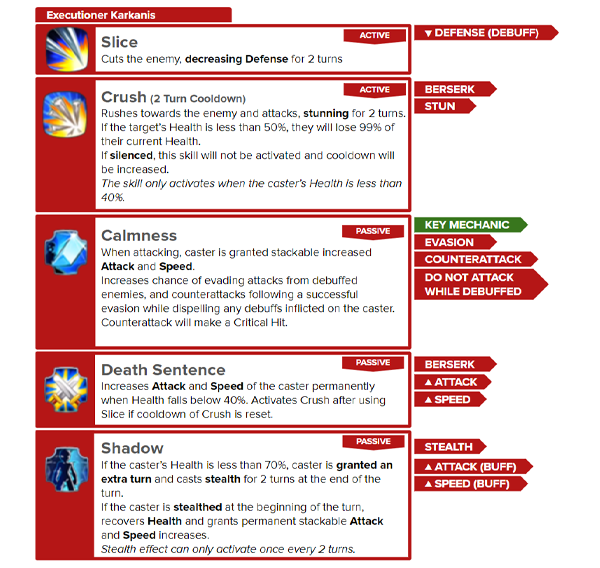
At least one AOE hero to break Stealth.
-
Avoid Earth heroes if possible as they have natural chance to miss due to elemental disadvantage.
-
Silence to stop Karkanis from casting Crush.
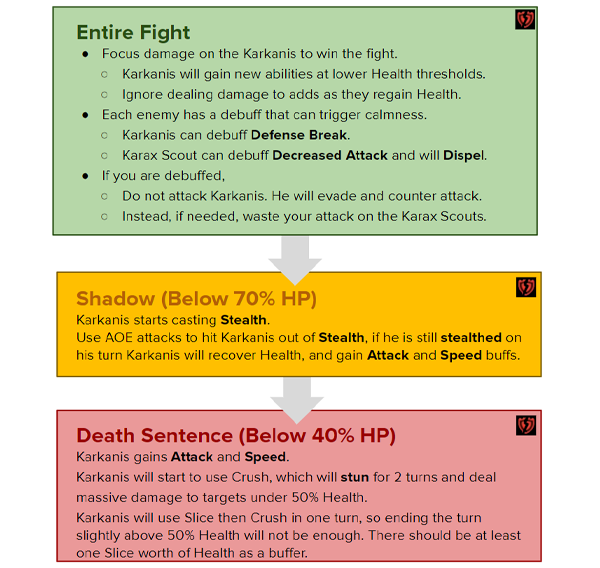
Do the mechanics
-
Do not attack Karkanis when you have debuffs.
You will get messed up. -
Break stealth as soon as possible with an AOE Attack (Guardian attack will not work)
-
Stay healthy before getting into Death Sentence.
-
Karkanis’ first Crush will be on your leader. Make sure they are above 50% HP and can afford to be stunned.
-
Buff / Debuff as you please
-
Karax Scouts can dispel your buffs though when they attack you
Secretary Vera

Enemies
-
Secretary Vera (Worm)
54 Earth Mage (105K HP) -
Azimanus Watcher (4) → Azimanus Scout
54 Light Warrior (6.9k HP Egg)
Relevant ability: Hatching
54 Light Warrior (11.0k HP Hatched)
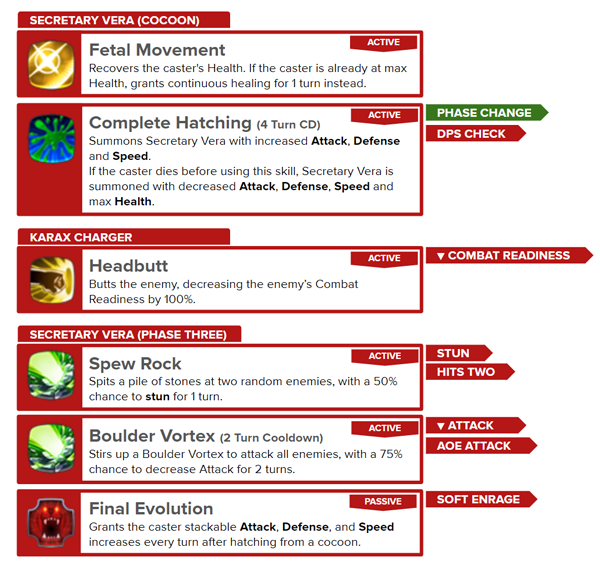
Secretary Vera (Cocoon)
54 Light Warrior (62.4k HP)Karax Charger (2)
54 Light Knight (30.9k HP)
Relevant ability: Headbutt
-
Secretary Vera (Worm)
54 Earth Mage (49.0k HP If Reduced)
54 Earth Mage (66.6k HP If Hatched)
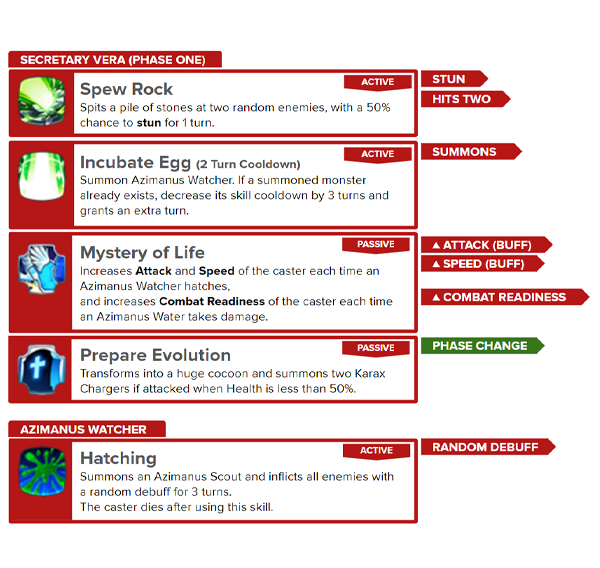
Team Composition
-
Immunity (Or Cleanse) lets you skip debuff mechanics and spend more time on dealing damage.
-
Strong single target DPS is required to focus and burn down Vera.
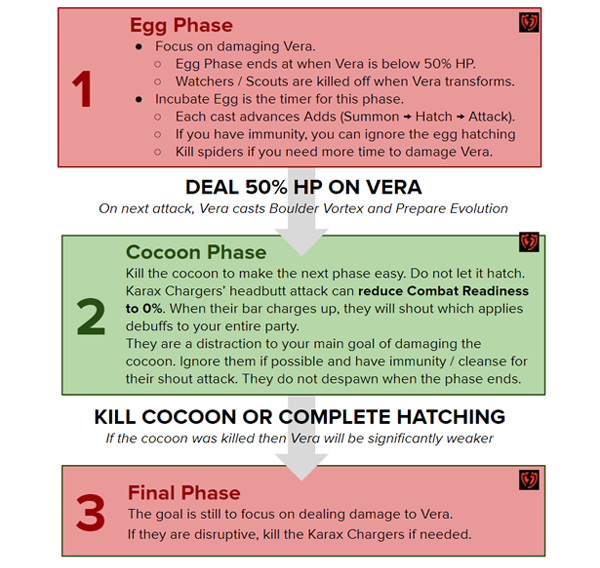
The goal is to deal damage to Vera
-
Dealing as much damage as possible to Vera is the key to the fight. If you can deal enough damage, you can ignore the adds. Only deal with the adds if you need additional time due to low damage.
-
Eggs despawn when Vera turns into a Cocoon
-
Arky Guardian attack can damage adds in Egg Phase to make them easier to kill if you need the time.
-
Karax Scouts do not despawn after Cocoon phase but are just a little annoying.
Buffs / Debuffs
-
Vera can stun or decrease attack
-
Block debuffs to allow your damage units to spend more time dealing damage.
-
Each phase has a delayed party-wide debuff cast
-
Azimanus Watchers’ Hatching ability
-
Karax Chargers’ Shout ability
-
-
There is no limits / restrictions to buffing or debuffing in this fight.
-
Use defense break at all times if possible.
Juleeve Council

Enemies
-
Juleeve Council
54 Light Ranger (157.3K HP) -
Juleeve Council - Split (3)
54 Light Ranger (25.6K HP)
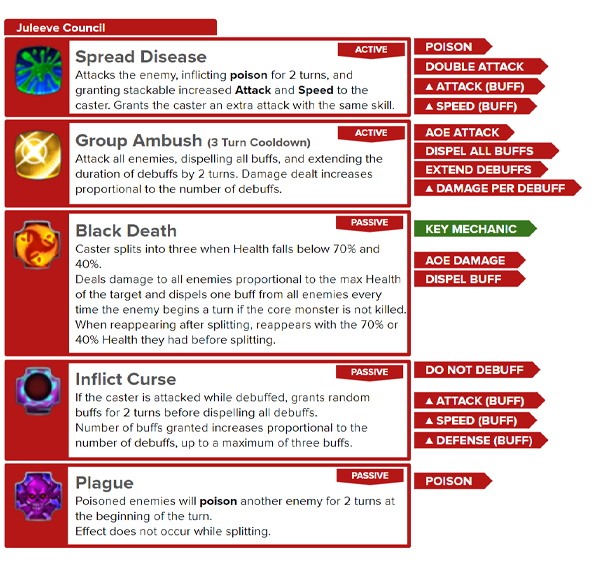
Team Composition
-
Need to have Immunity or Cleanse to handle poison
Don’t die to poison
-
Preventing the poison stacks from getting out of hand is key to the fight. Use Immunity or Cleanse to keep poison stacks cleared.

Queen Azumashik

Enemies
- Queen Azumashik
- 60 Light Warrior (160.7K HP)
- Azimanus Wacher (2) --> Devourer Arahakan
- 60 Light Warrior (13.2K HP Egg) Immune, Invincible
- 60 Dark Warrior (24.4K HP Hatched) Relevant Ability: Dash (Stun)
- Azimanus Manager (2) --> Raqix Flying Troop
- 60 Light Warrior (13.2K HP Egg) Immune, Invincible
- 60 Light Ranger (30.2K HP Hatched)
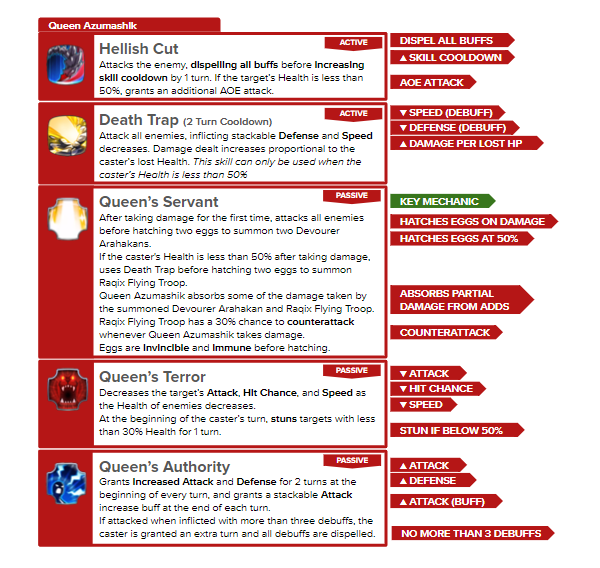
Basic Strategy
Team Composition
-
Required Immune or Cleanse for egg hatching debuffs.
-
Your party should be tanky in order to survive. (10K+ HP)
Under Pressure
-
Any party member falling below 50% HP can cause the fight to go bad quickly. Being able to sustain through the damage and keeping healthy is the key to the fight.
-
Getting your heal casts off is hard in this fight
-
Devourer Arahakan can stun a target
-
Hellish Cut (Queen) will dispel all buffs and increase cooldowns by 1 turn.
-
At the start of Queen’s turn, Queen’s Terror will stun any heros that are below 50%
-
-
If needed, cast Immune on the final turns of the previous fight to have it up at the start of the Queen fight for the first set of egg hatches.
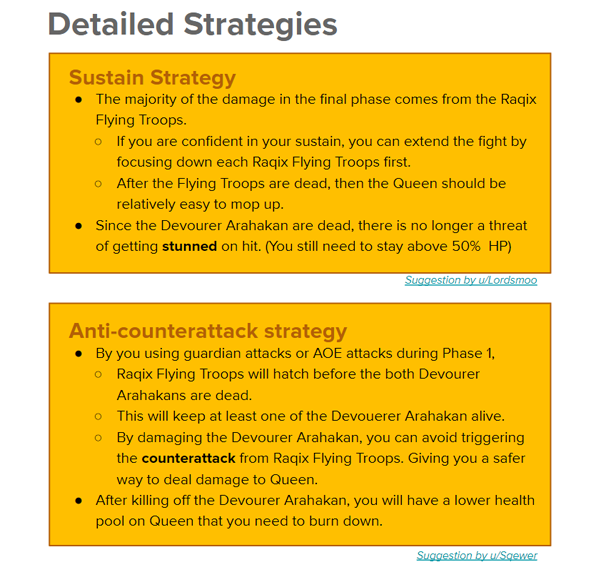
Track Queen Health to manage phases
-
Killing both Arahakans should deal enough damage to Queen to bring her to almost 50% HP.
-
If you use any additional AOE attacks or Guardian attacks, Queen will hatch the Raqix and start Phase 2 before the second Arahakan is dead. (See Anti-counterattack strategy)
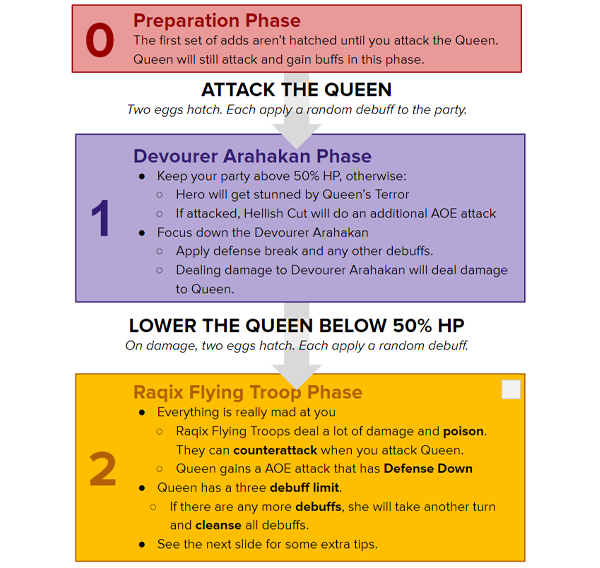
Advanced Strategy
Dealing Damage
-
Prioritize Defense Break as one of the three allowed debuffs on Queen
-
Spamming Guardian attacks can help deal the burst damage needed to kill the Queen.