


Introduction
The Asgardr Report aims to provide high-level Fire Emblem Heroes content on a regular basis. Each article will contain 3-4 topics related to the end-game content of the game; Aether Raids (Offense & Defense), Arena, and Summoner Duels.
I hope that people enjoyed the April Fools article (if it was not obvious enough lol), and I am back for the slightly belated March edition of Asgardr Report. We would first take a deep dive into how does follow-up works in Fire Emblem Heroes. We would then move on to discussing supports and why people should use them more often. As usual, we would discuss any new developments in the game for the month
This Month in Fire Emblem Heroes
In this segment, we would focus on units or skills that the author thinks are new and going to be meta-relevant moving forward due to the updates introduced in the game. For this month, this segment would cover all the content introduced for the month.
Spring Sonya
Spring Sonya. She hits hard, and she can get specials off fairly reliably. This meant that her damage ceiling is rather high as she can activate fairly powerful specials. However, she is slightly marred by the lack of Passive B options again; her weapon is already a more powerful Aerobatics, which does not work well with Trace if Sonya teleports more than her movement range (which is usually 2).
Sonya’s main strength is probably in Summoner Duels; her Harmonic skill provides additional cooldown for units that are in Awakening or Shadows of Valentia. Her best role is probably a suicide nuke; she can easily run a AoE special with the help of the Harmonic skill and her weapon and potentially weaken the opponent using the AoE damage. She can then use Pulse Smoke to provide even more disruption against the opposing nukes. Sonya is also potentially useful in Aether Raids Defense, however, players should keep in mind that she should probably not be used in Astra season due to Elimine removing her special gimmick as a whole.
Vital Astra
Compared to a year before, Melee Infantries were in a significantly weaker spot as their role is superseded by Armored units as they sniffed a bucket load of glue and stick together in a ball. While Ranged Fliers are still screaming for help, the developers decided to help Infantries instead. Very cool.

With that said, the presence of Vital Astra does mean that it is now slightly easier to get damage reduction. The most consistent way to get Vital Astra is probably having a cooldown reduction on the weapon alongside running Time’s Pulse. This instantly meets the two-charge requirement and allows the said unit to get Vital Astra off. Chaining Vital Astra is significantly tougher as you probably need to run Special Spiral to consistently activate it on repeated combats, as Vital Astra had the tendency of one-shotting the opponent, which meant suffering over success as you see your poor tank losing the damage reduction effect.
The application of Vital Astra is again, for Summoner Duels. As a player can’t run multiple Save skills, having a unit that has instant Vital Astra can be very threatening for the opponent as not being able to take the Vital Astra out usually meant losing a unit. Prominent users include the likes of Ascended Mareeta herself, Legendary Dimitri, and Brave Alm (with support).
Other news
- Spring Maria is released with our first instance of true damage reduction based on DEF instead of percentage-based damage reduction. While that makes Spring Maria a rather powerful Melee specialist, watch this space as such effects are introduced on other units, especially on an Armored unit.
- The Oath series of skills are released as a Sacred Seal. With an Oath Sacred Seal, it could be combined with other Oath skills to give provide buffs to all stats. For now, though, Atk/Res Oath is a bummer as Spd/Def Oath in the C slot is rather restricted by its limited accessibility.
- Ascendant Mareeta is a modern Sword Infantry that leverages on the said Vital Astra special extremely well as she is able to loop it indefinitely without any assistance from support and B slot.
- Nanna received a Legendary version that disables defensive specials likely due to the dominance of Hardy Fighter. However, as Far Save is much more prominent in the meta for almost all the modes, the impact on the meta is probably minimal. However, this does set the precedence for such effects in the near future, so watch this space!
Asgardr Hall of Fame
The Asgardr’s Hall of Fame is a form of recognition for units that fulfills either of the following 2 requirements.
- The unit is sufficiently common in Aether Raids Offense strategies and performs at a sufficiently high level.
- The unit performs at an exceptional level even if they are less accessible without a steep learning curve.
Updates
- Ascended Idunn is added to the Hall of Fame due to similarities to Brave Hector.
- Brave Ike and Ophelia are removed due to reduced usage.
What the Follow Up??
Follow-ups in Fire Emblem Heroes can be kind of confusing, and even the most experienced players can sometimes make mistakes in this matter. This section aims to explain the general rules of follow-up in the game, and provide some examples to apply the things described in this section.
There are in general, five different possible factors that determine whether a follow-up happens or not:
- Speed Differential.
- Guaranteed Follow-Ups (GFU)
- Prevented Follow-Ups (PFU).
- Neutralize Guaranteed Follow-Ups (NGFU)
- Neutralize Prevented Follow-Ups (NPFU).
Speed differential is the most straightforward; if the attacker has 5 or more speed than the opponent, he would have a follow-up attack assuming there are no other factors in play. Nowadays, however, things are much more complicated as there are 4 other potential factors in play. So let’s just say that winning a speed check gives a +1 to the follow-up check. This will become clearer once the remaining factors come into play.
The follow-up check can be evaluated as follows:
- If NGFU is found, skip step 2.
- For every GFU effect that is active, give +1 to follow-up check.
- If NPFU is found, skip step 4.
- For every PFU effect that is active, give -1 to follow-up check.
- If the attacker wins the speed check, give +1 to follow-up check.
- If the follow-up check is more than 0, follow-up occurs.
The above might seems a little complicated, so let’s bring in some examples here.
The Brave Hector Case Study
Let us recall what does Brave Hector’s weapon does again:
Accelerates Special trigger (cooldown count-1). Neutralizes "effective against armored" bonuses. If unit's HP ≥ 25% and foe initiates combat, neutralizes unit's penalties during combat and unit makes a guaranteed follow-up attack. If foe initiates combat or if foe's HP = 100% at start of combat, inflicts Atk/Def-6 on foe during combat and foe cannot make a follow-up attack.
From the above description during the enemy phase, Hector has a +1 follow-up check when he attacks, and a -1 follow-up check on the opponent. Let’s say hypothetically, a foe attacks into Brave Hector and wins the speed check, that would still not be enough as the final follow-up check count would be 0 (-1 PFU + 1 SPD = 0).
There are two ways to get around this; the attacker must have either some form of NPFU or GFU. For the most basic example, let’s say that a foe with the skill Null Follow-Up attacks Brave Hector. The following is a description of Null Follow-Up.
Neutralizes effects that guarantee foe's follow-up attacks and effects that prevent unit's follow-up attacks during combat.
In short, this provides both NPFU and NGFU. So the follow-up prevention portion of Maltet’s effect is totally ignored, and the attacker can successfully make a follow-up attack if he wins the speed check. As an added bonus, NGFU also ensures that Brave Hector does not follow up on the attacker as well (I will leave that as an exercise, it’s a similar logic as the above).
As for GFU, it is easy to see that follow-up would occur if the attacker meets the speed check (+1 GFU -1 PFU +1 SPD = 1). So if a foe that wins the speed check uses Lancebreaker and attacks Brave Hector, the foe will successfully follow up. For a final “no-u” moment, however, let’s bring Hardy Fighter into the mix for Brave Hector.
Neutralizes effects that guarantee foe's follow-up attacks during combat. At the start of turn 1, if foe's attack triggers Special, grants Special cooldown count-2. If foe's attack triggers Special and Special has the "reduces damage by X%" effect, Special triggers twice, then reduces damage by 5. (Example: if Special has the "reduces damage by 50%" effect and no other damage reduction effects trigger, reduces initial damage by 50%, then reduces remaining damage by 50% for a total damage reduction of 75%. The remaining damage is then reduced further by 5.) Each Special trigger is calculated as a separate activation.
Hardy Fighter provides the NGFU effect on the foe, so this meant that even if the foe has multiple counts of GFU, it will be negated as that step is skipped. This meant that an Otr that is supported by August’s Diplomacy Staff with Lancebreaker will not be able to follow up on Brave Hector if Otr initiates on Brave Hector as the GFU check step would be totally skipped.
I will leave the following as exercises to think about:
- Try to figure out whether Brave Hector would be able to follow up in the above scenario.
- Otr’s base kit does come with Flow Refresh, does that mean that Otr will follow up? (Note: Otr usually does not win the speed check against Brave Hector).
To conclude, follow-up shenanigans can be kind of complicated as shown above, but understanding it will make you a better player as a whole. A player would also be able to evaluate units a lot better using the information stated in the section.
Supports are important!
In the tier list article in January, it was mentioned that New Year Dagr’s matchup against Brave Hector can be a hit and miss depending on the support that attacker brings. This section would cover precisely just that; what are the supports available, and how to use supports to their maximum potential.
For this section, we would specifically be discussing stat-based supports. We would be examining the three general classifications of supports, namely Drives, Spurs, and Reins, and we would also go through a worked example to briefly understand how to apply the information covered in this section.
Drives
We first introduce the most common support that is used for a long time; drives. Drives are in-combat buff to any ally within 2 spaces of the unit. Drives are probably the easiest to use, as the two-space requirement meant that the support would not be in the range of enemy fire. Drives are also the most commonly used support before the advent of Far Save precisely due to this reason. This is usually done by placing the support directly behind the tank. Common units that give these kinds of support such as Brave Lucina with Geirskogul, Flayn with Caduceus Staff, Elimine with Holy Ground, and Thorr with Worldbreaker.
Under the modern context, as the 2 space requirements are shared with Far and Near Save, these buffs are the most flexible in terms of positioning. So long as the support is within the Save support range, the Save units will benefit from the buff. The lack of positioning requirements usually meant that the buffs it provides are either slightly weaker compared to the other types (Drives), or have other conditions to work with (Distant Guard, Wards, and Goads).
Spurs
Before Save skills became a thing, Spurs were incredibly difficult to use due to the reasons stated above; being in the line of enemy fire for a support unit usually means death. Now that Saves are a thing, support units getting sniped is extremely unlikely until there exists a skill that ignores Saves. The increased positional flexibility meant that it might not be a bad idea to leverage on Spurs, as it is possible to be more flexible in terms of stat allocation of Spurs.
For example, the most common support drive is Distant Guard to mainly tackle against Ranged nukes. If someone wants to buff something else other than bulk, however, things become much more difficult to do as they had to choose between buffing bulk or buffing offenses. Spur support sidesteps all these by actually being able to mix and match the stats used on both C and S slots.
The ideal positioning of Spurs would be somewhere in the middle of the formation where all the units could be buffed. It is also possible to place a Spur unit right at the front, as the front is the most susceptible to getting attacked, and the Spur user being attacked does mean that the Spurs will be active.
Reins
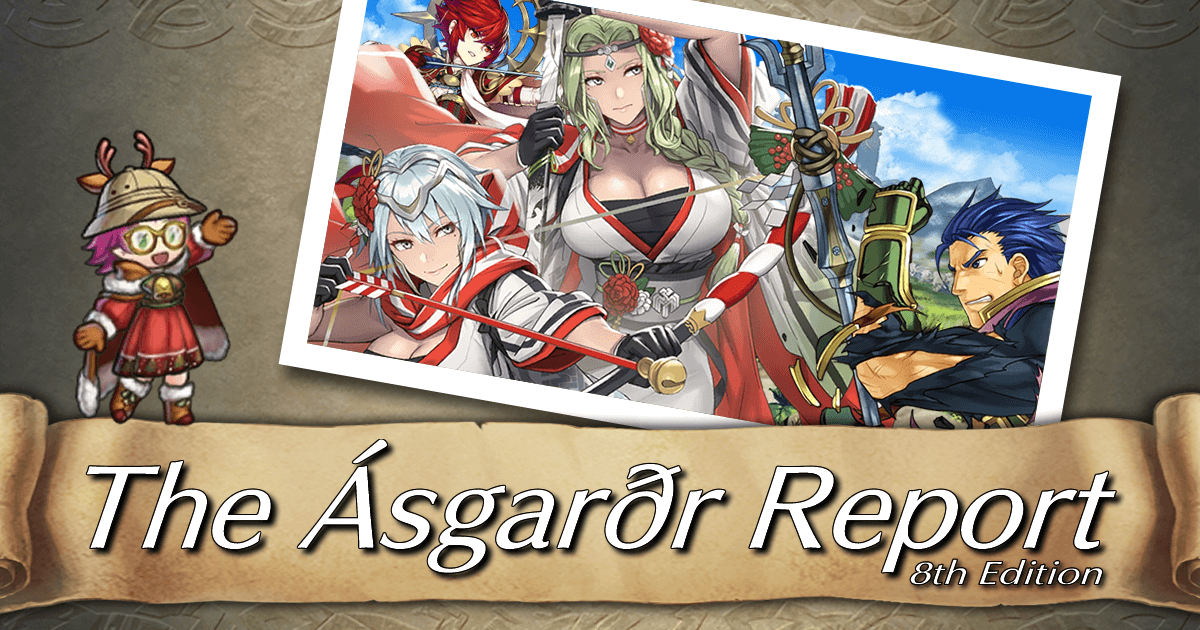
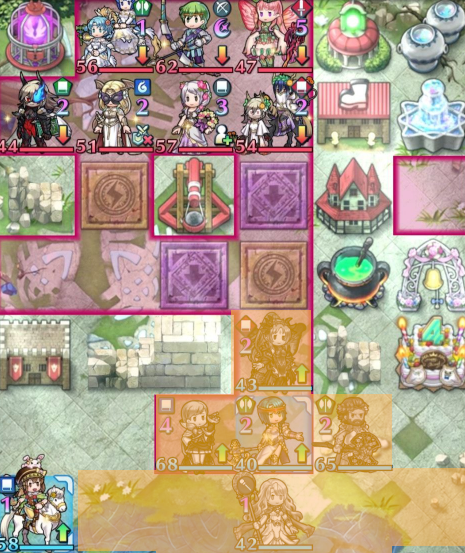
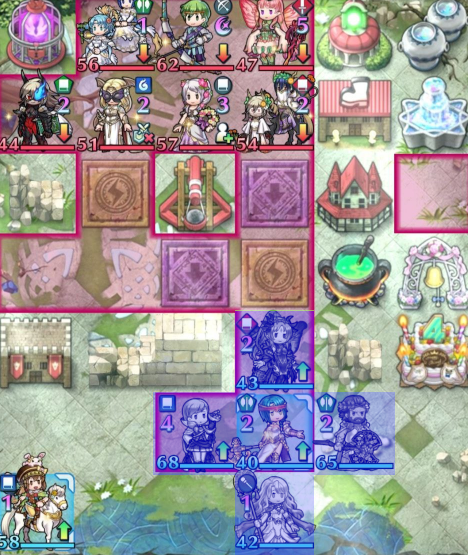
Reins are kind of like Drives, except you want the foes to be within 2 spaces. The front is the most ideal as it is the most likely location where the enemy would attack from. This is shown in the figure below.
Unlike other stat supports, Reins inflicts debuffs on the opponent instead of buffing your allies. Atk-based debuffs are the most potent as they effectively boost Def and Res to your allies. As Rein skills usually debuff two stats instead of one, the Save unit would effectively get a boost to three stats (Def, Res, and either Atk or Spd depending on the debuff), making Reins probably the set of skills that gives the most stat swing.
However, this comes at the expense of positional flexibility. If the Rein user is in the middle of the formation, the Save unit would only benefit from the debuff against melee foes, as ranged foes will not get debuffed at all. Needless to say, a Rein user at the back of the formation is effectively useless.
Summary
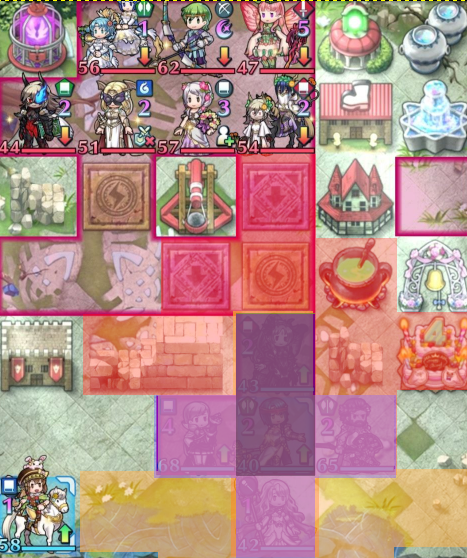
- Aim to provide the most stats at hotspots where the enemy is most likely to attack (black zone).
- Drives can be placed anywhere in the formation (orange zone)
- Spurs can be placed somewhere in the middle, although the front is not a bad location either due to hotspot coverage (blue zone).
- Reins provide the largest stat swing, but they should almost always be at the front (red zone).
- Remember to consider other support ranges too. This includes Mila’s Nurturing Breath and the new Hold skills. As an exercise, determine where should Mila / Hold users should be for maximum support.
Units and Builds
Specifically for building support, one should always consider the most optimal position of the said support unit before deciding which skills to give. Here are some examples of support builds that could be useful for reference.
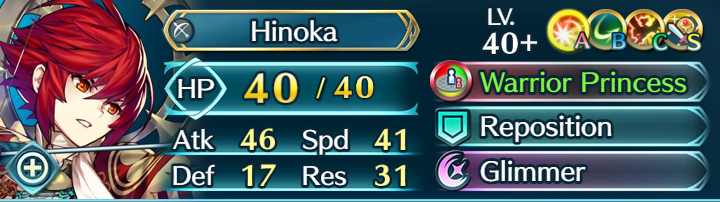
Other than the Atk/Spd Drive, Warrior Princess inflicts debuffs similar to Reins. This means that Hinoka’s optimal position is at the front of the formation. Hence, to maximize the amount of stats Hinoka could bring, Atk/Def Rein is used as the C passive to further overlap it with Warrior Princess, while Spur Atk/Def is used to cover the usual hotspot on the space Hinoka is occupying and the space behind

Muspell is frequently used as support for Vantage tanks (most notably Brave Marth). This meant that getting sniped is a potential issue Muspell would need to face. Under these circumstances, Muspell should try to avoid direct fire at any cause. Hence, the best Muspell could do is probably just a simple Drive Atk to ensure that the tank could take the foe out more easily with Domain of Flame providing an absurd amount of damage.

Sometimes you just need to field a Mythic that isn’t built to support to maximize the bonus scoring from offensive merges. As Reins are locked to fliers, one could either opt for running spurs or drives depending on preference. Consider also giving the Mythics support weapons as well, such as using Silver Goblet on Peony, and Love Candelabra on Dagr. The above Dagr does potentially provide +10 ATK, +6 RES, and +4 DEF just by herself. Not too shabby isn’t it?
Conclusion
We hope you enjoy this edition of the Asgardr Report. While the topics covered might be a known entity for some of the players, I hope you all enjoyed it nonetheless. In the next Asgardr Report, we would go on a deeper dive into Galeforce shenanigans and their application in Aether Raids Offense. Until then, see you all again very soon.


