


Map
- Normal
- Infernal
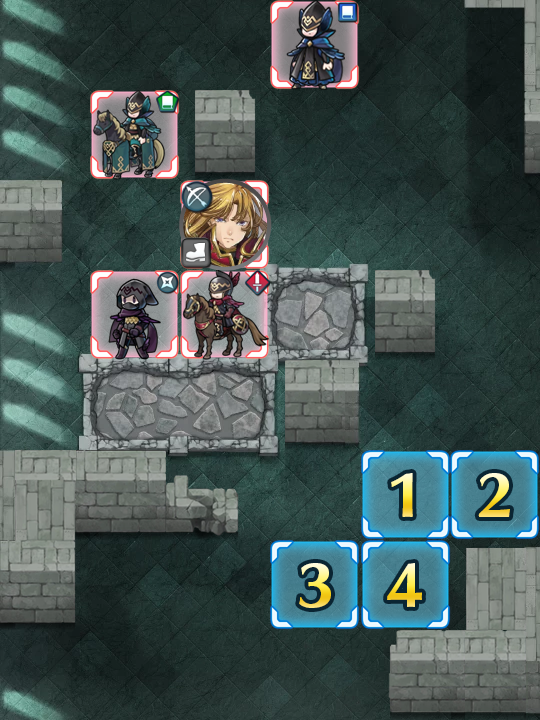
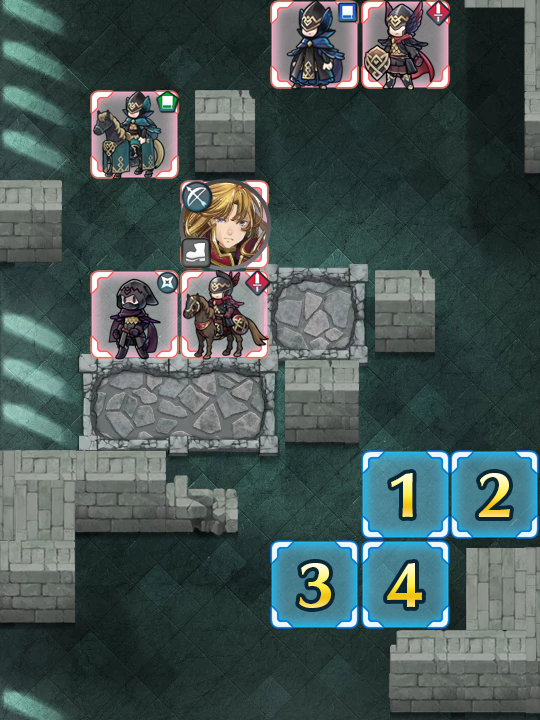
Map Enemies
- Hard
- Lunatic
- Infernal
| HP | ATK | SPD | DEF | RES | |
|---|---|---|---|---|---|
| 34 | 33 | 25 | 15 | 20 | |
| Weapon | Blárblade | A | Defiant Atk 2 | ||
| Support | B | Watersweep 2 | |||
| Special | Growing Thunder | C | Savage Blow 3 | ||
| HP | ATK | SPD | DEF | RES | |
|---|---|---|---|---|---|
| 29 | 35 | 19 | 12 | ||
| Weapon | Gronnraven | A | Triangle Adept 2 | ||
| Support | B | Quick Riposte 2 | |||
| Special | Growing Wind | C | Savage Blow 3 | ||
| HP | ATK | SPD | DEF | RES | |
|---|---|---|---|---|---|
| 33 | 26 | 30 | 10 | 25 | |
| Weapon | Smoke Dagger | A | Death Blow 2 | ||
| Support | B | Windsweep 2 | |||
| Special | Moonbow | C | Savage Blow 3 | ||
| HP | ATK | SPD | DEF | RES | |
|---|---|---|---|---|---|
| 36 | 31 | 18 | 24 | 23 | |
| Weapon | Killing Edge | A | Fortress Def 3 | ||
| Support | Reposition | B | Renewal 2 | ||
| Special | Aegis | C | Spur Spd 2 | ||
| HP | ATK | SPD | DEF | RES | |
|---|---|---|---|---|---|
| 40 | 35 | 27 | 19 | 15 | |
| Weapon | Clarisse's Bow+ | A | |||
| Support | B | Poison Strike 3 | |||
| Special | Glimmer | C | Threaten Def 3 | ||
| HP | ATK | SPD | DEF | RES | |
|---|---|---|---|---|---|
| 45 | 44 | 32 | 20 | 28 | |
| Weapon | Blárblade+ | A | Defiant Atk 3 | ||
| Support | B | Watersweep 3 | |||
| Special | Growing Thunder | C | Savage Blow 3 | ||
| HP | ATK | SPD | DEF | RES | |
|---|---|---|---|---|---|
| 40 | 47 | 26 | 17 | 35 | |
| Weapon | Gronnraven+ | A | Triangle Adept 3 | ||
| Support | B | Quick Riposte 3 | |||
| Special | Growing Wind | C | Savage Blow 3 | ||
| HP | ATK | SPD | DEF | RES | |
|---|---|---|---|---|---|
| 44 | 37 | 39 | 14 | 32 | |
| Weapon | Smoke Dagger+ | A | Death Blow 3 | ||
| Support | B | Windsweep 3 | |||
| Special | Moonbow | C | Savage Blow 3 | ||
| HP | ATK | SPD | DEF | RES | |
|---|---|---|---|---|---|
| 49 | 43 | 25 | 31 | 30 | |
| Weapon | Killing Edge+ | A | Fortress Def 3 | ||
| Support | Reposition | B | Renewal 3 | ||
| Special | Aegis | C | Spur Spd 3 | ||
| HP | ATK | SPD | DEF | RES | |
|---|---|---|---|---|---|
| 53 | 42 | 35 | 26 | 20 | |
| Weapon | Clarisse's Bow+ | A | |||
| Support | B | Poison Strike 3 | |||
| Special | Glimmer | C | Threaten Def 3 | ||
| HP | ATK | SPD | DEF | RES | |
|---|---|---|---|---|---|
| 52 | 47 | 35 | 22 | 31 | |
| Weapon | Blárblade+ | A | Defiant Atk 3 | ||
| Support | B | Watersweep 3 | |||
| Special | Growing Thunder | C | Savage Blow 3 | ||
| HP | ATK | SPD | DEF | RES | |
|---|---|---|---|---|---|
| 46 | 50 | 28 | 19 | 38 | |
| Weapon | Gronnraven+ | A | Triangle Adept 3 | ||
| Support | B | Quick Riposte 3 | |||
| Special | Growing Wind | C | Savage Blow 3 | ||
| HP | ATK | SPD | DEF | RES | |
|---|---|---|---|---|---|
| 50 | 40 | 43 | 15 | 35 | |
| Weapon | Smoke Dagger+ | A | Death Blow 3 | ||
| Support | B | Windsweep 3 | |||
| Special | Moonbow | C | Savage Blow 3 | ||
| HP | ATK | SPD | DEF | RES | |
|---|---|---|---|---|---|
| 57 | 47 | 27 | 33 | 33 | |
| Weapon | Armorslayer+ | A | Fortify Def 3 | ||
| Support | Reposition | B | Renewal 3 | ||
| Special | Aegis | C | Spur Spd 3 | ||
| HP | ATK | SPD | DEF | RES | |
|---|---|---|---|---|---|
| 61 | 52 | 39 | 28 | 20 | |
| Weapon | Wo Dao+ | A | Life and Death 3 | ||
| Support | B | Desperation 3 | |||
| Special | Bonfire | C | Panic Ploy 3 | ||
| HP | ATK | SPD | DEF | RES | |
|---|---|---|---|---|---|
| 60 | 45 | 38 | 28 | 22 | |
| Weapon | Clarisse's Bow+ | A | Darting Blow 3 | ||
| Support | B | Poison Strike 3 | |||
| Special | Glimmer | C | Threaten Def 3 | ||
User Submitted Teams
5* Xandar
5* Nino or another G Mage with good res/speed (FRobin might work)
Azura/Ninian
4* Wryss
With some finesse, you might be able to pull this off with any decent spear user. I haven't confirmed that though. They only kill the sword users, but dance gives some "safety" against the unexpected. Similarly Nino could potentially be replaced with other G tome users as he only needs to kill the B Tome user.
Open up the wall and put Xandar on the defensive square to tank everything. With desperation he will one-shot the Green Mage and hence survive.
The blue mage will move up and there is a square that only he can hit: sit your Nino is that square to draw him away. Xandar needs to run all the way south so Wryss can heal him, as he peels off the Red Cavalry.
In round 3 Azura/Ninian kill the R Cav and the healed Zandar takes back his defensive square to tank the thief and Clarisse. Again there is one square that only the blue mage can hit, so draw the blue mage into suiciding on Nino.
Round four, draw back again, so that only the R Swordsman can follow and heal Xandar. When he follows, kill him with Azura/Ninian and Xandar can run forwards again to kill Clarisse.
Take care mopping up the thief.
Not trying to take Credit from Phoenixmaster1, Just wanted to spread the easy to obtain team to use. :) Thank you so much Phoenixmaster1
Phoenixmaster1's video:
https://www.youtube.com/watch?v=fke4zFQCA9A
Clarine has Hone Calvary and Rehabilitate, Xander is 5*'d with Vantage and Seigfried (and no good A-slot skill, though I'd recommend Attack +3 or something), Reinhardt is using his usual +Atk Death Blow build, and all you need on Olivia or any Dancer is Dance, really. I would recommend Ninian or Azura to tank a Red attack if you have one of those, though. Clarine can be substituted for Elise or Priscilla if you have them, and they don't have to be fully levelled as they will mostly be sitting around and healing while avoiding combat.
Turn 1: Arrange the team in a way that both Reinhardt and Xander can benefit from Clarine's boosts while Olivia is out of range. Keep them out of the Red sword user's vertical position since he has Panic Ploy (reversing boosts in cardinal directions). Break the wall with Reinhardt, quickly scooch Xander in and have him battle the red horse so he's in the defensive tile and plugs up the entrance, and Dance Reinhardt and put him out of harm's way. In the enemy phase, Xander will barely survive but will also whittle down the opposition so Reinhardt can finish them off.
Turn 2: Have Xander retreat to the south and have Clarine heal him so he's okay to battle if needed. It's okay to put him in the Red horse's attack range. If Clarisse is in KO range, Dire Thunder her butt with Hone'd Reinhardt, and if positioned correctly, you can take out the red swordsman as well so he stops annoying you with Panic Ploy. In the enemy phase, Olivia might be in range of the red horseman, but if she's fully levelled she'll be okay. The blue mage and the ninja will pursue, but won't hit anybody if positioned semi-correctly.
Turn 3: KO whoever is left and in range (most likely the ninja or Clarisse), heal if needed. Stay out of the Blue mage's range since you wanna take him out last. It's okay to put your Horse Healer in range of the blue mage if she has an acceptable Res stat. Put Reinhardt and Xander in position so they benefit from Hone Calvary, and get Olivia out of the way, of course. In enemy phase, the blue mage will come closer, reeling himself for the kill.
Turn 4: Chop that bitch however way you like as long as you don't accidentally mess up your kill.
Ryoma will need to bait the green cav on the bottom of the map and kill him (careful not to step in too much and bait clarisse too), the ninja will also try to hit, but doesnt matter.
Robin (with TA and raven tome) will deal clarisse a lot of damage, killing her on your turn. Use azura to keep him away from the blue mage´s reach, and the rest of the enemies wont be able to harm him.
Move nino north to kill the blue mage, while robin kills the thief.
The rest can be cleaned up by either azura, nino, or robin.


