


Map
- Normal
- Infernal
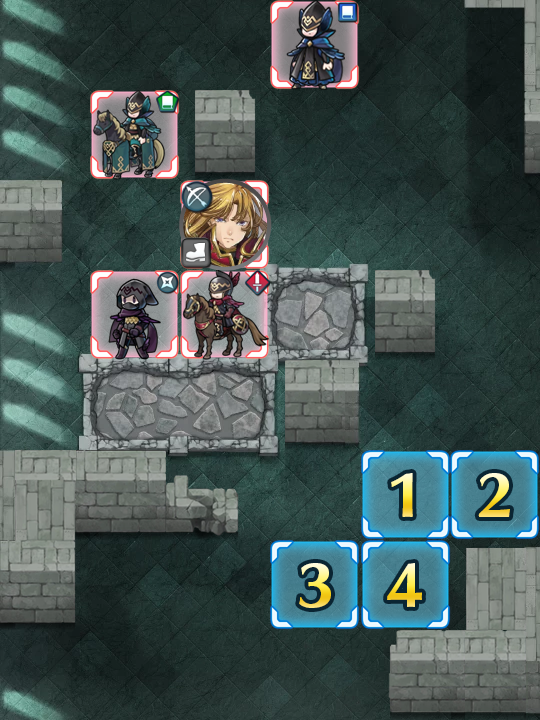
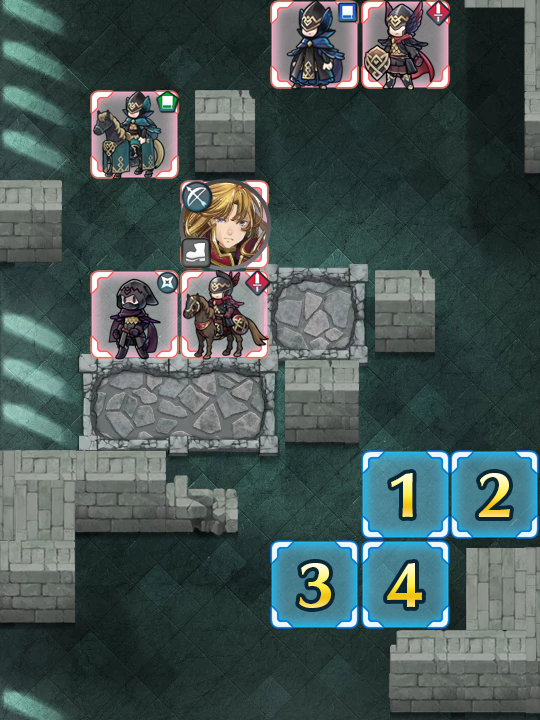
Map Enemies
- Hard
- Lunatic
- Infernal
| HP | ATK | SPD | DEF | RES | |
|---|---|---|---|---|---|
| 34 | 33 | 25 | 15 | 20 | |
| Weapon | Blárblade | A | Defiant Atk 2 | ||
| Support | B | Watersweep 2 | |||
| Special | Growing Thunder | C | Savage Blow 3 | ||
| HP | ATK | SPD | DEF | RES | |
|---|---|---|---|---|---|
| 29 | 35 | 19 | 12 | ||
| Weapon | Gronnraven | A | Triangle Adept 2 | ||
| Support | B | Quick Riposte 2 | |||
| Special | Growing Wind | C | Savage Blow 3 | ||
| HP | ATK | SPD | DEF | RES | |
|---|---|---|---|---|---|
| 33 | 26 | 30 | 10 | 25 | |
| Weapon | Smoke Dagger | A | Death Blow 2 | ||
| Support | B | Windsweep 2 | |||
| Special | Moonbow | C | Savage Blow 3 | ||
| HP | ATK | SPD | DEF | RES | |
|---|---|---|---|---|---|
| 36 | 31 | 18 | 24 | 23 | |
| Weapon | Killing Edge | A | Fortress Def 3 | ||
| Support | Reposition | B | Renewal 2 | ||
| Special | Aegis | C | Spur Spd 2 | ||
| HP | ATK | SPD | DEF | RES | |
|---|---|---|---|---|---|
| 40 | 35 | 27 | 19 | 15 | |
| Weapon | Clarisse's Bow+ | A | |||
| Support | B | Poison Strike 3 | |||
| Special | Glimmer | C | Threaten Def 3 | ||
| HP | ATK | SPD | DEF | RES | |
|---|---|---|---|---|---|
| 45 | 44 | 32 | 20 | 28 | |
| Weapon | Blárblade+ | A | Defiant Atk 3 | ||
| Support | B | Watersweep 3 | |||
| Special | Growing Thunder | C | Savage Blow 3 | ||
| HP | ATK | SPD | DEF | RES | |
|---|---|---|---|---|---|
| 40 | 47 | 26 | 17 | 35 | |
| Weapon | Gronnraven+ | A | Triangle Adept 3 | ||
| Support | B | Quick Riposte 3 | |||
| Special | Growing Wind | C | Savage Blow 3 | ||
| HP | ATK | SPD | DEF | RES | |
|---|---|---|---|---|---|
| 44 | 37 | 39 | 14 | 32 | |
| Weapon | Smoke Dagger+ | A | Death Blow 3 | ||
| Support | B | Windsweep 3 | |||
| Special | Moonbow | C | Savage Blow 3 | ||
| HP | ATK | SPD | DEF | RES | |
|---|---|---|---|---|---|
| 49 | 43 | 25 | 31 | 30 | |
| Weapon | Killing Edge+ | A | Fortress Def 3 | ||
| Support | Reposition | B | Renewal 3 | ||
| Special | Aegis | C | Spur Spd 3 | ||
| HP | ATK | SPD | DEF | RES | |
|---|---|---|---|---|---|
| 53 | 42 | 35 | 26 | 20 | |
| Weapon | Clarisse's Bow+ | A | |||
| Support | B | Poison Strike 3 | |||
| Special | Glimmer | C | Threaten Def 3 | ||
| HP | ATK | SPD | DEF | RES | |
|---|---|---|---|---|---|
| 52 | 47 | 35 | 22 | 31 | |
| Weapon | Blárblade+ | A | Defiant Atk 3 | ||
| Support | B | Watersweep 3 | |||
| Special | Growing Thunder | C | Savage Blow 3 | ||
| HP | ATK | SPD | DEF | RES | |
|---|---|---|---|---|---|
| 46 | 50 | 28 | 19 | 38 | |
| Weapon | Gronnraven+ | A | Triangle Adept 3 | ||
| Support | B | Quick Riposte 3 | |||
| Special | Growing Wind | C | Savage Blow 3 | ||
| HP | ATK | SPD | DEF | RES | |
|---|---|---|---|---|---|
| 50 | 40 | 43 | 15 | 35 | |
| Weapon | Smoke Dagger+ | A | Death Blow 3 | ||
| Support | B | Windsweep 3 | |||
| Special | Moonbow | C | Savage Blow 3 | ||
| HP | ATK | SPD | DEF | RES | |
|---|---|---|---|---|---|
| 57 | 47 | 27 | 33 | 33 | |
| Weapon | Armorslayer+ | A | Fortify Def 3 | ||
| Support | Reposition | B | Renewal 3 | ||
| Special | Aegis | C | Spur Spd 3 | ||
| HP | ATK | SPD | DEF | RES | |
|---|---|---|---|---|---|
| 61 | 52 | 39 | 28 | 20 | |
| Weapon | Wo Dao+ | A | Life and Death 3 | ||
| Support | B | Desperation 3 | |||
| Special | Bonfire | C | Panic Ploy 3 | ||
| HP | ATK | SPD | DEF | RES | |
|---|---|---|---|---|---|
| 60 | 45 | 38 | 28 | 22 | |
| Weapon | Clarisse's Bow+ | A | Darting Blow 3 | ||
| Support | B | Poison Strike 3 | |||
| Special | Glimmer | C | Threaten Def 3 | ||
User Submitted Teams
Typical horse emblem with the following skills used for specific units:
1. Priscilla gets Fortify Cavalry
2. Olwen has her Ward Cavalry
3. Camus and Xander both have Goad Cavalry.
The main purpose in this fight is to let Xander do most of the job while Priscilla, Olwen, and Camus provide the necessary buffs Xander needs to survive against all enemies. Priscilla heals, while Olwen kills injured units (if necessary). Camus' major use here is to provide safe positioning for Olwen and/or Priscilla.
The builds below are what I have, but they are not necessarily the best; replace skills/heroes as you see fit. I mainly focused on Xander taking hits, healing him with Priscilla, and moving Priscilla out of the way with Reposition from both Olwen and Cecilia. Try to keep Xander out of the blue mage's range until you can get rid of the blue mage safely. This usually involves a buffed Cecelia+Xander. Xander buffed with fortify calvary and placed on a defensive tile should be able to withstand an attack from the blue mage,, but you still need to watch out for other enemy units. When buffing, remember to keep your units out of the cardinal directions of the sword user with panic ploy. The ninja is a mage killer, but you can resolve this with Xander since the ninja's defense is low. Hope these tips help and GL!
- Xander: Siegfried, Ignis, Fury 1, Quick Riposte 2, Hone Calvary
- Olwen: Dire Thunder, Reposition, Iceberg, Warding Blow 3, Desperation 3, Fortify Calvary
- Cecilia: Gronnblade+, Reposition, Chilling Wind, Atk +2, G Tomebreaker 1, Hone Calvary
- Priscilla: Panic, Rehabilitate, Still-Water Balm, Hone Atk 2
5* Robin (M) with bow breaker, 5*Kagero LnD3 and moonbow, Ike, and 4* Lissa (any rehabilitate user).
Turn 1: robin next to breakable block, bait green mage with Ike.
Rest if fight heal with lissa as needed and take out the Thief and blue mage with kagero.
Worked on infernal.
For people who have no xander or distant counter units like me. Celica can be replaced with any red mage that can kill the green cav. Nino can be replaced with another green mage as long as they have enough res to survive the blue mage.
Robin 5* has Triangle adept 2 and QR1
Nino 5* has LnD 3 and Desparation 3
Celica 5* has LnD 2 and Renewal 2
Olivia 4* Hone atk 3
Round 1: place robin to the right of the breakble wall and nino to his bottom right. Celica and Olivia need to be moved along the bottom wall out of danger.
Round 2: Robin will be attacked by the ninja then Clarisse killing the latter. the green cav should of moved onto the defencive tile where he can be killed by Celica, who then needs to be danced to safety by Olivia. Make sure to dance Celica on the tile to the right of her and not the behind her. Move Nino next to Olivia and move Robin onto the defencive tile and attack the ninja again.
Round 3: Robin will be attacked by most units (the blue mage the only one doing damage) and will kill the ninja. This leaves the Blue mage open to Nino who will kill her with a dance from Olivia. After the blue mage is down the whole map is pretty much won as neither red unit can damage robin while on the defencive tile and can be shot down from afar by the other units.
This team setup ensures a cleanish run of the map.
Required skills:
Rein: DB3, Reposition
Frederick: Brave Axe, Hone Cavalry
Sophia: Rauorraven, Triangle Adept 3, Reposition
Sanaki: Anything is fine
Turn 1:
Sanaki breaks the barrier, Frederick gives Hone Cavalry to Reinhardt, which allows him (If he has DB3 and neutral attack) to ORKO the cavalry sword unit. Be sure to move Frederick down, that's important for later. Reinhardt OHKOs the sword cavalier, and then Sophia repositions him out of aggro range. Clarisse will attack Sophia and take heavy damage while the other units reposition.
Turn 2: Frederick moves to the bottom left of the map with Reinhardt adjacent to him. Sophia attacks and kills Clarisse. Sanaki must move out of range from the thief, but stay in range of the green cavalier. The thief will attack Sophia, and the Green Mage will attack Sanaki.
Turn 3: Sophia kills the thief. Sanaki kills the green mage. Reinhardt repositions Frederick and Frederick ORKOs the blue mage.
After that, just clean up the remaining sword user and you're golden.


