Introduction
While a vast majority of the units in the game are easiest to use with autoskill, there are a few important exceptions that should not be on auto. For example, compare Kord’s performance in the following two GIFs:

Kord on autoskill.
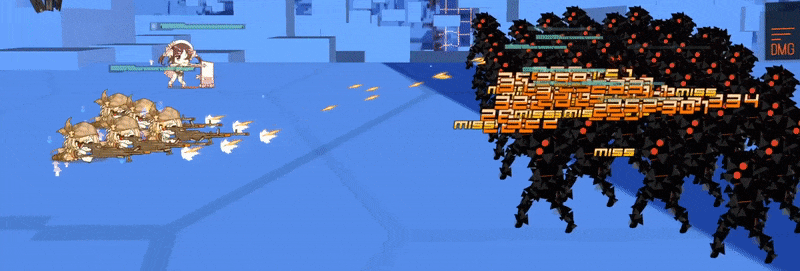
Kord on forced manual.
Hopefully, you can see the difference in the damage dealt in the first volley. Now, suppose you are using a team with a mix of dolls that want to be on autoskill and some that don’t. Obviously, it isn’t very fun to micromanage the skill activations for all the dolls that want to be autoskill. Thankfully, there is an in-game option that addresses this exact issue: the forced manual setting. This can be set for each individual unit’s active skills. We refer to turning this setting on as “setting a unit to forced manual”.
Toggle-type Skills
Most dolls with toggle-type skills are used for only one specific mode for most fights, and constantly swapping between modes prevents them from excelling at their niche.
Traditional Toggles

Passive buffs depending on mode, should generally be kept on Evasion which is default.

Passive buffs depending on mode, either as an off-tank or main tank.
Toggle between FP buff or Mov buff.
Toggle between single-target and pierce modes. The main attraction here is her ability to hit many targets at the same time for absurd DPS in pierce mode and she should generally be left in pierce mode.
This skill is not forced manual by default but should be set to this.

Toggle between backline and frontline targeting. Usually leave on backline as she’s an RF, but occasionally toggle to frontline if needed.

Toggle between Evasion and Damage mode, draining the opposite stats. Starts in Standby mode and needs to be toggled into whichever mode you want her in.
Toggle between spray and single-target mode. Defaults to spray mode and should be toggled to single-target for most fights.
Toggle between burst and sustained mode. Burst should be activated once during HG buffs and then toggled back off the moment skill cooldown is ready again.
Skill 2
Toggle between AoE and single-target modes. AoE mode is not linksplash and should be toggled to single-target unless enemies are grouped up together.
Ski Destroyer Skill 2
Toggle to swap the targeting for Skill 1. See analysis for details.

Toggle between ranged and melee mode. Executioner is best not used, if you insist on using her, leave her on ranged as she is not a tank.
Unconventional “Toggles”
Activate skill once to make her start using her extra ammo. This skill is not forced manual by default but should be set to this.
Automatically enters AR mode after expending ammo, activate skill to reload and re-enter MG mode. Should be left on auto.
Activate skill to enter AR mode buffing her stats, automatically enters MG mode after 6s. Should be left on auto.

Defaults to Evasion mode, can be toggled once to Damage mode. If you are using her for DPS she should be left on auto. Not recommended for use.

If you are using her as a tank, you will want to leave her on auto so she keeps giving herself HP Shields.
If you are using her as a weird RF you will want to leave her on force manual and not activate her Skill.
Toggle to activate and deactivate self-buffs. Should be kept on manual, see page for details.

Automatically swaps between building stacks and expending stacks for buffs. Skill activation effect changes with which mode she is in. Can be left on auto for ease of use for slightly less DPS.

Toggle between multi-hit and single-hit. Should be manually taken out of multi-hit at ~15 stacks for general use.
Skills where timing matters
Some dolls have skills that need to be activated within tight timing windows to get the most out of them. For instance, force shielders have a very short window of immunity that should be saved for when the otherwise untankable attacks come out, such as boss skills or Hydras.
Force Shielders
Standard SMG Force Shielders


Force Shield SMGs gain immunity to almost all damage for a short duration on use. This should be timed manually most of the time.

Similar to standard Force Shield SMGs, but the damage reduction fades over the duration. Should still be timed manually most of the time.
Brief moment of immunity similar to standard Force Shield SMGs, but much lower duration and very hard to use. Not recommended for use.

Brief moment of immunity similar to standard Force Shield SMGs, but much lower duration and very hard to use. Not recommended for use.
Brief moment of immunity to everyone in her effect area, hard to use but is invaluable when her niche is needed. Should be timed manually.

Massive damage reduction for backline MGs. Should be timed manually if needed, otherwise should be left on auto.

Skill 1
Immunity to damage for a short duration similar to standard Force Shield SMGs. Should generally be left on auto.
Nukes and Burst Damage
Bamboos, generic or not


High burst damage, typically against a single target. Often left on auto, but may need to be manually activated for targeting. Technically optimal to leave all bamboos on manual due to the 1st stack not activating properly if on auto. Most bamboos are not recommended for use.
Relies on amount of targets in range and may need to be delayed for desired effect.

Executes highest FP non-elite. For this to target the correct enemy, you may need to kite her to delay activation.

Anti-Armor specialist. May need to kite to avoid wasting ammo until priority target enters range.

Occasionally may want to delay skill activation for “double tapping”, see page for details. Generally best left on auto.
Other

Knockback when timed incorrectly may be detrimental or ineffective. As such, best timed manually.

Silences key targets on skill activation. May need to be delayed for desired effect.

Repositions enemies based on position. May need to be delayed for desired effect. Not recommended for use.

Deploys holograms in front of her for a short duration. May need to be delayed for desired effect. Generally best left on auto.

Deploys shields in front of allies on her column. May need to be delayed for desired effect. Generally best left on auto.

Mod specifically.
Deploys shield in front of self after taking damage. May need to be kited to delay activation.

Stuns enemies once each based on stacks applied by autos. May need to be delayed for desired effect. Generally best left on auto.

Can be paired with M26-MASS for temporary immunity similar to Force Shield SMGs. This should be timed manually most of the time.
Skill 1 Delay
As Alchemist’s Skill 1 can crit and activates before Skill 2, for hard content, you may want to delay Skill 1 until Skill 2 activates. Generally best left on auto for easier content.

HP Shield cleanse is tied to Skill activation, as such it should be timed for when the cleanse would be most effective.
Skills where activation order matters
There are a few dolls that have particular activation conditions or effects that require skills to be activated in a particular order.

Mod specifically.
Cannon mode requires 3 or less units on the field. As such, delaying her activation until HGs activate skills and retreat is needed for full effect. Best left on manual in exodia comps, auto in normal ARSMG.
Can provide CDR for echelon leader, but requires the skill to be on cooldown for best effect. As such, when used in exodia comps, should be activated manually after the leader’s skill. Otherwise best left on auto.
Makes all others’ skills available for use on activation. As such, should be activated manually when this is desired. Not recommended for general use.

Copies current MVP’s stats and reapplies them after a delay. As such, timing this with when the MVP’s buffs will run out is needed for maximum effect. Not recommended for use.
Others
These dolls don’t fall into the other categories, but there may be cases where they are best used on forced manual.
Massive buffs based on stacks. Optimal time of activation changes with use cases. See page for details.
Taunting Enemies


Forces all allies to attack a specific target. Occasionally useful but can be detrimental for general use.
Forces all allies to attack the echelon leader’s target. Too short duration to matter much.
Either provides small buffs while charging or is an MG without skills. Not recommended for use.
Self-Saboteurs
These units actively hinder their own DPS or survivability when their skills are used incorrectly.

Mod specifically.
Gepard’s Skill 2 only grants her the massive Damage buff while Skill 1 is off cooldown. As such, Skill 1 should generally not be used.
Brings the echelon’s Mov to 0, preventing kiting. Not recommended for use.
Causes massive damage to own echelon. Not recommended for use.
Mod specifically.
KSVK’s Skill 1 is best left on manual and unused unless Skill Level 10, in which case it doesn’t matter. Not recommended for use.
May occasionally kill one of her own dummies. Recommended to pay attention when using her, so that fights can be reset if this occurs.
Hitbox jank makes her susceptible to AoEs where her mainframe jumps to. Not recommended for use.
Switching modes has a very long animation, during which she cannot attack. Not recommended for use.

Skill 1s
AoE skills with too few targets delay auto attacks too much, lowering DPS. As such, turning off autoskill when there are only a few targets left may be desirable.
Mosasaur’s Skill 2 may pull unwanted enemies into range, such as Hydras or Snytos, which may cause instant death. As such, you may want to turn off autoskill for some fights.