


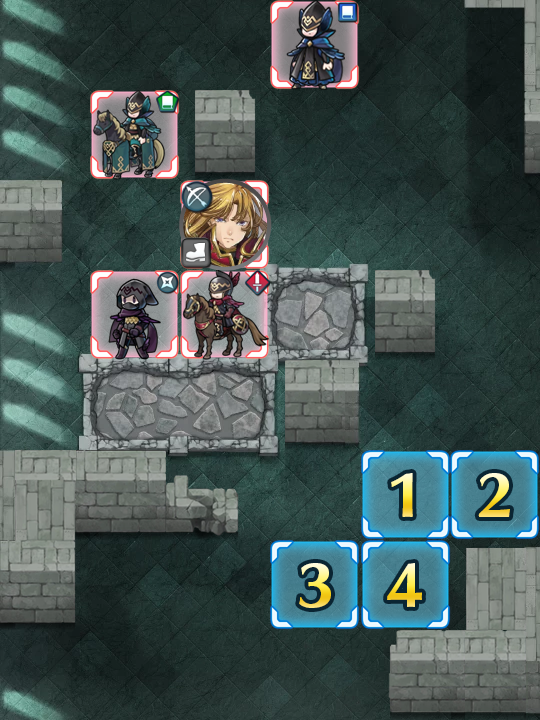
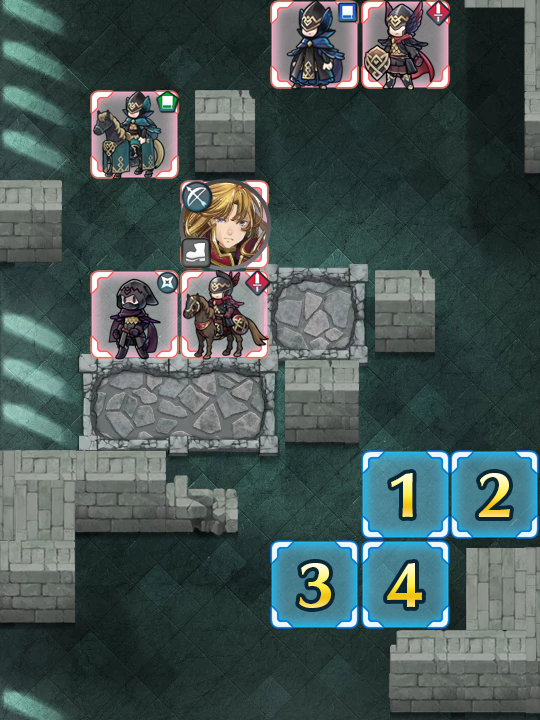
Map
- Normal
- Infernal
Map Enemies
- Hard
- Lunatic
- Infernal
| HP | ATK | SPD | DEF | RES | |
|---|---|---|---|---|---|
| 34 | 33 | 25 | 15 | 20 | |
| Weapon | Blárblade | A | Defiant Atk 2 | ||
| Support | B | Watersweep 2 | |||
| Special | Growing Thunder | C | Savage Blow 3 | ||
| HP | ATK | SPD | DEF | RES | |
|---|---|---|---|---|---|
| 29 | 35 | 19 | 12 | ||
| Weapon | Gronnraven | A | Triangle Adept 2 | ||
| Support | B | Quick Riposte 2 | |||
| Special | Growing Wind | C | Savage Blow 3 | ||
| HP | ATK | SPD | DEF | RES | |
|---|---|---|---|---|---|
| 33 | 26 | 30 | 10 | 25 | |
| Weapon | Smoke Dagger | A | Death Blow 2 | ||
| Support | B | Windsweep 2 | |||
| Special | Moonbow | C | Savage Blow 3 | ||
| HP | ATK | SPD | DEF | RES | |
|---|---|---|---|---|---|
| 36 | 31 | 18 | 24 | 23 | |
| Weapon | Killing Edge | A | Fortress Def 3 | ||
| Support | Reposition | B | Renewal 2 | ||
| Special | Aegis | C | Spur Spd 2 | ||
| HP | ATK | SPD | DEF | RES | |
|---|---|---|---|---|---|
| 40 | 35 | 27 | 19 | 15 | |
| Weapon | Clarisse's Bow+ | A | |||
| Support | B | Poison Strike 3 | |||
| Special | Glimmer | C | Threaten Def 3 | ||
| HP | ATK | SPD | DEF | RES | |
|---|---|---|---|---|---|
| 45 | 44 | 32 | 20 | 28 | |
| Weapon | Blárblade+ | A | Defiant Atk 3 | ||
| Support | B | Watersweep 3 | |||
| Special | Growing Thunder | C | Savage Blow 3 | ||
| HP | ATK | SPD | DEF | RES | |
|---|---|---|---|---|---|
| 40 | 47 | 26 | 17 | 35 | |
| Weapon | Gronnraven+ | A | Triangle Adept 3 | ||
| Support | B | Quick Riposte 3 | |||
| Special | Growing Wind | C | Savage Blow 3 | ||
| HP | ATK | SPD | DEF | RES | |
|---|---|---|---|---|---|
| 44 | 37 | 39 | 14 | 32 | |
| Weapon | Smoke Dagger+ | A | Death Blow 3 | ||
| Support | B | Windsweep 3 | |||
| Special | Moonbow | C | Savage Blow 3 | ||
| HP | ATK | SPD | DEF | RES | |
|---|---|---|---|---|---|
| 49 | 43 | 25 | 31 | 30 | |
| Weapon | Killing Edge+ | A | Fortress Def 3 | ||
| Support | Reposition | B | Renewal 3 | ||
| Special | Aegis | C | Spur Spd 3 | ||
| HP | ATK | SPD | DEF | RES | |
|---|---|---|---|---|---|
| 53 | 42 | 35 | 26 | 20 | |
| Weapon | Clarisse's Bow+ | A | |||
| Support | B | Poison Strike 3 | |||
| Special | Glimmer | C | Threaten Def 3 | ||
| HP | ATK | SPD | DEF | RES | |
|---|---|---|---|---|---|
| 52 | 47 | 35 | 22 | 31 | |
| Weapon | Blárblade+ | A | Defiant Atk 3 | ||
| Support | B | Watersweep 3 | |||
| Special | Growing Thunder | C | Savage Blow 3 | ||
| HP | ATK | SPD | DEF | RES | |
|---|---|---|---|---|---|
| 46 | 50 | 28 | 19 | 38 | |
| Weapon | Gronnraven+ | A | Triangle Adept 3 | ||
| Support | B | Quick Riposte 3 | |||
| Special | Growing Wind | C | Savage Blow 3 | ||
| HP | ATK | SPD | DEF | RES | |
|---|---|---|---|---|---|
| 50 | 40 | 43 | 15 | 35 | |
| Weapon | Smoke Dagger+ | A | Death Blow 3 | ||
| Support | B | Windsweep 3 | |||
| Special | Moonbow | C | Savage Blow 3 | ||
| HP | ATK | SPD | DEF | RES | |
|---|---|---|---|---|---|
| 57 | 47 | 27 | 33 | 33 | |
| Weapon | Armorslayer+ | A | Fortify Def 3 | ||
| Support | Reposition | B | Renewal 3 | ||
| Special | Aegis | C | Spur Spd 3 | ||
| HP | ATK | SPD | DEF | RES | |
|---|---|---|---|---|---|
| 61 | 52 | 39 | 28 | 20 | |
| Weapon | Wo Dao+ | A | Life and Death 3 | ||
| Support | B | Desperation 3 | |||
| Special | Bonfire | C | Panic Ploy 3 | ||
| HP | ATK | SPD | DEF | RES | |
|---|---|---|---|---|---|
| 60 | 45 | 38 | 28 | 22 | |
| Weapon | Clarisse's Bow+ | A | Darting Blow 3 | ||
| Support | B | Poison Strike 3 | |||
| Special | Glimmer | C | Threaten Def 3 | ||
User Submitted Teams
Funnel of death for Infernal
https://youtu.be/GW5V26UgyKs
Just look the video, don't like my voice or accent just cut the audio.
5* team w/ reposition:
X: Fury3,Renewal2,H.Cav. Ignis
A: Spd3,WINGS OF MERCY,F.Res. S.Lance(luna optional)
C: Grani's, Vantage2, G.Cav.
R:TA, vantage3, G.Cav, moonbow
X baits on the left, gets C/R near but out of ranges. and dance around.
The healer can be anyone, *as long as* the heal skill is set to Physic, although Sakura's Fortify Def 3 does help. If seals are available, equip Azura with Fortify Res and Black Knight with Fortify Def or HP +3. If Ally Support is available, get support between Azura and Lyn. (These two are OP outside the Clarisse maps too. So it's worthwhile.)
Use Black Knight to tank everyone on the tile below (and subsequently on) the broken wall. Remember to park Azura and Lyn away from the impact of the Savage Blow (and all the debuffs). Lyn will help out sniping off units. Azura will help tank the blue mage. *THIS IS IMPORTANT* Remember to park Azura near (but out of range) of the blue mage, so that instead of squeezing into a tile to attack Black Knight, he comes to Azura. With the help of the healer, Azura should be able to tank two hits from the blue mage (if not, definitely able to with Ally Support). This should give enough time for Black Knight and Lyn to clear the map.


