


Map
- Normal
- Infernal
Bound Hero Battle: Ephraim & Eirika
Team Compositions
When facing Eirika and Ephraim Bond Battle Infernal, many team compositions employing several plans exist. This demonstration involves one of the more easily-attainable setups.
- Unit 1 - Dancer/Singer (Recommended Level: 1+)
Any level Dancer/Singer of any type will do. They will not enter combat at all.
- Unit 2 - Dancer/Singer (Recommended Level: 40+)
Any Dancer/Singer of any type will suffice, but they will need to take one exchange from the Sword Cavalier. This will not be an issue for Ninian or Azura, but Olivia should have a minimum speed of 29 and a combined sum for HP and DEF of 58.
- Unit 3 - Repositioner or Dancer/Singer (Recommended Level: 1+)
They will not engage in combat. Repositioner has the benefit of being able to be danced and reposition if something goes awry, but if you follow this guide, you should be fine. If your "Unit 4" needs a Hone Atk boost, this unit needs to be the one that does it.
- Unit 4 - Brave Bow Archer (Recommended Level: 40+)
Any archer with Brave Bow will suffice (Niles may not reach minimum ATK strength). In combat, the archer needs to reach 48 ATK no special, 45 ATK with Moonbow, or 43 ATK with Luna + Quickened Pulse.
- Brave Bow - 4 Mt
- Brave Bow+ - 7 Mt
Neutral ATK Archers:
- Bridal Cordelia - 35 ATK
- Leon - 34 ATK
- Innes - 33 ATK
- Lyn - Brave Lady: 33 ATK
- Jeorge - 32 ATK
- Takumi - 32 ATK
- Clarisse - 31 ATK
- Gordin - 31 ATK
- Klein - 31 ATK
- Virion - 31 ATK
Useful A Passives
- Death Blow 3 - +6 ATK (Skill Inheritance from Klein, Effie, Ursula)
- Life and Death 3 - +5 ATK (Skill Inheritance from Hana, Jaffar, Minerva, Zephiel)
- Swift Sparrow 2 - +4 ATK (Skill Inheritance from Spring Lucina, Katarina, Lyn - Brave Lady)
- Attack +3 - +3 ATK (Skill Inheritance from Cherche, Gordin, Tobin)
Many other useful A Passives exist such as: Sturdy Blow, Fury, Mirror Strike, etc.
Useful Seals:
Summoner Support:
- Provides up to an extra +2 ATK.
In Action:
For example, if we use a neutral 5* Gordin, we will have his 31 ATK plus his native Brave Bow+ Mt for an extra 7 ATK. Placing him at 38 ATK. If we use a Hone Atk 3 Repositioner, this will place him at 42 ATK in combat. Tack on the ATK seal, and he will be at 43 ATK. Because we are already using an Attack +1 seal, we will need to attain 2 more ATK + Moonbow special or 5 more ATK with no regards for the special. This can be easily fulfilled with the A passives described above. If we attain Summoner Support S and Atk + 3 on him, he no longer needs to worry about a special activation. A stronger archer allows for more breathing room in terms of ATK strength.
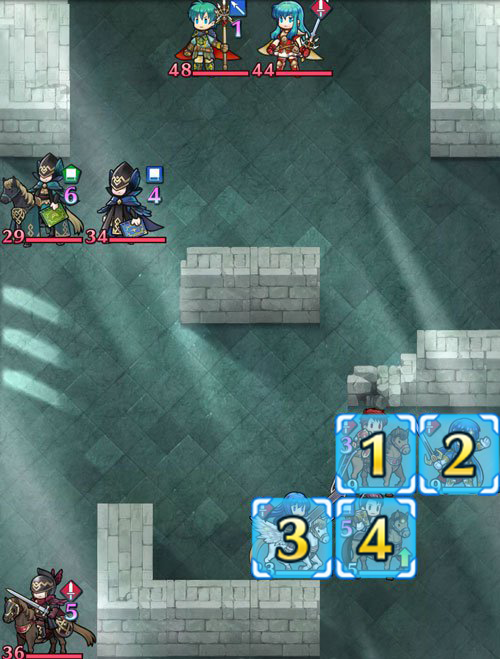
Turn 1:
- Position Unit 1, 2 and 4 on the edge of the enemy attack range.
- Unit 2 should be in the southern edge block.
- Place Unit 3 next to Unit 4.
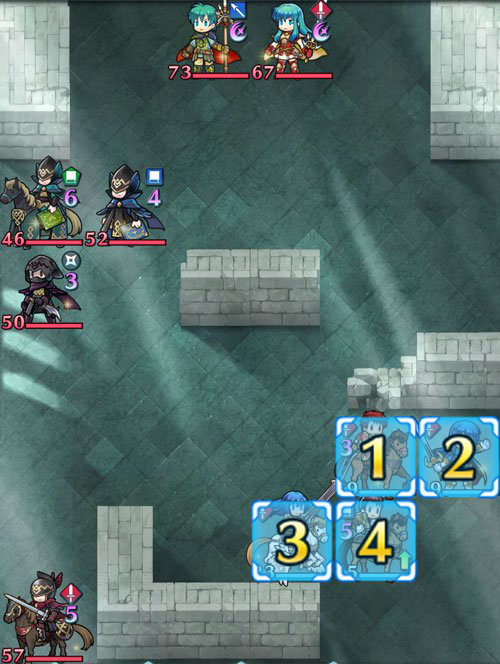
Turn 2:
- Reposition Unit 4 towards the group of three enemies.
- Use Unit 4 to kill Thief first.
- Move Unit 2 inside the Red Cavalry's attack range and dance Unit 4.
- Use Unit 4 to kill Blue Tome enemy.
- Move Unit 1 to Unit 4 and dance him once more.
- Move Unit 4 up and attack the Green Cavalry.
- Final setting: Unit 1, 3, 4 outside of enemy attack range.
- Unit 2 inside of Red Cavalry's attack range.
Turn 3:
- Can vary. If Unit 3 can finish off Red Cavalry, proceed to do so and then use Unit 4 to kill Eirika and retreat from Ephraim.
- Otherwise, use Unit 4 to kill Red Cavalry and safely retreat from Eirika and Ephraim.
Turn 4:
- If Eirika is alive, kill her with Unit 4 (and dancer do-overs) and retreat from Ephraim.
- Otherwise, kill Ephraim and run is over.
Turn 5:
- If you could not kill both Eirika and the Red Cavalry on the same turn, then this turn is needed for defeating Ephraim.
Final Notes: Congrats, you have bested Infernal Bond Battle Eirika and Ephraim!
Example Playthrough
Map Enemies
- Hard
- Lunatic
- Infernal
| HP | ATK | SPD | DEF | RES | |
|---|---|---|---|---|---|
| 29 | 37 | 19 | 12 | 27 | |
| Weapon | Gronnblade | A | Defiant Atk 2 | ||
| Support | Rally Atk/Spd | B | Vantage 3 | ||
| Special | Miracle | C | Drive Atk 1 | ||
| HP | ATK | SPD | DEF | RES | |
|---|---|---|---|---|---|
| 36 | 38 | 18 | 19 | 23 | |
| Weapon | Silver Sword | A | Darting Blow 3 | ||
| Support | Rally Atk/Spd | B | Lunge | ||
| Special | Growing Flame | C | Hone Atk 2 | ||
| HP | ATK | SPD | DEF | RES | |
|---|---|---|---|---|---|
| 34 | 33 | 25 | 15 | 20 | |
| Weapon | Blárblade | A | Warding Blow 2 | ||
| Support | Rally Atk/Spd | B | Guard 2 | ||
| Special | Luna | C | Atk Smoke 3 | ||
| HP | ATK | SPD | DEF | RES | |
|---|---|---|---|---|---|
| 48 | 47 | 22 | 28 | 18 | |
| Weapon | Siegmund | A | Fury 3 | ||
| Support | B | Seal Def 3 | |||
| Special | Moonbow | C | Threaten Def 3 | ||
| HP | ATK | SPD | DEF | RES | |
|---|---|---|---|---|---|
| 44 | 37 | 28 | 20 | 20 | |
| Weapon | Sieglinde | A | Armored Blow 3 | ||
| Support | Pivot | B | Drag Back | ||
| Special | C | Hone Spd 3 | |||
| HP | ATK | SPD | DEF | RES | |
|---|---|---|---|---|---|
| 40 | 49 | 26 | 17 | 35 | |
| Weapon | Gronnblade+ | A | Defiant Atk 3 | ||
| Support | Rally Atk/Spd | B | Vantage 3 | ||
| Special | Miracle | C | Drive Atk 2 | ||
| HP | ATK | SPD | DEF | RES | |
|---|---|---|---|---|---|
| 49 | 50 | 25 | 26 | 30 | |
| Weapon | Silver Sword+ | A | Darting Blow 3 | ||
| Support | Rally Atk/Spd | B | Lunge | ||
| Special | Growing Flame | C | Hone Atk 3 | ||
| HP | ATK | SPD | DEF | RES | |
|---|---|---|---|---|---|
| 45 | 44 | 32 | 20 | 28 | |
| Weapon | Blárblade+ | A | Warding Blow 3 | ||
| Support | Rally Atk/Spd | B | Guard 3 | ||
| Special | Luna | C | Atk Smoke 3 | ||
| HP | ATK | SPD | DEF | RES | |
|---|---|---|---|---|---|
| 64 | 55 | 29 | 35 | 23 | |
| Weapon | Siegmund | A | Fury 3 | ||
| Support | B | Seal Def 3 | |||
| Special | Moonbow | C | Threaten Def 3 | ||
| HP | ATK | SPD | DEF | RES | |
|---|---|---|---|---|---|
| 58 | 43 | 36 | 27 | 28 | |
| Weapon | Sieglinde | A | Armored Blow 3 | ||
| Support | Pivot | B | Drag Back | ||
| Special | C | Hone Spd 3 | |||
| HP | ATK | SPD | DEF | RES | |
|---|---|---|---|---|---|
| 46 | 52 | 28 | 19 | 38 | |
| Weapon | Gronnblade+ | A | Defiant Atk 3 | ||
| Support | Rally Atk/Spd | B | Vantage 3 | ||
| Special | Miracle | C | Drive Atk 2 | ||
| HP | ATK | SPD | DEF | RES | |
|---|---|---|---|---|---|
| 57 | 53 | 27 | 28 | 33 | |
| Weapon | Silver Sword+ | A | Darting Blow 3 | ||
| Support | Rally Atk/Spd | B | Lunge | ||
| Special | Growing Flame | C | Hone Atk 3 | ||
| HP | ATK | SPD | DEF | RES | |
|---|---|---|---|---|---|
| 52 | 47 | 35 | 22 | 31 | |
| Weapon | Blárblade+ | A | Warding Blow 3 | ||
| Support | Rally Atk/Spd | B | Guard 3 | ||
| Special | Luna | C | Atk Smoke 3 | ||
| HP | ATK | SPD | DEF | RES | |
|---|---|---|---|---|---|
| 50 | 38 | 43 | 15 | 35 | |
| Weapon | Rogue Dagger+ | A | Armored Blow 3 | ||
| Support | Rally Atk/Spd | B | Poison Strike 3 | ||
| Special | Iceberg | C | Panic Ploy 3 | ||
| HP | ATK | SPD | DEF | RES | |
|---|---|---|---|---|---|
| 73 | 58 | 31 | 38 | 25 | |
| Weapon | Siegmund | A | Fury 3 | ||
| Support | Pivot | B | Obstruct 3 | ||
| Special | Moonbow | C | Threaten Def 3 | ||
| HP | ATK | SPD | DEF | RES | |
|---|---|---|---|---|---|
| 67 | 45 | 39 | 29 | 31 | |
| Weapon | Sieglinde | A | Armored Blow 3 | ||
| Support | Pivot | B | Drag Back | ||
| Special | Moonbow | C | Hone Spd 3 | ||
User Submitted Teams
Nino can tank both mages and kill them with a fortify res buff if she doesnt have -hp IV. After that, the job is easy to deal with
Build:
Robin:
Weapon: Gronnwolf+
A: Fury 3
B: B Tomebreaker 3
C: Fortify Res 3
Support: Draw Back (Required)
Special: Bonfire
Seal: Atk +1 (Required)
Cordelia: (Must be neutral attack) (+Def -Hp)
Weapon: Brave Lance+
A: L&D 2 (Required)
B: Drag Back ( Hit and Run works)
C: None
Support: Reposition
Special: Galeforce (Required)
Seal: Quickened Pulse (Required)
Klein: (+Spd -Res)
Weapon: Brave Bow+
A: Death Blow 3
B: Quick Riposte 3
C: Hone Spd 3
Support: Draw Back
Special: Luna
Seal: Hardy Bearing
Olivia: Neutral (I did have Ruby Sword equipped though)
Introduction:
Due to the overwhelming amount of units with inflated stats, leaving them alive to encroach isn't a good idea. We have two brave users to handle the units' pitiful defenses, and Robin pulls her weight along the way.
Step 1:
So you'll want to start out by positioning your units accordingly. Robin will occupy the danger area above the breakable tile. Cordelia will position herself right beside the wall on the left. Klein will position himself right beside Cordelia, and Olivia will position herself right above Klein.
Step 2:
Green Cavalier should attack Robin. Blue Cavalier should have moved beside Green. Ephraim and Eirika should be directly in front of Robin. Red Cavalier should be in range of Cordelia, and Thief should be close by Cavalier.
Step 3:
What you want to do is get Robin the hell out of there. Move down two spaces, if Olivia is where she should be, use Draw Back on her and get Robin out of range of Ephraim. Kill Green Cavalier with Klein, dance on him, then kill Blue Cavalier. This next step is essential. Cordelia should be neutral attack, no merge should give her even 1 attack, and she should have L&D 2. If you meet these requirements, Cordelia should get a Galeforce proc after single combat with Red Cavalier. Olivia should still be in the position she started in, and thus after killing the Red Cavalier, Cordelia shouldn't move from Drag Back. Move in and kill Thief.
Step 4:
Ephraim and Eirika move in. Robin should be at 1 with her Special. Move down two to get in range to attack Ephraim. Shortly after that, dance on her (make sure not to be in Eirika's range) and move towards Cordelia and Klein before attacking again. attack with a Bonfire proc, and Ephraim should be dead. Reposition Robin out of there.
Step 5: Eirika moves in. Brave bow her, then kill with Cordelia.
Notes: Dancer is required. Enemy may move differently depending on who you use though. I attempted to use another green mage, but the Red Cavalier would run straight up to attack said mage. He moves towards the others instead because of Robin having the Gronnwolf tome. If you can kill the Red Cavalier, get a Galeforce proc and live, as well as kill Eirika, any Brave Galeforce user can take Cordelia's job. Enemy may move differently though. Finally any Brave bow user can work.
Simply: Lyn to the rescue, Eldigan not short behind!
Neutral Brave Lyn needs Brave Bow or Brave Bow+, and HP seal.
Eldigan mostly for Hone Cavalry, but if you dont have Brave Bow+ he will need to do some cleaning (can be repalced by any red riders with 50+ atk or any blue rider, as long as it has hone cavalry)
2x Dancer/Singer, any. But if you have only Brave Bow on Lyn (like me, coz im not big fan of that build) you need spur atk on one of them.
Gameplay:
Just destroy the wall with Lyn(from spot closest to noname enemies) in first turn and place one of dancers there. Put cavalier next to Lyn and second dancer so she will be able to Dance/Sing Lyn, after Lyn jumps on the thief.
In next turn just go and kill thief, then dance Lyn with the one of the dancers (the one with spur if you dont have BB+) and melt blue mage, then dance her again and melt green mage. Let red cavalier hit you, and kill him in next turn as payback.
Then just sweep the rest, if you have BB+ there is no trick to it, if not you need to fall back (i got separated from one of my dancers, pivot!) and then in next turn severely injure Eirika, dance Lyn and injure Ephraim, then finish Ephraim with your second rider, dance him with second dancer and finish off Eirika.
Start by killing dagger with Lyn (brave bow), then sing for her, and use her to reposition Azura out of danger (previously broke the wall so Azura can go there). Julia swaps with Lyn and on enemy turn kills blue mage (Julia is my summoner support, which might be necessary for the ko depending on ivs). Next turn Camus kills the red cavalry, other units pull him out of danger, and Julia goes in range of green mage. Next turn Camus finishes off green mage. Azura kills Eirika (Swordbreaker on Azura so she doubles). Julia attacks Ephraim to weaken him, and Lyn finishes him off.
My team specifics. No Ally or Summoner supports:
Xander - Neutral.
Attack+3, QR2, Hone Cavalry.
Siegfried, Reposition, Bonfire
Brave Lyn - Neutral
Swift Sparrow 2, Sacae's Blessing, Atk Smoke 3
Mulagir, Reposition, Draconia Aura
Ephraim. 5*+1. +Atk/-Def
Siegmund, Reposition, Moonbow
Defense+3, QR3, Hone Speed
Nino 5*+1. +Spd/-HP
Gronnblade+. Draw back, Moonbow.
Fury 3, Desperation 3, Hone Atk 3
================Turn 1================
Player phase:
Move everyone so that:
-Lyn is up one, right two from the red cav.
-Xander is to her right
-Nino is above Xander
-Ephraim is to the right of Nino. Have Ephraim break the block
Enemy phase: No movement
================Turn 2================
Player phase
-Honed cav Lyn takes out the blue mage
-Move Xander to Lyn's right and have him reposition Lyn so that she's above Nino.
-Have Nino draw back Lyn.
-Xander should be in the range of the thief and green mage. Everyone else is safe
End turn.
Enemy phase:
-Red cav should move up to rally the thief.
-Thief should hit xander for 0 dmg and die.
-Green mage will hit xander and die.
-Eirika moves diagonally down right.
-Enemy!Ephraim moves diagonally down left.
================Turn 3================
Player Phase
-Move Ephraim up one spot so that he's in Eirika's range.
-Move Nino under Ephraim for buffs.
-Move Lyn over two to attack the red cav.
-Move Xander to hit/KO the red cav from Lyn's left (/from below the red cav). Make sure Xander is not in enemy!Ephraim's range.
Enemy phase:
-Eirika will attack Ephraim and die.
-Enemy!Ephraim moves closer
================Turn 4================
Player Phase
-Have Lyn Reposition Nino so that Nino is closer to enemy!Ephraim.
-Nino attacks and KOs enemy!Ephraim.
-You win


