


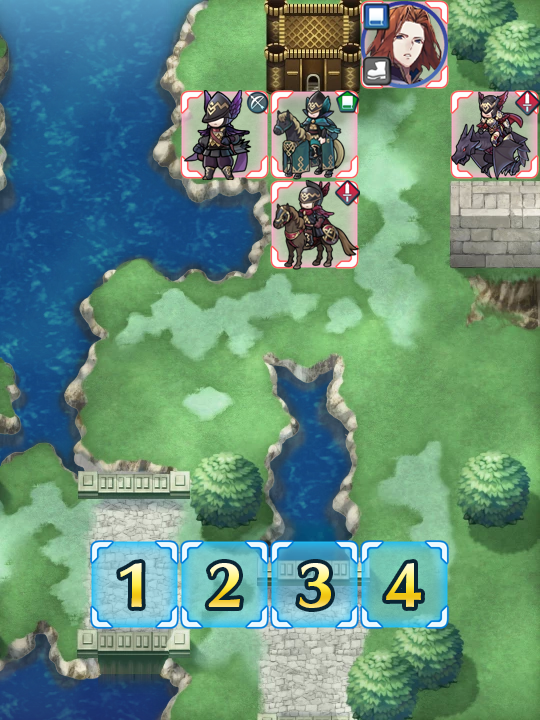
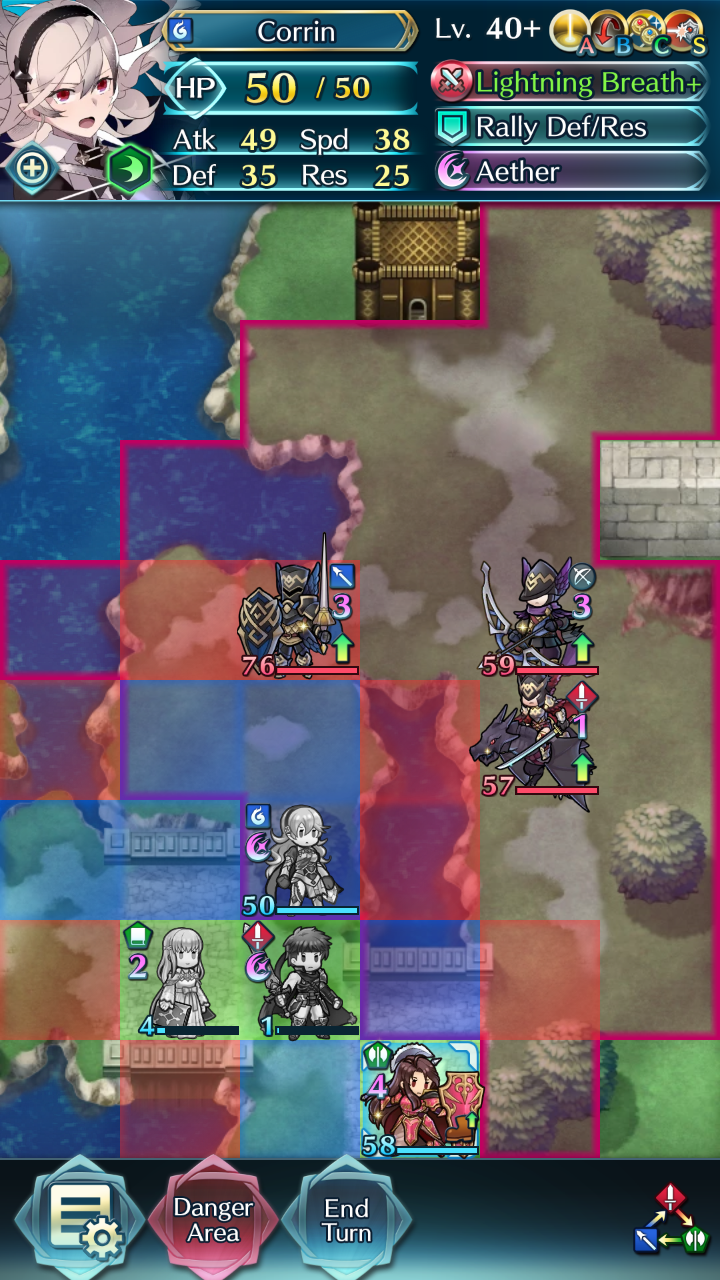
Map
- Normal
- Infernal

Saias: Bishop of Flame
Saias's Grand Hero Battle is challenging and will keep you on your toes. While the lower difficulties aren't as tricky, Infernal has many traps designed to catch out an unwary player: Pass and Wings of Mercy can stop an otherwise successful run, Chill skills weaken your frontline, and Saias himself comes with powerful Ploy skills and a pre-charged Glacies. Mastery and understand of positioning and buffs is key to victory on this map.
This is the first new Grand Hero Battle to be introduced at 0 Stamina cost. Meaning, all players are free to experiment and find strategies that work for them! There's no penalty for failing, so even if the battle can't be beaten just yet, you can experiment until something worthy is found.
Before you begin teambuilding, it’s completely possible you already possess everything you need to beat this map. Created by Gamepress staff member RedFerrari1998, the video guide below uses only F2P units -- see the description for more details. If it doesn’t work for you, though, then read on!
Who to Choose
Baiters
The map this time around does not grant much freedom, and with multiple Cavalry foes, taking hits is the best strategy, particularly at higher difficulties. You will need units who can tank both physical and magical damage, and even some who can tank both. The long movement range of the Green Cavalier will mean at least one baiter will be required. Saias and the Green Cavalier both deal extremely high damage with their attacks, and tanking hits from them is not easy.
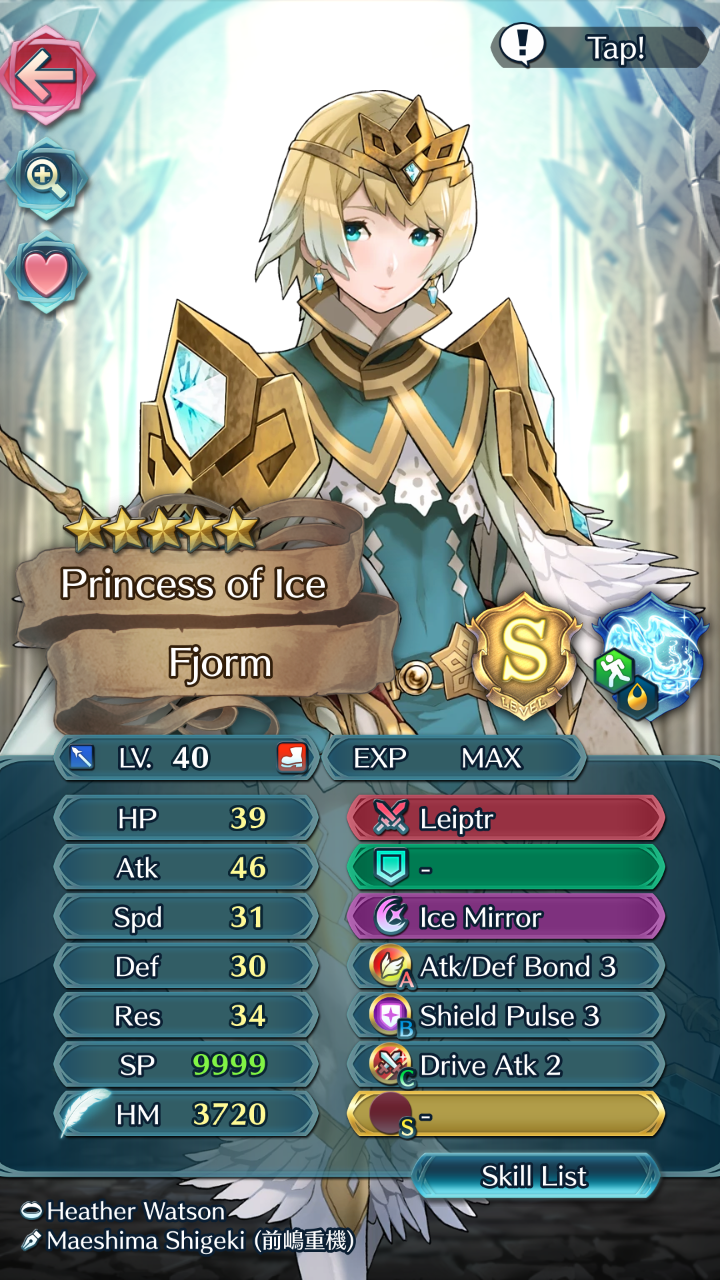
Dragons are good as always, their strong mixed defenses and refined breath weapons make them stellar candidates. Young Tiki has great Res, and can tank the Green Cavalier and the Sword Cavalier. Vanguard Ike is a great F2P option, especially on the lower difficulties. However, he will need significant (+6 Defense and Resistance) buffs to survive on Infernal. Fjorm is an amazing choice, as with her Ice Mirror and a little support, she can survive the heavy hits dealt by Saias and the Green Cavalier. Other great baiters include Julia, Deirdre, Sheena and Winter Lissa.
Skills like Warding Breath, Steady Breath, Distant Counter, Distant Defense and Quick Riposte are all great for your baiter.
Baiters are the best choice for another reason: Panic Ploy. Using Panic Ploy can make it easy to survive the Green Cavalier, and since it comes on a Sacred Seal, it can be given to anyone with enough HP. Arden is a great unit who can activate Panic Ploy on both Saias and the Green Cavalier with Panic Ploy. On Infernal, the Green Cavalier has 45 HP.
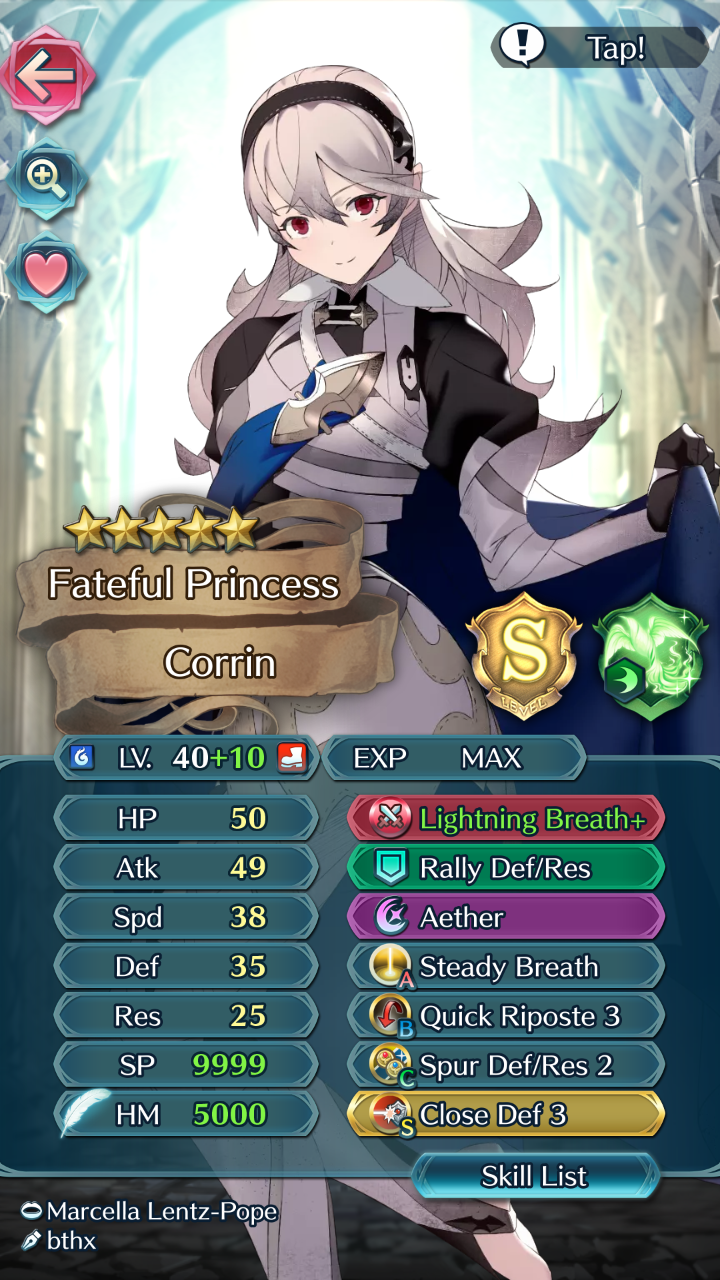
Saias and the Cavaliers will often be the first to move down, but once they are defeated, the final three units must be KO'd. A Blue unit with Distant Counter and/or Steady Breath is the best choice of unit, and with a healing special they can potentially beat all three units by themselves. Corrin(F) and Nowi are two amazing choices of unit, but Fallen Hardin, Effie, Valentine's Eliwood or Winter Robin can perform the feat as well. Many of these units also have enough HP to make use of Panic Ploy on the Green Cavalier. A high-defense blue unit is best, as the final three units attack with physical damage and blue will be neutral or better against all of them.
Finally, it is highly recommended to have Harsh Command on a unit within your team. The Green Cavalier has Chill Res, which targets the unit on your team with the highest Resistance. Harsh Command turns what would be a -7 debuff into a +7 buff, which makes a massive difference. It can also be used to flip the effects of Saias's Ploy skills. Harsh Command is available on Gunter at three stars. Reversing the Resistance debuff can make it much easier to tank Saias and the Green Cavalier.
Strikers
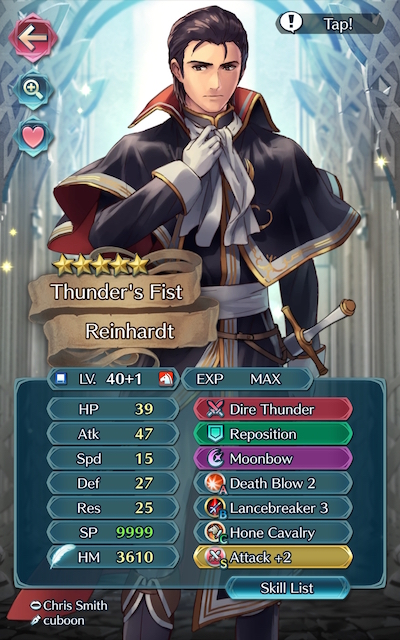
Strikers are difficult to use due to the layout of the map, but can come in handy during the middle and later parts of the battle. Magic beats Physical here as most of the units have low Resistance. Reinhardt and to a lesser extent Olwen are both great for KO'ing the Lance Armor, Sword Wyvern and Bow Fighter as all three have poor Resistance. Dire Thunder is also the only magical weapon that can effectively hit through the Lance Armor's Wary Fighter, but a good tank with Quick Riposte can achieve the same feat.
Those looking to take down Saias without tanking his Glacies will want to look at a strong physical attacker. Cherche is a great choice, boasting freedom of movement and enough firepower to down the Bishop of Flame. However, she will need positioning support to retreat after the KO.
Healers
With an emphasis on baiters, Healers are a great choice of unit for this Grand Hero Battle. Tanking the huge hits from Saias and the Green Cavalier will likely require a source of healing if the same unit is to do both. Of course, any healer will work: but the best choice of healing ability here is Rehabilitate. Wrys is a free unit who naturally learns Rehabilitate and works well during this battle. Star rarity and skills don't matter as long as they have Rehabilitate.
Strategy
While it’s difficult to exactly predict what will happen on this map due to the stat variance of your units, here’s some general tips to get you started.
First Steps
A quick look at the map shows two main halves divided by a body of water. Going right means walking into Saias's Ploy skills. A good strategy is to split the enemies onto different sides: this makes it easier to deal with them, and also makes it harder for them to take advantage of their Tactic skills. The three main members of this team are Ike, Corrin and Julia. Ike's job is to start things off by luring the Cavaliers to the left side, Julia's job is to take out Saias, and Corrin's job is to handle the remaining three low-resistance enemies (all Sheena does is use Harsh Command).
The enemies on this map won't move until one of your units moves within their attack range or initiates combat with them. To get started, you'll have to lure them in to fight. The Cavaliers have nearly exactly the same threat range, so you'll have to tank both at the same time. This is where it comes in handy to have Vanguard Ike, Young Tiki, or another strong red baiter. It's best to do this on the left-hand side of the map as it means the baiter can avoid being Ploy'd by Saias.
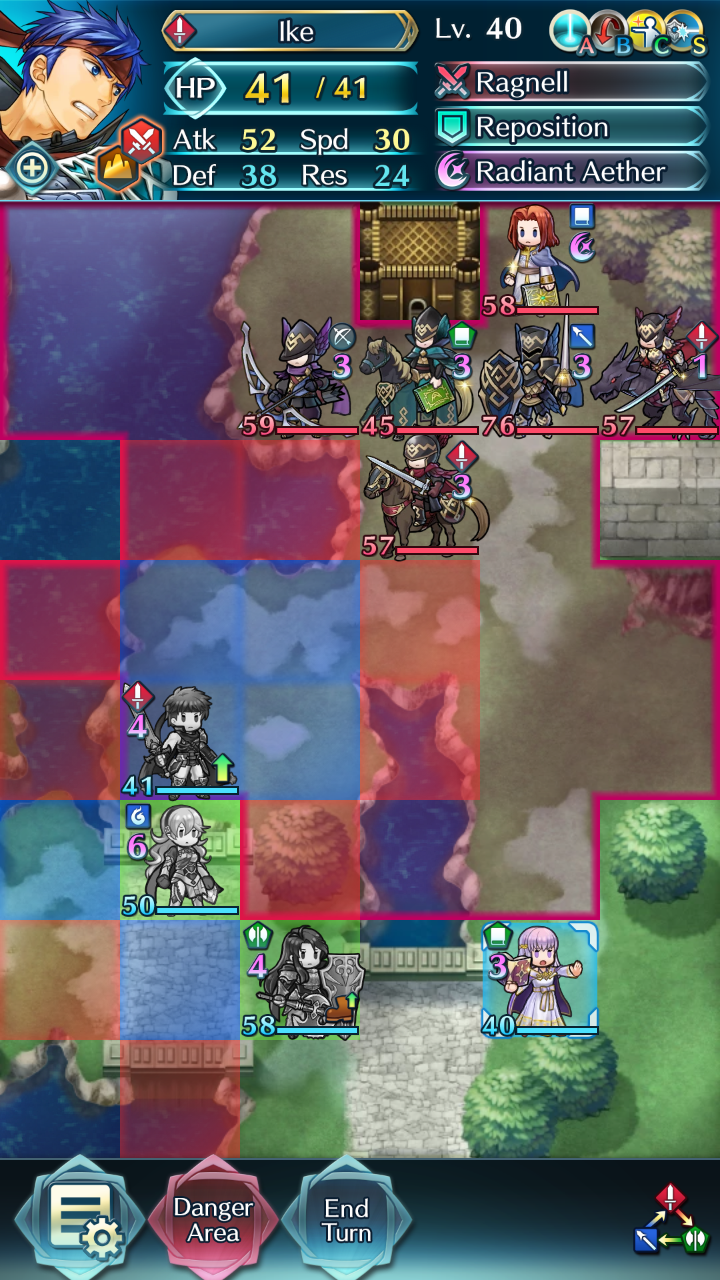
Enemies on the move
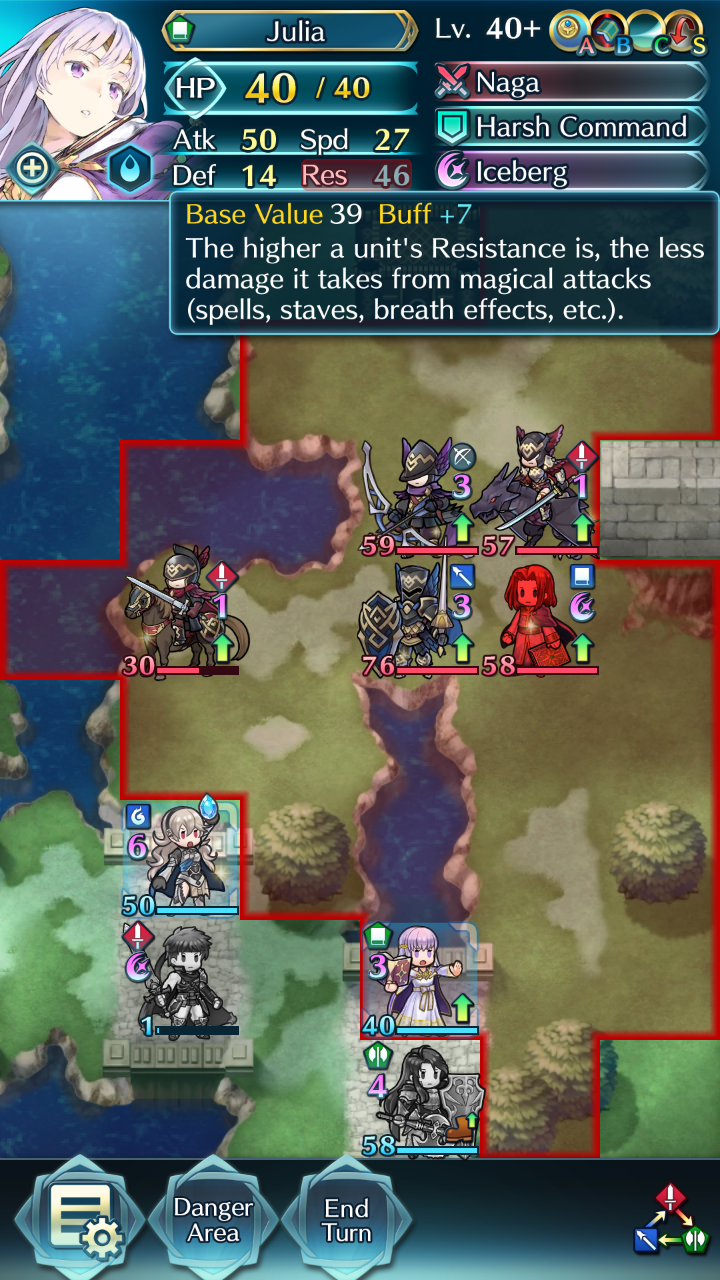
Now, the enemies will be able to move around the map. If your baiter was successful, the Cavaliers will be either dead or drawn to the left of the map. The next thing you'll have to worry about is Saias, as he will move up with the help of the Sword Wyvern with Guidance. I'm using Julia here to tank the Glacies from Saias. The problem is, her Resistance is still lowered from last turn thanks to the (now dead) Green Cavalier's Chill Res.
This is where Harsh Command comes in: With Sheena's Harsh Command, Julia can turn the -7 debuff into a +7 buff! This makes it possible for her to tank Saias without issue. Corrin is my cleanup hitter and once Saias is out of the way, she can begin to clear out the map.
Cleaning up
Hopefully your unit has finished off Saias, but no sweat if they haven't. Finish off Saias and the hard part of this Grand Hero Battle is over. Now, your cleanup unit can finish off the remaining three units. Corrin is the perfect unit choice here, as she is the right color, has the ability to deal magic damage and packs Distant Counter (courtesy of her Lightning Breath) to wallop the Bow Fighter.
If At First You Don’t Succeed
Don’t be fooled by video walkthroughs of any Grand Hero Battle that you watch -- it’s very rare for anyone to beat high-difficulty content (or record a video of themselves doing so!) on their first try. Additionally, the potential variance in unit builds that Skill Inheritance brought along with the random nature of summoning has resulted in pretty much every single summoner having different “building blocks” to work with. This, when combined with the high difficulty level of Infernal, may prove frustrating while someone is trying to find the right combination of units and moves. The key thing to keep in mind is that it may take some light Skill Inheritance and seal shuffling, or multiple tries of the map to find a strategy that works for you. Every single turn you complete gets you one step closer to completing the puzzle. Finally, reading about or watching videos of successful strategies may also help you break through a particularly difficult turn that you can’t complete, or may give you ideas of a new unit to use.
Map Enemies
- Hard
- Lunatic
- Infernal
| HP | ATK | SPD | DEF | RES | |
|---|---|---|---|---|---|
| 37 | 38 | 23 | 13 | 26 | |
| Weapon | Wargod's Tome | A | |||
| Support | B | Escape Route 3 | |||
| Special | Glacies | C | Spd Ploy 3 | ||
| HP | ATK | SPD | DEF | RES | |
|---|---|---|---|---|---|
| 37 | 28 | 17 | 21 | 11 | |
| Weapon | Brave Bow | A | Atk/Def Bond 3 | ||
| Support | B | Guard 2 | |||
| Special | Luna | C | Atk Tactic 2 | ||
| HP | ATK | SPD | DEF | RES | |
|---|---|---|---|---|---|
| 29 | 36 | 18 | 12 | 26 | |
| Weapon | Gronnblade | A | Warding Blow 3 | ||
| Support | B | Chill Res 2 | |||
| Special | Glimmer | C | Atk Ploy 2 | ||
| HP | ATK | SPD | DEF | RES | |
|---|---|---|---|---|---|
| 36 | 37 | 19 | 28 | 13 | |
| Weapon | Slaying Edge | A | Distant Def 2 | ||
| Support | B | Drag Back | |||
| Special | Reprisal | C | Guidance 3 | ||
| HP | ATK | SPD | DEF | RES | |
|---|---|---|---|---|---|
| 36 | 40 | 20 | 21 | 26 | |
| Weapon | Silver Sword | A | Fury 3 | ||
| Support | B | Pass 2 | |||
| Special | Draconic Aura | C | Def Tactic 2 | ||
| HP | ATK | SPD | DEF | RES | |
|---|---|---|---|---|---|
| 50 | 47 | 30 | 18 | 34 | |
| Weapon | Wargod's Tome | A | |||
| Support | B | Escape Route 3 | |||
| Special | Glacies | C | Spd Ploy 3 | ||
| HP | ATK | SPD | DEF | RES | |
|---|---|---|---|---|---|
| 51 | 39 | 24 | 29 | 16 | |
| Weapon | Brave Bow+ | A | Atk/Def Bond 3 | ||
| Support | B | Guard 3 | |||
| Special | Luna | C | Atk Tactic 3 | ||
| HP | ATK | SPD | DEF | RES | |
|---|---|---|---|---|---|
| 39 | 48 | 25 | 17 | 34 | |
| Weapon | Gronnblade+ | A | Warding Blow 3 | ||
| Support | B | Chill Res 3 | |||
| Special | Glimmer | C | Atk Ploy 3 | ||
| HP | ATK | SPD | DEF | RES | |
|---|---|---|---|---|---|
| 49 | 49 | 27 | 36 | 19 | |
| Weapon | Slaying Edge+ | A | Distant Def 3 | ||
| Support | B | Drag Back | |||
| Special | Reprisal | C | Guidance 3 | ||
| HP | ATK | SPD | DEF | RES | |
|---|---|---|---|---|---|
| 49 | 52 | 27 | 28 | 33 | |
| Weapon | Silver Sword+ | A | Fury 3 | ||
| Support | B | Pass 3 | |||
| Special | Draconic Aura | C | Def Tactic 3 | ||
| HP | ATK | SPD | DEF | RES | |
|---|---|---|---|---|---|
| 58 | 53 | 36 | 22 | 40 | |
| Weapon | Wargod's Tome | A | Fury 3 | ||
| Support | B | Escape Route 3 | |||
| Special | Glacies | C | Spd Ploy 3 | ||
| HP | ATK | SPD | DEF | RES | |
|---|---|---|---|---|---|
| 59 | 42 | 27 | 32 | 17 | |
| Weapon | Brave Bow+ | A | Atk/Def Bond 3 | ||
| Support | B | Guard 3 | |||
| Special | Luna | C | Atk Tactic 3 | ||
| HP | ATK | SPD | DEF | RES | |
|---|---|---|---|---|---|
| 45 | 51 | 28 | 18 | 37 | |
| Weapon | Gronnblade+ | A | Warding Blow 3 | ||
| Support | B | Chill Res 3 | |||
| Special | Glimmer | C | Atk Ploy 3 | ||
| HP | ATK | SPD | DEF | RES | |
|---|---|---|---|---|---|
| 76 | 56 | 17 | 44 | 21 | |
| Weapon | Ridersbane+ | A | Mirror Stance 2 | ||
| Support | Pivot | B | Wary Fighter 3 | ||
| Special | Bonfire | C | Res Tactic 3 | ||
| HP | ATK | SPD | DEF | RES | |
|---|---|---|---|---|---|
| 57 | 52 | 30 | 39 | 21 | |
| Weapon | Slaying Edge+ | A | Distant Def 3 | ||
| Support | B | Drag Back | |||
| Special | Reprisal | C | Guidance 3 | ||
| HP | ATK | SPD | DEF | RES | |
|---|---|---|---|---|---|
| 57 | 55 | 30 | 31 | 36 | |
| Weapon | Silver Sword+ | A | Fury 3 | ||
| Support | B | Pass 3 | |||
| Special | Draconic Aura | C | Def Tactic 3 | ||
User Submitted Teams
I will take this as a personal grudge, people. THIS is how you are SUPPOSED to use Corrin on this map:
F!Corrin:(+atk -HP)+2
Dark Breath+(spd bonus)
Pivot
Aegis
Distant Counter
Shield Pulse 3
Savage Blow 3
Deflect Magic 3 SS (I ended up swapping it back, yes. Left Distant Defense to Sigurd instead)
Since we won't need extra power to one-round anything other than the knight, nor extra speed to double any enemy, we can go for the anti-Naga set (or in this case, anti-Bladetome set), and just laugh at everything this GHB has to throw against us.
Marth:(-HP +Spd) (41 HP) +2 (YAY, got more of him since that demotion)
Falchon (effect bonus)
Reposition
Aether(Arena scoring is strong with this one)
Close Def 3
Swordbreaker 3
Drive Speed 2
Drive Def 2 SS (literally upgraded today)
+1 Bridal Lyn (-atk +HP)
Candlelight+ (Wrathful bonus)
Rehabilitate+
Swift-Winds Balm
HP+5
Dazzling Staff 3
Infantry Pulse 3
HP+5 SS
Azura:(-spd +res) (41 HP) (Please P!Azura, show up on the next banner!)
Slaying Lance (res bonus)
Sing
Glimmer
Triangle Adept
Geyser Dance 2
Spur Atk 3
Spur Spd 3 SS
Well, time to show you how it's done!
Simply put, walk up on them from the left side. Even the green blade tome will do pathetic damage to Corrin thanks to Aegis, and you will have enemies to spare to recharge it and take Saias' Glacier head on. It will be easier with Marth and Azura nearby to boost Corrin, but it won't be really necessary.
In case you want to ask, I have been using this build for a couple of weeks, since I saw a variant of it on a video. I still use Blazing Wind more, but this variation comes in handy sometimes, it's a matter of wether you prefer an unstoppable powerhouse or an unkillable powerhouse.
Walkthrough: https://youtu.be/FgNElXOItTk
L!Robin +1 (+Def, -HP): Earth Blessing (Spd)
Expiration, Reposition, Bonfire, Dragonskin, Goad Fliers, Distant Defense 3 seal
NY!Camilla (+Def, -Res): Earth Blessed, S-Summoner Support
Kadomatsu+ (Def), Reposition, Ignis, Spd/Def Bond 3, Ward Fliers
S!Camilla (+HP, -Def): Earth Blessed
Green Egg+, Draw Back, Triangle Adept 3, Goad Fliers
5* Camilla +4 (+Spd, -HP): Earth Blessed
Brave Axe+, Goad Fliers
Key points:
-Ward Fliers + Dragonskin + DD3 seal allows L!Robin to survive the blade mage and KOs him on the counter.
-S!Camilla's TA3 somehow forces Saias to move down instead of left, allowing the team to get out of his range more easily.
-Ignis on NY!Camilla allows her to KO the sword dragoon on the counter. Having regular Bonfire isn't enough and she will get dragged back into position to eat Saias' Glacies.
Link: https://youtu.be/00lKvL_lpa8
Palla +10: +ATK -RES
Wo Dao+ +spd, Reposition, Aether, Life & Death, Hone Speed 3 seal.
Cordelia +7: +RES -HP
Reposition, Life & Death, Wings of Mercy, Goad Fliers, Heavy Blade 3 Seal.
Cherche +9: +ATK -SPD
Brave Axe, Reposition, Aether, Death Blow, Wings of Mercy, Goad Fliers, Deflect Magic 3 Seal.
Catria +7: +ATK -HP
Slaying Lance +SPD, Reposition, Ignis, Fury, Escape Route, Goad Fliers, Hone Atk 3 seal.
Managed to clear Infernal with this team. Legendary Ike has Vantage, allowing him to activate his Radiant Aether on the second cavalier after baiting both. He has support from a +4 Soren with Res Fortify, who is mainly there to take on Saias, and with neutral Res can tank Saias's special. Robin's got the Brave Bow covered with TA Bowbreaker Raven, and the two tacticians will team up against the armor once he comes down. Brave Lyn's there for cleanup. The three infantries have Reposition just in case.
https://www.youtube.com/watch?v=s7V1iM7__rU


