


Map
- Normal
- Infernal
Bound Hero Battle: Ephraim & Eirika
Team Compositions
When facing Eirika and Ephraim Bond Battle Infernal, many team compositions employing several plans exist. This demonstration involves one of the more easily-attainable setups.
- Unit 1 - Dancer/Singer (Recommended Level: 1+)
Any level Dancer/Singer of any type will do. They will not enter combat at all.
- Unit 2 - Dancer/Singer (Recommended Level: 40+)
Any Dancer/Singer of any type will suffice, but they will need to take one exchange from the Sword Cavalier. This will not be an issue for Ninian or Azura, but Olivia should have a minimum speed of 29 and a combined sum for HP and DEF of 58.
- Unit 3 - Repositioner or Dancer/Singer (Recommended Level: 1+)
They will not engage in combat. Repositioner has the benefit of being able to be danced and reposition if something goes awry, but if you follow this guide, you should be fine. If your "Unit 4" needs a Hone Atk boost, this unit needs to be the one that does it.
- Unit 4 - Brave Bow Archer (Recommended Level: 40+)
Any archer with Brave Bow will suffice (Niles may not reach minimum ATK strength). In combat, the archer needs to reach 48 ATK no special, 45 ATK with Moonbow, or 43 ATK with Luna + Quickened Pulse.
- Brave Bow - 4 Mt
- Brave Bow+ - 7 Mt
Neutral ATK Archers:
- Bridal Cordelia - 35 ATK
- Leon - 34 ATK
- Innes - 33 ATK
- Lyn - Brave Lady: 33 ATK
- Jeorge - 32 ATK
- Takumi - 32 ATK
- Clarisse - 31 ATK
- Gordin - 31 ATK
- Klein - 31 ATK
- Virion - 31 ATK
Useful A Passives
- Death Blow 3 - +6 ATK (Skill Inheritance from Klein, Effie, Ursula)
- Life and Death 3 - +5 ATK (Skill Inheritance from Hana, Jaffar, Minerva, Zephiel)
- Swift Sparrow 2 - +4 ATK (Skill Inheritance from Spring Lucina, Katarina, Lyn - Brave Lady)
- Attack +3 - +3 ATK (Skill Inheritance from Cherche, Gordin, Tobin)
Many other useful A Passives exist such as: Sturdy Blow, Fury, Mirror Strike, etc.
Useful Seals:
Summoner Support:
- Provides up to an extra +2 ATK.
In Action:
For example, if we use a neutral 5* Gordin, we will have his 31 ATK plus his native Brave Bow+ Mt for an extra 7 ATK. Placing him at 38 ATK. If we use a Hone Atk 3 Repositioner, this will place him at 42 ATK in combat. Tack on the ATK seal, and he will be at 43 ATK. Because we are already using an Attack +1 seal, we will need to attain 2 more ATK + Moonbow special or 5 more ATK with no regards for the special. This can be easily fulfilled with the A passives described above. If we attain Summoner Support S and Atk + 3 on him, he no longer needs to worry about a special activation. A stronger archer allows for more breathing room in terms of ATK strength.
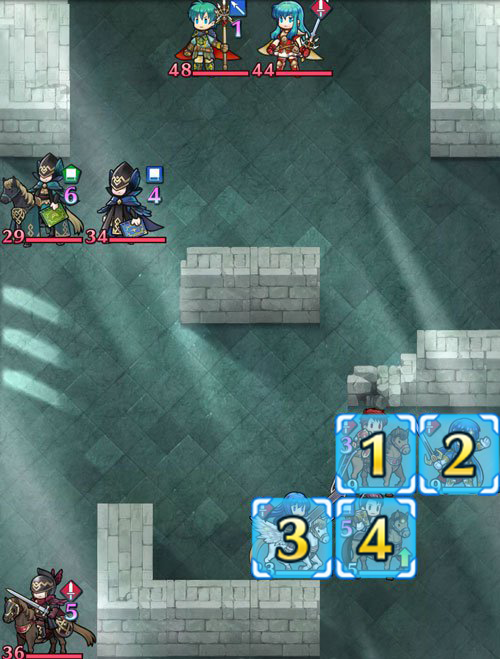
Turn 1:
- Position Unit 1, 2 and 4 on the edge of the enemy attack range.
- Unit 2 should be in the southern edge block.
- Place Unit 3 next to Unit 4.
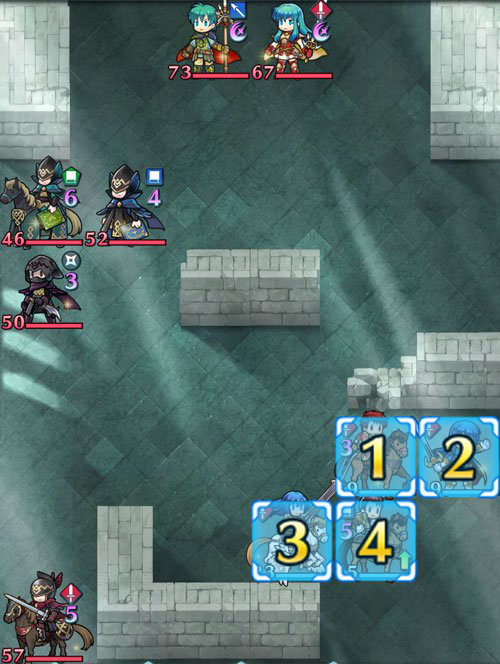
Turn 2:
- Reposition Unit 4 towards the group of three enemies.
- Use Unit 4 to kill Thief first.
- Move Unit 2 inside the Red Cavalry's attack range and dance Unit 4.
- Use Unit 4 to kill Blue Tome enemy.
- Move Unit 1 to Unit 4 and dance him once more.
- Move Unit 4 up and attack the Green Cavalry.
- Final setting: Unit 1, 3, 4 outside of enemy attack range.
- Unit 2 inside of Red Cavalry's attack range.
Turn 3:
- Can vary. If Unit 3 can finish off Red Cavalry, proceed to do so and then use Unit 4 to kill Eirika and retreat from Ephraim.
- Otherwise, use Unit 4 to kill Red Cavalry and safely retreat from Eirika and Ephraim.
Turn 4:
- If Eirika is alive, kill her with Unit 4 (and dancer do-overs) and retreat from Ephraim.
- Otherwise, kill Ephraim and run is over.
Turn 5:
- If you could not kill both Eirika and the Red Cavalry on the same turn, then this turn is needed for defeating Ephraim.
Final Notes: Congrats, you have bested Infernal Bond Battle Eirika and Ephraim!
Example Playthrough
Map Enemies
- Hard
- Lunatic
- Infernal
| HP | ATK | SPD | DEF | RES | |
|---|---|---|---|---|---|
| 29 | 37 | 19 | 12 | 27 | |
| Weapon | Gronnblade | A | Defiant Atk 2 | ||
| Support | Rally Atk/Spd | B | Vantage 3 | ||
| Special | Miracle | C | Drive Atk 1 | ||
| HP | ATK | SPD | DEF | RES | |
|---|---|---|---|---|---|
| 36 | 38 | 18 | 19 | 23 | |
| Weapon | Silver Sword | A | Darting Blow 3 | ||
| Support | Rally Atk/Spd | B | Lunge | ||
| Special | Growing Flame | C | Hone Atk 2 | ||
| HP | ATK | SPD | DEF | RES | |
|---|---|---|---|---|---|
| 34 | 33 | 25 | 15 | 20 | |
| Weapon | Blárblade | A | Warding Blow 2 | ||
| Support | Rally Atk/Spd | B | Guard 2 | ||
| Special | Luna | C | Atk Smoke 3 | ||
| HP | ATK | SPD | DEF | RES | |
|---|---|---|---|---|---|
| 48 | 47 | 22 | 28 | 18 | |
| Weapon | Siegmund | A | Fury 3 | ||
| Support | B | Seal Def 3 | |||
| Special | Moonbow | C | Threaten Def 3 | ||
| HP | ATK | SPD | DEF | RES | |
|---|---|---|---|---|---|
| 44 | 37 | 28 | 20 | 20 | |
| Weapon | Sieglinde | A | Armored Blow 3 | ||
| Support | Pivot | B | Drag Back | ||
| Special | C | Hone Spd 3 | |||
| HP | ATK | SPD | DEF | RES | |
|---|---|---|---|---|---|
| 40 | 49 | 26 | 17 | 35 | |
| Weapon | Gronnblade+ | A | Defiant Atk 3 | ||
| Support | Rally Atk/Spd | B | Vantage 3 | ||
| Special | Miracle | C | Drive Atk 2 | ||
| HP | ATK | SPD | DEF | RES | |
|---|---|---|---|---|---|
| 49 | 50 | 25 | 26 | 30 | |
| Weapon | Silver Sword+ | A | Darting Blow 3 | ||
| Support | Rally Atk/Spd | B | Lunge | ||
| Special | Growing Flame | C | Hone Atk 3 | ||
| HP | ATK | SPD | DEF | RES | |
|---|---|---|---|---|---|
| 45 | 44 | 32 | 20 | 28 | |
| Weapon | Blárblade+ | A | Warding Blow 3 | ||
| Support | Rally Atk/Spd | B | Guard 3 | ||
| Special | Luna | C | Atk Smoke 3 | ||
| HP | ATK | SPD | DEF | RES | |
|---|---|---|---|---|---|
| 64 | 55 | 29 | 35 | 23 | |
| Weapon | Siegmund | A | Fury 3 | ||
| Support | B | Seal Def 3 | |||
| Special | Moonbow | C | Threaten Def 3 | ||
| HP | ATK | SPD | DEF | RES | |
|---|---|---|---|---|---|
| 58 | 43 | 36 | 27 | 28 | |
| Weapon | Sieglinde | A | Armored Blow 3 | ||
| Support | Pivot | B | Drag Back | ||
| Special | C | Hone Spd 3 | |||
| HP | ATK | SPD | DEF | RES | |
|---|---|---|---|---|---|
| 46 | 52 | 28 | 19 | 38 | |
| Weapon | Gronnblade+ | A | Defiant Atk 3 | ||
| Support | Rally Atk/Spd | B | Vantage 3 | ||
| Special | Miracle | C | Drive Atk 2 | ||
| HP | ATK | SPD | DEF | RES | |
|---|---|---|---|---|---|
| 57 | 53 | 27 | 28 | 33 | |
| Weapon | Silver Sword+ | A | Darting Blow 3 | ||
| Support | Rally Atk/Spd | B | Lunge | ||
| Special | Growing Flame | C | Hone Atk 3 | ||
| HP | ATK | SPD | DEF | RES | |
|---|---|---|---|---|---|
| 52 | 47 | 35 | 22 | 31 | |
| Weapon | Blárblade+ | A | Warding Blow 3 | ||
| Support | Rally Atk/Spd | B | Guard 3 | ||
| Special | Luna | C | Atk Smoke 3 | ||
| HP | ATK | SPD | DEF | RES | |
|---|---|---|---|---|---|
| 50 | 38 | 43 | 15 | 35 | |
| Weapon | Rogue Dagger+ | A | Armored Blow 3 | ||
| Support | Rally Atk/Spd | B | Poison Strike 3 | ||
| Special | Iceberg | C | Panic Ploy 3 | ||
| HP | ATK | SPD | DEF | RES | |
|---|---|---|---|---|---|
| 73 | 58 | 31 | 38 | 25 | |
| Weapon | Siegmund | A | Fury 3 | ||
| Support | Pivot | B | Obstruct 3 | ||
| Special | Moonbow | C | Threaten Def 3 | ||
| HP | ATK | SPD | DEF | RES | |
|---|---|---|---|---|---|
| 67 | 45 | 39 | 29 | 31 | |
| Weapon | Sieglinde | A | Armored Blow 3 | ||
| Support | Pivot | B | Drag Back | ||
| Special | Moonbow | C | Hone Spd 3 | ||
User Submitted Teams
All you really need to focus on this team is positioning.
Robin needs hone speed and reinhardt needs +res seal, both need reposition
Tharja and nino need life and death, moonbow.
For the team's starting position, place tharja and nino where they can get the most buffs
Turn 1: use nino to bait the green mage
Turn 2: use tharja to finish off the green mage, reposition her with robin, kill ephraim with nino and reposition her with reinhardt.
Turn 3: kill the red cavalier with reinhardt, draw him back, kill the ninja with robin
Turn 4: kill eirika and stay away from the blue mage
Turn 5: kill the last blue mage with nino.
That's it (๑╹ω╹๑ )
Only unit that matters is Cecilia. Mine has Gronnblade, Close counter, and Vantage. Buff her with a hone and fortify, and she'll kill everyone but Eirika and the Sword Cavalier.
If my pathetic +hp -spd Olwen survived this map, then you can too!
Break the wall, line up Lyn, Camus and Olwen in that column, Olivia to the left of Olwen. Lyn KOs both mages, Camus KOs cavalry and weakens dagger. Stay out of the twins' range, they each take 2 or 3 hits.
Hector (-def/+res)
Armads
Pavise
Distant Counter
Vantage 3
Attack +1 Seal
Zephiel
To be honest, it doesnt need to be zephiel. Just as long as you have someone with pivot and fortify armor, then you're good. My zephiel doesn't even have his legendary wep.
Brave Lyn (Neutral IV)
Just the base loadout of Brave Lyn with Reposition added in.
Delthea (-atk/+res can literally be any IV though)
Only skills that matter are Dark Aura, reposition, Fury3, and Drive Attack.
Turn 1 and 2: have delthea break the wall, and move everyone one space. Then, on turn two, move delthea to the left once and end turn so that you can apply the +6 attack buff to hector
Turn 3: Move everyone but Brave Lyn up one tile. Hector will be baiting and killing the two mages and the ninja. The attack +1 seal is absolutely necessary as he will deal exactly the amount of damage needed to kill the blue mage.
Turn 4: move Brave Lyn up one and left one to attack the sword rider. Finish off the sword rider with delthea.
Turn 5: Thanks to pavise, hector will survive Emphraim's attack with 1 hp. Use hector to kill ephraim and then move him behind delthea with reposition. then have zephiel move once to the left and pivot behind Brave Lyn. Then have Lyn move once to the right and reposition Delthea to the space below her.
Turn 6:Attack Eirika with Lyn and then Delthea (or the other way around for these two it doesnt make a difference). Finish off eirika with Hector.
And that's it.
Start by inching your units just outside the danger zone. Ike on the lower left corner, azura to his right, lucina above azura and Reinhardt to the right of lucina.
Move Ike up and left one, have azura dance him so he can attack the red horse on bottom left. Lucina moves to bottom left where Ike started ( so she can buff him, not positive if this is necessary but I did it anyway). Then have Reinhardt reposition azura to the right to safety.


