


Map
- Normal
- Infernal

Zephiel: The Liberator
While doubtlessly one of the less taxing maps on lower difficulties, Zephiel’s Infernal Grand Hero Battle is definitely a challenge. Between the tight maneuvering quarters, a multitude of armors toting Wary Fighter, the presence of Armor March, and Zephiel himself carrying Distant Counter, there will likely be no easy way to win here -- you may have to change up your usual strategy if you want to succeed.
Who To Choose
As is generally true of GHBs, the individual units used is very important as they will primarily inform a strategy. There are a few routes one can take depending on what units are personally available, and, of course, adjustment based on the units one possesses is always a possibility.
Baiters
Technically, you can use an entirely baiting strategy on this Grand Hero Battle, but you might want to use a more mixed team composition so as to get the best of both worlds.
If you’re struggling with choosing a unit to bait, consider a dragon. Tanks who deal damage to Defense will probably have difficulty chipping away at the armors, so you may want to use bulky units who deal magic damage as your baiters instead. Further complicating matters is the fact that these armors seem to favour using movement skills to throw a wrench into your plans -- this means that Triangle Adept tanks such as Triangle Adept Nowi may have difficulty avoiding being KO’d due to the close quarters of this map. Consider using dragons with Fury or other skills instead.
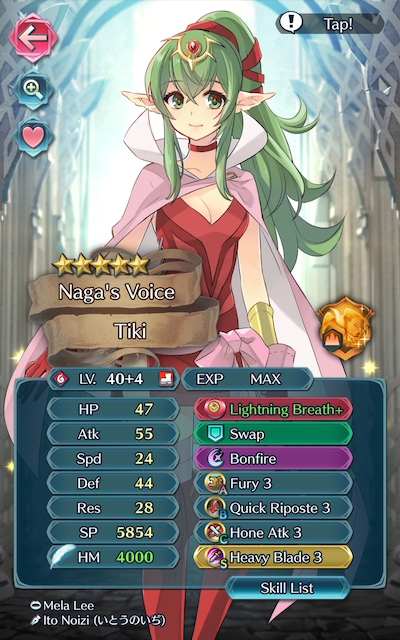
Ideally, you’ll also want to use a Distant Counter or Close Counter user utilizing the Quick Riposte skill or seal with mid-to-high Defense, as these units are able to override Wary Fighter’s effect and default to a regular Speed check. Self-sustaining tanks who tote Aether, Radiant Aether, or Sol / Noontime can potentially forego healer support as well. Nowi, Female Corrin, Adult Tiki, Lightning Breath Young Tiki, Fae, Fallen Robin, Myrrh, and bulky Close Counter mages like Winter Tharja are all good choices who are able to counterattack regardless of distance. You can also use a unit with an Armorslayer / Armorsmasher or the Hammer to deal massive damage to most of the enemies on this map.
Strikers
Brave Bow users are decidedly less useful than they normally are on this map due to most of the enemies here being high Defense armors, but can still prove handy for easily KOing the mages if you have a free spot on your team. The same goes for units who carry melee Brave Weapons -- they will likely struggle to break through the wall the enemy armors create.
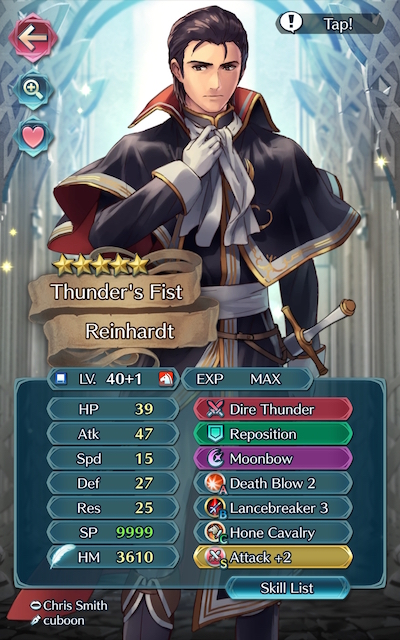
Olwen and Reinhardt, however -- as the only users of Brave tomes -- are able to attack foes’ Resistance twice instead of their Defense, making these two units much better candidates for the role of Striker in this Grand Hero Battle. Blade mages may also be able to deal heavy damage if not outright KO the armors while fully buffed, but be warned -- the fact that these enemies all carry Wary Fighter make them difficult to perform follow-up attacks against unless they’ve been heavily damaged, which may cause your Blade mage to be put in a particularly dangerous position.
Dancers
Dancers help support units with high firepower, may even have a decent offensive presence themselves, and can usually tank a hit or two, if need be. Olivia, Performing Olivia, Performing Inigo, Performing Shigure,Performing Azura, Azura, New Year Azura, and Ninian all give the support that high-firepower units need while also possessing the ability to provide an assist to KO an enemy.
Healers
While not generally a great choice over units who can deal heavy damage or dancers, Healers can be incredibly useful in this Grand Hero Battle to heal up your Tanks, especially if your bulky units carry Fury. Genny, Priscilla, and Elise are potential additions to a team that may serve useful in this Grand Hero Battle.
Strategy
While it’s difficult to exactly predict what will happen on this map due to the IV / Merge variance of your units, here’s some general tips to get you started.
The First Move
You may be wondering where to begin on this map, and that’s a reasonable question to ask. Essentially, you have two options; baiting and striking. Which one you chose depends on if the AI’s movement is favourable to you at the end of this turn.
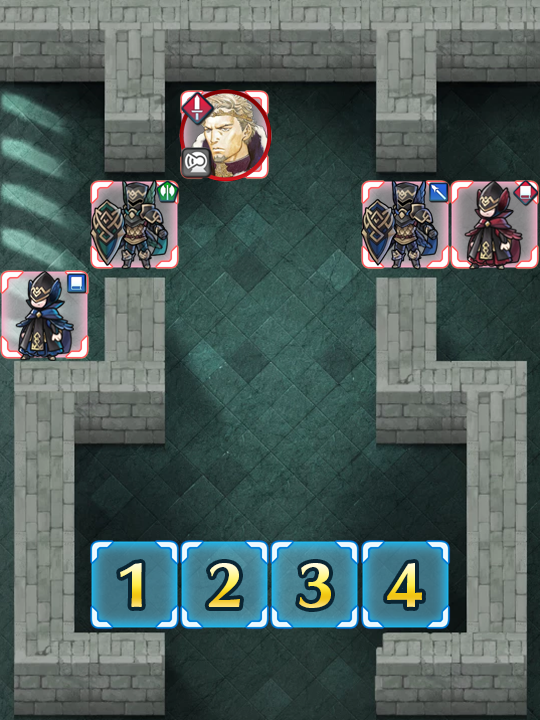
Since Zephiel has Distant Counter and a massive HP pool, it’s probably a bad idea to attack him with any mage unless you know for sure you can KO him outright. If you’re using a Striker to start off, then, you’ll likely want to target the lance armor instead, be danced, and then Reposition or Draw Back your Dancer/Singer to safety.
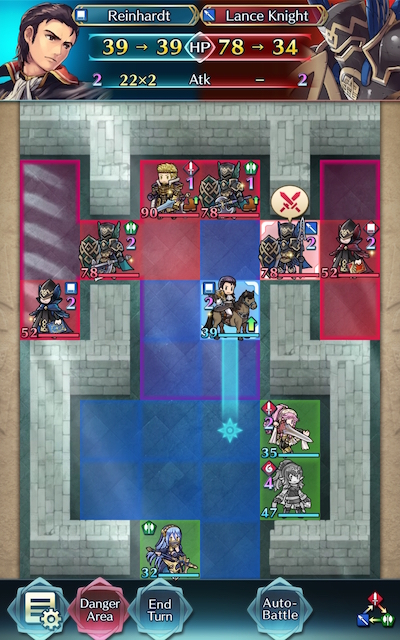
Alternatively, if you’re using a baiting strategy, you can move into the range of Zephiel or the green armor.
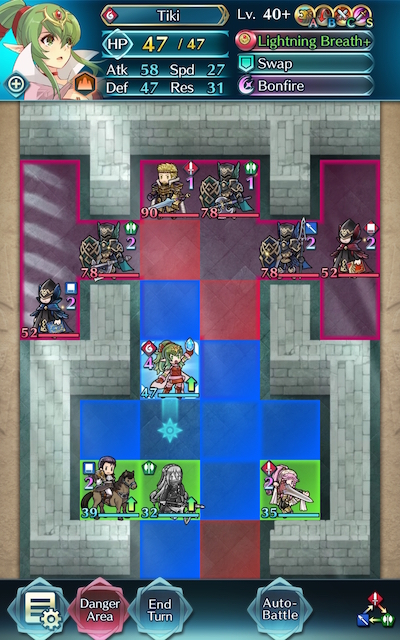
Know Thy Enemy, Love Thy Enemy
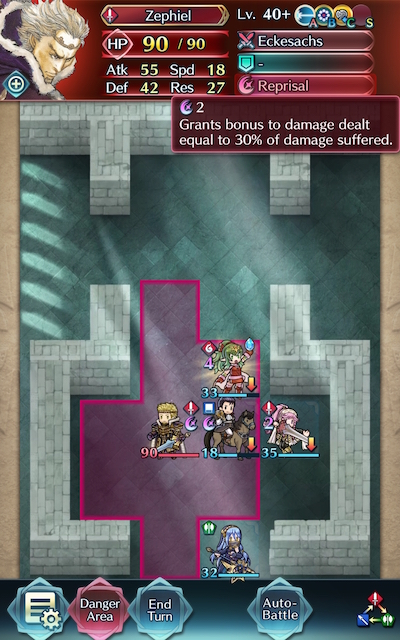
You may notice that in the screenshot above, I’m placing Adult Tiki as if Zephiel had the movement of an infantry unit. What gives? Well, he and the lance armor have Armor March in their C slot, which extends their range if they begin Enemy Phase next to another armor. This makes them significantly more threatening, and will be something you’ll need to account for as you're trying to beat this Grand Hero Battle.

Unfortunately, this map doesn’t exactly grant a lot of maneuvering room for you to kite these foes once they start advancing -- and if they manage to catch you off guard, it will likely result in an instant game over. Because the Danger Area can prove inconsistent in showing where enemies will end up if Armor March is active, be sure to account for any armors who may have extended range at the beginning of Enemy Phase.
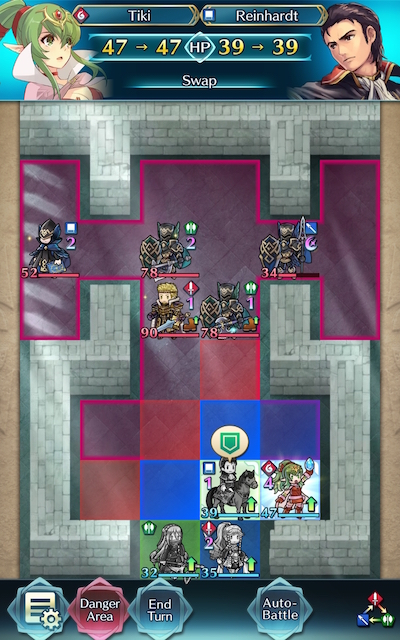
Swapping Out
Since this map doesn’t exactly give you a lot of space to work with, it’s a good idea to equip your Tank with a movement skill like Swap so that they can deliver your other units to safety. You likely won’t have a lot of safe space to work with, so the leeway this skills provide in positioning can help you recover from a move that may otherwise spell out disaster.
The Triangle Doesn’t Trump All
Speaking of Weapons Triangle Advantage, it isn’t always necessary to deal effective or even neutral damage to the armors on this map. Since Wary Fighter is exceedingly common here, your primary goal should be to break through the enemy’s defenses in order to allow yourself to KO them -- whether you possess a Weapons Triangle Advantage or not. Low cooldown Specials like Moonbow can assist you power through if their current charge permits, but even if they’re not at the ready, any damage you can deal will help.
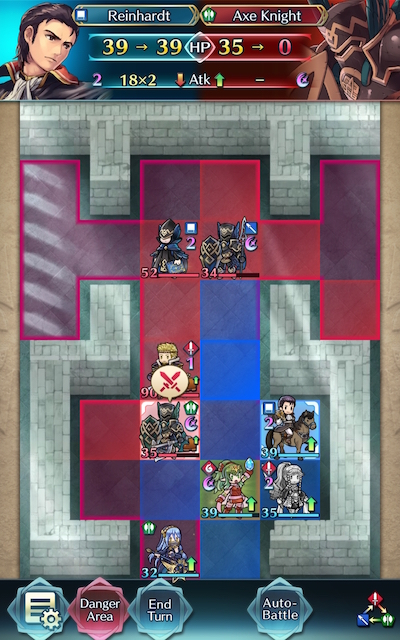
And When All Else Fails…
Thankfully, the armors who don’t tote Brave weapons (including Zephiel) will most likely be unable to perform follow-ups on your units due to their low Speed. While it’s far from ideal, even slowpokes like Reinhardt can tank a hit from them if need be (provided they aren’t weak to that color). Don’t assume all is lost because your Striker has been left in the line of fire -- it’s entirely possible they’ll be able to brave the hit like a champ.
If At First You Don’t Succeed
Don’t be fooled by video walkthroughs of any Grand Hero Battle that you watch -- it’s very rare for anyone to beat high-difficulty content (or record a video of themselves doing so!) on their first try. Additionally, the potential variance in unit builds that Skill Inheritance brought along with the random nature of summoning has resulted in pretty much every single summoner having different “building blocks” to work with. This, when combined with the high difficulty level of Infernal, may prove frustrating while someone is trying to find the right combination of units and moves. The key thing to keep in mind is that it may take some light skill inheritance and seal shuffling (Breaker skills and the Attack +3 seal are your friends!), multiple tries of the map, and a few stamina potions to find a strategy that works for you. Every single turn you complete gets you one step closer to completing the puzzle. Finally, reading about or watching videos of successful strategies may also help you break through a particularly difficult turn that you can’t complete, or may give you ideas of a new unit to use.
Map Enemies
- Hard
- Lunatic
- Infernal
| HP | ATK | SPD | DEF | RES | |
|---|---|---|---|---|---|
| 58 | 49 | 16 | 26 | 13 | |
| Weapon | Eckesachs | A | Life and Death 3 | ||
| Support | B | Wary Fighter 3 | |||
| Special | Reprisal | C | |||
| HP | ATK | SPD | DEF | RES | |
|---|---|---|---|---|---|
| 34 | 33 | 25 | 15 | 20 | |
| Weapon | Bolganone | A | Armored Blow 2 | ||
| Support | B | Seal Atk 3 | |||
| Special | Blazing Thunder | C | Breath of Life 2 | ||
| HP | ATK | SPD | DEF | RES | |
|---|---|---|---|---|---|
| 34 | 33 | 25 | 15 | 20 | |
| Weapon | Thoron | A | Armored Blow 2 | ||
| Support | B | Seal Atk 3 | |||
| Special | Blazing Thunder | C | Breath of Life 2 | ||
| HP | ATK | SPD | DEF | RES | |
|---|---|---|---|---|---|
| 49 | 35 | 6 | 32 | 14 | |
| Weapon | Brave Lance | A | |||
| Support | Swap | B | Wary Fighter 3 | ||
| Special | Sol | C | Fortify Res 2 | ||
| HP | ATK | SPD | DEF | RES | |
|---|---|---|---|---|---|
| 49 | 35 | 6 | 32 | 14 | |
| Weapon | Brave Axe | A | |||
| Support | Swap | B | Wary Fighter 3 | ||
| Special | Sol | C | Fortify Res 2 | ||
| HP | ATK | SPD | DEF | RES | |
|---|---|---|---|---|---|
| 78 | 57 | 21 | 34 | 20 | |
| Weapon | Eckesachs | A | Life and Death 3 | ||
| Support | B | Wary Fighter 3 | |||
| Special | Reprisal | C | |||
| HP | ATK | SPD | DEF | RES | |
|---|---|---|---|---|---|
| 45 | 44 | 32 | 20 | 28 | |
| Weapon | Bolganone+ | A | Armored Blow 3 | ||
| Support | B | Seal Atk 3 | |||
| Special | Blazing Thunder | C | Breath of Life 3 | ||
| HP | ATK | SPD | DEF | RES | |
|---|---|---|---|---|---|
| 45 | 44 | 32 | 20 | 28 | |
| Weapon | Thoron+ | A | Armored Blow 3 | ||
| Support | B | Seal Atk 3 | |||
| Special | Blazing Thunder | C | Breath of Life 3 | ||
| HP | ATK | SPD | DEF | RES | |
|---|---|---|---|---|---|
| 67 | 47 | 11 | 41 | 19 | |
| Weapon | Brave Lance+ | A | |||
| Support | Swap | B | Wary Fighter 3 | ||
| Special | Sol | C | Fortify Res 3 | ||
| HP | ATK | SPD | DEF | RES | |
|---|---|---|---|---|---|
| 67 | 47 | 11 | 41 | 19 | |
| Weapon | Brave Axe+ | A | |||
| Support | Swap | B | Wary Fighter 3 | ||
| Special | Sol | C | Fortify Res 3 | ||
| HP | ATK | SPD | DEF | RES | |
|---|---|---|---|---|---|
| 90 | 55 | 18 | 42 | 27 | |
| Weapon | Eckesachs | A | Distant Counter | ||
| Support | B | Wary Fighter 3 | |||
| Special | Reprisal | C | Armor March 3 | ||
| HP | ATK | SPD | DEF | RES | |
|---|---|---|---|---|---|
| 52 | 44 | 35 | 22 | 31 | |
| Weapon | Rauðrwolf+ | A | Sturdy Blow 2 | ||
| Support | B | Seal Atk 2 | |||
| Special | Blazing Thunder | C | Drive Res 2 | ||
| HP | ATK | SPD | DEF | RES | |
|---|---|---|---|---|---|
| 52 | 45 | 35 | 22 | 31 | |
| Weapon | Blárraven+ | A | Distant Def 3 | ||
| Support | B | Guard 3 | |||
| Special | Blazing Thunder | C | Drive Res 2 | ||
| HP | ATK | SPD | DEF | RES | |
|---|---|---|---|---|---|
| 78 | 51 | 13 | 45 | 21 | |
| Weapon | Brave Lance+ | A | Atk/Res Bond 3 | ||
| Support | Swap | B | Wary Fighter 3 | ||
| Special | Bonfire | C | Armor March 3 | ||
| HP | ATK | SPD | DEF | RES | |
|---|---|---|---|---|---|
| 78 | 51 | 13 | 45 | 21 | |
| Weapon | Brave Axe+ | A | Atk/Res Bond 3 | ||
| Support | Swap | B | Wary Fighter 3 | ||
| Special | Bonfire | C | Ward Armor | ||
| HP | ATK | SPD | DEF | RES | |
|---|---|---|---|---|---|
| 78 | 57 | 18 | 45 | 21 | |
| Weapon | Slaying Axe+ | A | Svalinn Shield | ||
| Support | Swap | B | Wary Fighter 3 | ||
| Special | Vengeance | C | Ward Armor | ||
User Submitted Teams
Lunatic: the red mage drives me nuts. This is the fastest way I found to kill it.
Inherit skills: Setsuna - red tomebreaker and an offensive skill.
Nino - offensive skill (I had Astra from a Virion, but you can use any of them that will give you a few more points of damage)
Setsuna kills the blue mage on turn 2. All units move down the very bottom of the map, and Setsuna uses Reciprocal Aid to refill her HP from Olivia. On turn 4 the red mage oversteps and comes to the very front. Setsuna OHKOs it.
Then it's mostly a matter of hit and fade with Nino and Olivia or Selena moving her back. Nino can 2HKO most knights and doesn't need to back down.
For Zephiel's last round it took a full team effort. Nino hits two times, Setsuna gives the key damage to put him in range of Selena's Armorslayer hit for the win.
Basically ripping off the two dancers/singers. Except the only high level mages I have are Linde( 5 star and level 40, yes I am lucky) and Cecilia(3 star and level 34). The Olivias are used were both 3 star, one level 15 and other level 10(just enough to get dance).
You put Linde into range to lure the red mage. Then you attack and dance just keeping your mages just out of range. For me only the blue mage was a threat, but beat Olivias untouched but Cecilia and Linde were single digit hp. I hope this helps. :)
My Camilla has reposition so Julia could attack three times with no consequence. Took out the Blue Mage then Blue Knight with dragon fang in one turn. Julia tanks red Mage, now retreat and set up so that you're clear of attack and bait the Mage. Kill Mage with Camilla and Julia with dancers helping. The rest Julia's got. She can do anything! With dancers.
First I positioned my mages right out of the danger area with Ninian close by. On my second turn I took out the blue mage with my Nino and danced her to safety and I put Linde in the range of the red mage to bait him out and killed him on the enemy turn. After that I used Nino with dance to kill the blue lance knight. Then I used Nino with dance again to finish off the green knight and finally used dance with Linde to finish off Zephiel. The only skill inheritance for this team is life and death 2 on Nino. I ended up not using my Y-Tiki at all.


