


Map
- Normal
- Infernal
Michalis: Ambitious King
You can breathe a sigh of relief now; Michalis’ map doesn’t feature reinforcements like later GHBs, resulting in a rather nice change of pace. Instead, its layout requires that enemies are damaged, KO’d, or baited in order to get them moving, which gives you much more time to carefully arrange your units in order to put yourself in a favourable position once you begin.
The presence of multiple fliers on this map gives archers a clear advantage (although Michalis does throw a wrench into this -- more on that later). Using fliers yourself, however, also presents some interesting options due to their ability to traverse the mountains near the bottom of the map. You’ll likely want to ensure you at least bring one bow user, though, as doing so will serve to make dealing with this map much easier.
Before you begin teambuilding, it’s completely possible you already possess everything you need to beat this map. Created by Gamepress staff member RedFerrari1998, the video guide below uses only F2P units, seals, and light, accessible skill inheritance -- see the description for more details. If it doesn’t work for you, though, then read on!
Who To Choose
As is generally true of GHBs, the individual units you will use is very important as they will primarily inform your strategy. There are a few routes you can take depending on what units you have available to you, and, of course, adjustment based on the units you possess is always a possibility.
Strikers
One way you may want to start this map requires a striker, so you’ll probably want to bring one with you to this GHB. Blade or Brave weapon users like Nino, S!Camilla, S!Corrin, Cecilia, Reinhardt, Hinoka, Cordelia, and Cherche will work well here, though Reinhardt will likely want Lancebreaker to net an extra KO.
Of special note in this GHB are archers with effective base kits or native Brave Bows like Gordin, Klein, and B!Lyn. Since high res fliers are common in this GHB, these units possess the ability to utilize effective physical damage and follow-ups, netting KOs without ever receiving a point of damage themselves.
Baiters
As mentioned in the introduction, the mountains on the bottom of this map can be traversed by your own fliers, allowing them to serve as bait. By doing this, you keep your units at the bottom of map, putting distance between you and the enemies located at the top. Additionally, it allows you to deal with arguably the biggest threat of the GHB -- Michalis -- right off the bat, and grants you the ability to retreat behind the mountains and chip away at the remaining foes if you need to. Palla and NY!Camilla would be some of the best (and only) choices to bait Michalis, while Michalis himself, Minerva, and Narcian would do well baiting the flying lancer.
Dancers
Dancers help support units with high firepower, may even have a decent offensive presence themselves, and can usually tank a hit or two, if need be. Olivia, PA!Azura, PA!Inigo, PA!Olivia, Azura, NY!Azura, and Ninian all provide the support that high-firepower units need while also possessing the ability to net a few KOs themselves.
Cavalry
Although they do not possess the ability to cross the mountains on this map like fliers can, cavalry’s increased range and ability to utilize class-specific buffs makes them incredibly useful on this map. Reinhardt fills the Brave role discussed above, while B!Lyn is a strong archer in her own right, even more so when she has buffs to take advantage of. Sigurd is an excellent dedicated tank who can easily handle Michalis on his own, while Xander fulfills a similar function. Also of note is Ursula, who possesses a native tome that is effective against cavalry -- this may prove useful to you if you are struggling with the red cavalier who is able to deal effective damage to cavalry due to Zanbato. She can also serve as bait to Michalis, galloping out of danger before he can deal damage to her.
Strategy
Strategizing for this GHB is made much simpler by the fact that there are no reinforcements. While it’s difficult to exactly predict what will happen due to IV / Merge variance, here’s some tips to get you started.
In The Beginning...
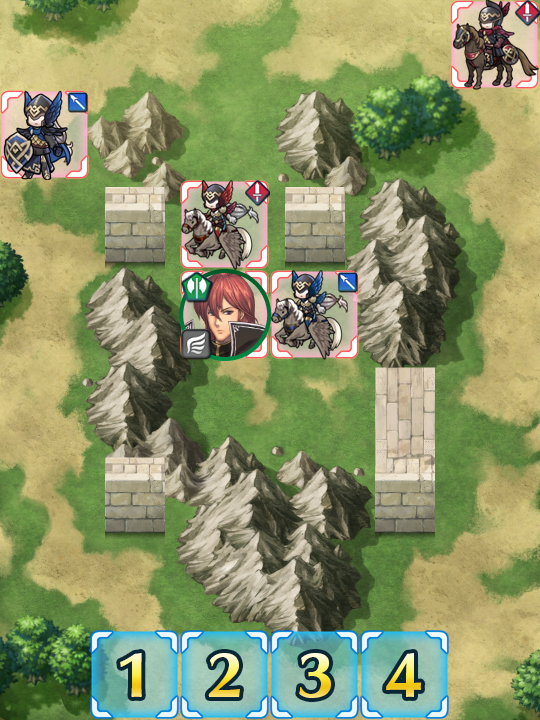
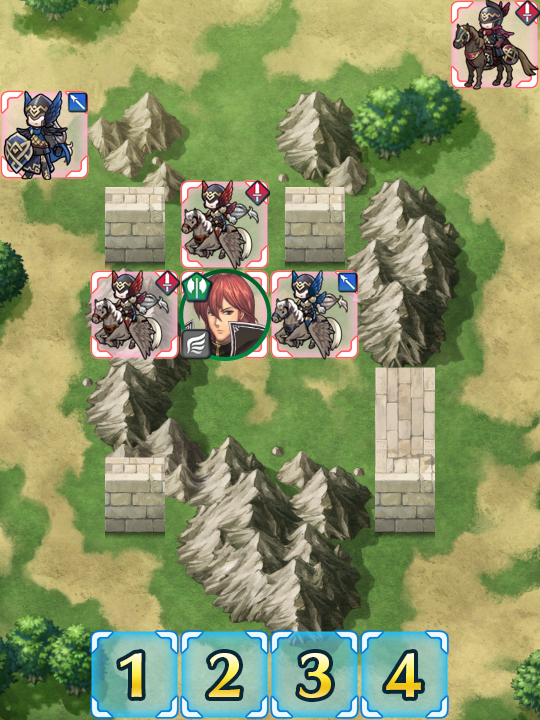
As is customary for most GHBs, the enemies on Michalis’ map will not start to move unless they are baited, damaged, or KO’d. Since this map layout allows for an attack + dance + draw back / reposition strategy and a baiting strategy, you’ll have to choose between an offensive or defensive opening turn.
If you decide to use a more common and offensive strategy, then you have the choice to either start on the left or the right side of the map, therefore targeting the red sword flier or the blue lance flier, respectively. Which side you choose will naturally depend on which striker you’re using -- archers can start on either side, while Blade and Brave mages must be more discerning due to the fliers’ high res. If you do choose a magic user (presumably because you do not have an archer available to you), it’s likely that you won’t get an outright KO here -- you may have to take caution with your positioning in order to prevent being overwhelmed by the enemy forces. Be sure to bring a dancer too, as you’ll want to attack, be danced, and then draw back / reposition your dancer to safety in order to get the map moving.
If you choose to bait, your options are going to be a) the space directly above starting space (2), b) the space directly above starting space (3), c) a combination of a and b, d) the first space in the danger zone on the left side of the map, and e) the first space in the danger zone on the right side of the map. Options d and e -- due to the difficulty in KOing the baited units outright -- are not recommended, which leaves a, b, and c. If you decide to go with option a (or c), you’re going to want to make sure that your chosen flier bait totes Triangle Adept or a Ruby Sword due to Michalis’ raw power. If you use option b (or c), then you’ll want to use a strong green flier who can KO this flying lancer outright.
Preferably, you’ll want to net as many KOs as you can this turn, although that may not be possible if you’re using the strike and retreat method. If you’re baiting, a healer may be useful here, especially if they tote Physic+, as they’ll be able to heal at-range or provide an assist with a Wrathful / Dazzling attack, if need be.
It’s All In The Movement
In the first few turns of this map, you’ll likely want to keep your units close together so they can benefit from buffs and stay away from advancing enemies. This, however, presents a slight problem, as tight spacing can sometimes result in your countermeasures against enemies being thwarted by your own forces -- basically, sometimes your own units will get in your way! To prevent this from happening, movement skills such as swap and reposition can help you move around your units in close quarters and allows you to get your units where you need them, when you need them.
Use Dancers
As always, dancers serve a valuable role refreshing your units and allowing them to get some KOs they cannot net outright. Some dancers can even provide valuable buffs that can help a unit either deal greater damage or survive a round of combat they would be KO’d by otherwise. A team composed of an Archer and multiple dancers is a very potent combination in this GHB, especially if you’ve built an Olivia who can provide assistance KOing Michalis.
Know Your Enemy, Love Your Enemy
Speaking of Michalis, you may be wondering why an archer can’t easily deal with him on this map, and that is because he has Iote’s Shield equipped. This skill nullifies all effective damage, which means that archers must rely on a Special activation to KO him, and even then, his high def means that strategy isn’t even guaranteed to work. Combined with his axe, Hauteclere, which provides him with -1 cooldown, and his powerful AOE special, Michalis is a force to be reckoned with if you go into this battle thinking that he’s going to be a pushover. Luckily, his low spd of 29 and lower res of 21 means that most non-blue mages will have no problem blowing Michalis out of the sky.
Also of note is the red sword cavalry unit, who is sporting Zanbato, a weapon that deals effective damage to cavalry. Although this enemy isn’t too threatening if you have a dedicated counter for it, if you’re using an all-cavalry team, be aware that this foe should be a priority for you to deal with (preferably at-range) before it has the chance to KO one of your units.
Finally on this list of tricky enemies is the blue infantry lancer who has a Heavy Spear and therefore deals effective damage to armored units. Just like the foe above, if you’re using armored units on your team, you’ll want to take note of this enemy so that it doesn’t take you by surprise.
If At First You Don’t Succeed
As is true of all high difficulty content, the potential variance in unit builds that Skill Inheritance brought along with the random nature of summoning has resulted in pretty much every single player having different “building blocks” to work with. This, when combined with the high difficulty level of Infernal, may prove frustrating while someone is trying to find the right combination of units and moves. The key thing to keep in mind is that it may take multiple tries of the map and a few stamina potions for you to find a strategy that works for you. Every single turn you complete gets you one step closer to completing the puzzle. Reading about or watching videos of successful strategies may also help you break through a particularly difficult turn that you can’t complete, or may give you ideas of a new unit to try to use.
Map Enemies
- Hard
- Lunatic
- Infernal
| HP | ATK | SPD | DEF | RES | |
|---|---|---|---|---|---|
| 39 | 32 | 23 | 23 | 16 | |
| Weapon | Heavy Spear | A | Death Blow 2 | ||
| Support | B | Bowbreaker 3 | |||
| Special | Draconic Aura | C | |||
| HP | ATK | SPD | DEF | RES | |
|---|---|---|---|---|---|
| 36 | 38 | 18 | 19 | 23 | |
| Weapon | Silver Sword | A | Death Blow 2 | ||
| Support | B | Bowbreaker 3 | |||
| Special | Draconic Aura | C | |||
| HP | ATK | SPD | DEF | RES | |
|---|---|---|---|---|---|
| 34 | 31 | 28 | 15 | 29 | |
| Weapon | Silver Sword | A | Darting Blow 3 | ||
| Support | B | Drag Back | |||
| Special | Iceberg | C | Hone Fliers | ||
| HP | ATK | SPD | DEF | RES | |
|---|---|---|---|---|---|
| 34 | 31 | 28 | 15 | 29 | |
| Weapon | Silver Lance | A | Darting Blow 2 | ||
| Support | B | Drag Back | |||
| Special | Iceberg | C | Fortify Fliers | ||
| HP | ATK | SPD | DEF | RES | |
|---|---|---|---|---|---|
| 45 | 43 | 20 | 28 | 14 | |
| Weapon | Hauteclere | A | Iote's Shield | ||
| Support | B | ||||
| Special | Blazing Thunder | C | Threaten Def 3 | ||
| HP | ATK | SPD | DEF | RES | |
|---|---|---|---|---|---|
| 52 | 43 | 31 | 30 | 23 | |
| Weapon | Heavy Spear+ | A | Death Blow 3 | ||
| Support | B | Bowbreaker 3 | |||
| Special | Draconic Aura | C | |||
| HP | ATK | SPD | DEF | RES | |
|---|---|---|---|---|---|
| 49 | 50 | 25 | 26 | 30 | |
| Weapon | Silver Sword+ | A | Death Blow 3 | ||
| Support | B | Bowbreaker 3 | |||
| Special | Draconic Aura | C | |||
| HP | ATK | SPD | DEF | RES | |
|---|---|---|---|---|---|
| 45 | 43 | 36 | 22 | 37 | |
| Weapon | Silver Sword+ | A | Darting Blow 3 | ||
| Support | B | Drag Back | |||
| Special | Iceberg | C | Hone Fliers | ||
| HP | ATK | SPD | DEF | RES | |
|---|---|---|---|---|---|
| 60 | 51 | 27 | 36 | 19 | |
| Weapon | Hauteclere | A | Iote's Shield | ||
| Support | B | ||||
| Special | Blazing Thunder | C | Threaten Def 3 | ||
| HP | ATK | SPD | DEF | RES | |
|---|---|---|---|---|---|
| 45 | 43 | 36 | 22 | 37 | |
| Weapon | Silver Lance+ | A | Darting Blow 3 | ||
| Support | B | Drag Back | |||
| Special | Iceberg | C | Fortify Fliers | ||
| HP | ATK | SPD | DEF | RES | |
|---|---|---|---|---|---|
| 61 | 46 | 34 | 33 | 25 | |
| Weapon | Heavy Spear+ | A | Death Blow 3 | ||
| Support | B | Lunge | |||
| Special | Draconic Aura | C | Drive Def 2 | ||
| HP | ATK | SPD | DEF | RES | |
|---|---|---|---|---|---|
| 57 | 52 | 27 | 28 | 33 | |
| Weapon | Zanbato+ | A | Death Blow 3 | ||
| Support | B | Bowbreaker 3 | |||
| Special | Moonbow | C | Drive Def 2 | ||
| HP | ATK | SPD | DEF | RES | |
|---|---|---|---|---|---|
| 52 | 45 | 39 | 24 | 40 | |
| Weapon | Slaying Edge+ | A | Darting Blow 3 | ||
| Support | B | Hit and Run | |||
| Special | Iceberg | C | Ward Fliers | ||
| HP | ATK | SPD | DEF | RES | |
|---|---|---|---|---|---|
| 52 | 46 | 39 | 24 | 40 | |
| Weapon | Silver Sword+ | A | Darting Blow 3 | ||
| Support | B | Flier Formation 3 | |||
| Special | Iceberg | C | Hone Fliers | ||
| HP | ATK | SPD | DEF | RES | |
|---|---|---|---|---|---|
| 69 | 54 | 29 | 39 | 21 | |
| Weapon | Hauteclere | A | Iote's Shield | ||
| Support | B | Flier Formation 3 | |||
| Special | Blazing Thunder | C | Fortify Fliers | ||
| HP | ATK | SPD | DEF | RES | |
|---|---|---|---|---|---|
| 52 | 45 | 39 | 24 | 40 | |
| Weapon | Slaying Lance+ | A | Iote's Shield | ||
| Support | B | Drag Back | |||
| Special | Pavise | C | Fortify Fliers | ||
User Submitted Teams
Zelgius: +Def/-Atk, Alondite, Swap, Black Luna, Fierce Stance 3, Vantage 3, Panic Ploy 3, QR seal
Fjorm: Neutral, Leiptr, Draw Back, Ice Mirror, Atk/Def Bond 3, Shield Pulse 3, Drive Atk 2, CD seal
Azura: +Def/-Atk, Sapphire Lance+, Sing, Speed +3, WoM 2, Hone Spd 3, Hone Atk seal
Lachesis: +Atk/-Res, Dazzling Fear+, Physic+, Miracle, Attack +3, Wrathful Staff 3, Savage Blow 3, Drive Def seal
Zelgius does most of the work baiting lance flier with Lachesis close enough for drive def for extra bulk. Fierce Stance is a huge boost as Zelgius only enemy phase counterattacked. Had Lachesis heal him after first round of enemy phase attacks. One Sword Flier may fly south instead of toward Zelgius, but Fjorm can tank. Once the Heavy Spear Lancer gets close funnel him into Fjorm and Lachesis with help from Azura dancing can mop him up on next player phase.
Nino is 5* +ATK, standard optimal build with Threaten Res 3 and Speed +3 seal
Lute is +ATK, standard optimal build with no A slot skill and no seal. She was used primarily to take care of the red units so she may or may not be replaceable with any high damage blue mage/sapphire lance user.
The dancers are not involved in combat, but must have Wings of Mercy 2 at least.
Have everyone start in the BR corner with Nino just out of danger, Azura south of her. Lute in the corner with Olivia left of her. Nino will initiate on the blue flier then use draw back.
The rest is mostly positioning. Nino will kill everything except for the red units which Lute took care of.
For this build to work, the requirement is a strong Delthea with reposition (although I'm sure Linde with an identical build could do this too), two dancers, and a defensive red unit.
My Delthea specifically has Dark Aura, Reposition, Moonbow, Fury 3, Desperation 3, Drive Atk & an Attack +3 seal. She's also +SPD. The only other important build is some sort of high defense infantry unit who can withstand and kill Michalis. My Tiki has triangle adept and 32 defense, so she tanked the hit and killed him next round. Dancers of any sort are very useful on this map as the other two units, but PA!Azura would be most beneficial as she helps Delthea kill units.
Strategy:
First, I positioned most units (except for Tiki) on the right side of the map. Then, when they were all positioned, I had Delthea attack the lance flier. I used Azura to dance, and had Delthea reposition everyone out of the way. The next round, Delthea kills the lance flier and the sword cavalier on the top right. Tiki has to tank a hit from Michalis, and Delthea can eventually make her way to the other side of the map and kill all remaining units with the help of dancers.
https://youtu.be/_DyT2VEyyi0
https://youtu.be/jYu0eAvT770


