


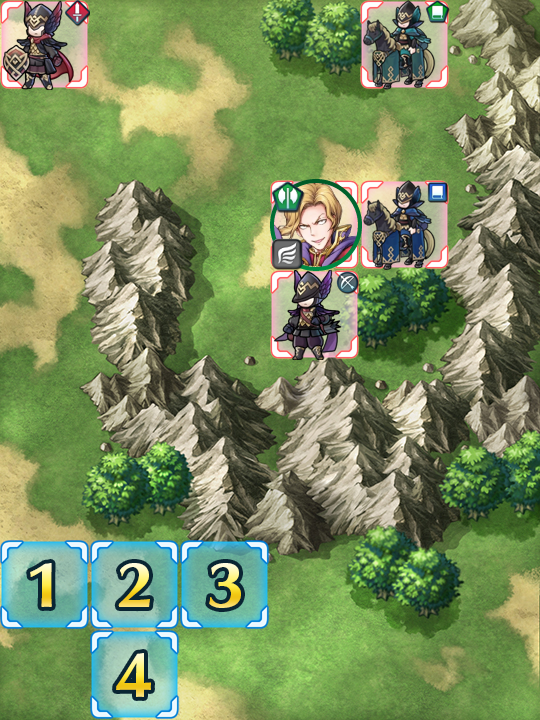
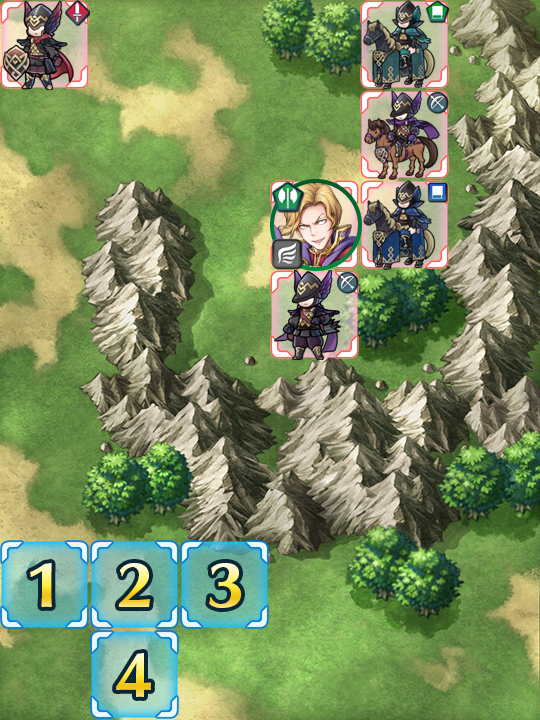
Map
- Normal
- Infernal
Narcian: Wyvern General
Oh Narcian, we sure have come a long way, haven’t we? As the first GHB we ever received, Narcian’s map was one of the primary factors in the popularization of Nino due to her role in striker + dancer + draw back combo. Given the extremely high level difficulty that later GHBs have provided, Narcian’s GHB is much simpler in comparison. This is especially true given Narcian himself carries an Emerald Axe, making him easy to overcome with pretty much any powerful red ally.
Thankfully, even Infernal difficulty hasn’t added many unexpected complications. None of the archers possess Cancel Affinity, meaning that they can be easily KO’d with a Triangle Adept Raven mage carrying Bowbreaker. The Green mage cavalier totes Gronnraven, but also only has 19 Defense and 28 Speed, meaning he can easily be doubled by Bow users and quadded by Brave Bow users utilizing buffs. The closest thing to a surprise on this map is the Red infantry sword with Zanbato, which is effective against Cavalry units. Given, however, that you’ll likely be dealing heavy damage to him first -- if not KOing him outright -- he shouldn't prove to be much of an issue.
Before you begin teambuilding, it’s completely possible you already possess everything you need to beat this map. Created by Gamepress staff member RedFerrari1998, the video guide below uses only F2P units and seals -- see the description for more details. If it doesn’t work for you, though, then read on!
Who To Choose
As is generally true of GHBs, the individual units you will use is very important as they will primarily inform your strategy. There are a few routes you can take depending on what units you have available to you, and, of course, adjustment based on the units you possess is always a possibility.
Strikers
Since the easiest ways of starting this map require a striker, Brave Bows prove useful in this GHB due to their quadding potential, especially when combined with SPD buffs / spurs / drives or a breaker skill. Speedy bow users are an additional option although their damage output may be less depending on their currently active buffs. Brave Lyn, Bridal Cordelia, Klein, and Setsuna are potential strikers you may want to use.
Alternatively, Brave and Blade tome users can also serve to be just as useful if your team composition provides them with the appropriate buffs. S!Corrin, S!Camilla, Cecilia, Reinhardt, Nino, Tharja, and Tailtiu are all options here. Melee Brave Fliers can enact an alternate method of attack over the mountains while utilizing Hit and Run or Drag Back and a dancer to retreat, making them useful as well. Cordelia, Cherche, Elincia, and Hinoka may serve you well here.
Also of note are strong mages like Linde, Delthea, Celica, Sanaki, Julia, and Deirdre, who are able to independently check two (or more) units on this map on their own, especially if they're using a breaker skill. Triangle Adept Raven Mages are also useful, given their ability to not only win matchups against the color they are strong against but also handle the archers in this GHB as well.
Baiters
Although it’s much more effective to use a striker on this map, if you don’t have one, you may attempt to bait at the beginning of the danger zone directly above starting space (1) instead.
A Blue Distant Counter unit is a must here -- if you use a Red unit, then the Blue Mage Cavalier will KO them. Unless you just so happen to have a fully built Distant Counter Blue to use (or a really bulky Close Counter Blue mage, but what’s the probability of that) then your best option is Nowi, especially if she’s toting the Distant Defense seal.
Alternatively, you may choose to bait the Archer (and/or the Blue Mage Cavalry) over the mountains. In that case, you’ll want to use Triangle Adept Raven S!Camilla, Iote’s Shield S!Camilla, Iote’s Shield Michalis, Iote’s Shield Cherche, or Iote’s Shield Minerva.
Once the map gets started, though, it’s completely possible (and even suggestible) that you’ll have to use tanks in order to block to chokepoint of this map. Bulky units with Distant Counter capabilities like Hector, LA!Hector, Black Knight, and Xander can prove useful here, especially if you use careful positioning to ensure that they aren’t put in the range of enemies that they have a direct disadvantage against.
Dancers
Dancers help support units with high firepower, may even have a decent offensive presence themselves, and can usually tank a hit or two, if need be. Olivia, PA!Azura, PA!Inigo, PA!Olivia, Azura, NY!Azura, and Ninian all provide the support that high-firepower units need while also possessing the ability to net a few KOs themselves.
Strategy
Strategizing for this GHB is made much simpler by the fact that there are no reinforcements. While it’s difficult to exactly predict what will happen due to IV / Merge variance, here’s some general tips to get you started.
Starting Strong
As is customary for most GHBs, the enemies on Narcian’s map will not start to move unless they are baited, damaged, or KO’d. Since this map layout allows for a strike and retreat strategy and a baiting strategy, you’ll have to choose between an offensive or defensive opening turn.
As was mentioned in the baiters section above, you really only have three viable options for baiting -- a) the space in the start of the danger zone above starting space (1), b) the space on the mountains directly above starting space (3), and c) the space on the mountains two spaces right and one space above starting space (3). Space c has the advantage of only requiring you to withstand the attack of one foe, the infantry archer, due to the trees blocking the cavalry units from targeting that space. Space b has a similar effect if you bait with a flier that cannot counterattack. Otherwise, you’ll have to tank two units (at least).
The preferable strategy (and the one that originally broke this GHB wide open), however, is to use a ranged unit to attack the infantry Sword, dance your unit, and then Draw Back or Reposition your dancer out of the enemy’s range. The advantages of this method are clear and numerous -- since this foe only has 25 RES, it’s likely that you’ll get an easy KO here, especially if you have a fast Blade mage at your disposal, have the weapons triangle on your side, use a breaker skill, or have an inclination towards just using Reinhardt. Brave bow users or particularly speedy archers are also an option, although they’ll hit this enemy in his stronger DEF. Swordbreaker is also suggested here along with a low cooldown special like Moonbow or Luna if you’re using a Brave Archer, as when you attack an appropriate unit, you’ll be able to quad.
It’s also worth noting that melee fliers with Hit and Run or Drag Back can attack the archer, KO him, and instantly retreat with the help of a dancer, or, if not fully built, can be used in later turns to kite the archers around the map. This will make it much easier for you to pick off the enemy and prevent yourself from getting overwhelmed.
Preferably, you’ll want to net at least one KO this turn, although that may not be possible depending on the units you have available to you. If your bait is missing out on finishing off the red sword or the ranged enemies, try the Quick Riposte seal or inherit the 2nd level of the skill onto your chosen baiter (which can be found on a 4 star Subaki). Vantage may also work here as a method of hitting the Archer or Blue Cavalry Mage hard once the Red Sword has been baited. If your striker is having a similar issue, the Attack+3 Seal and a Hone Attack buff can work wonders. A healer may also be useful if you’re baiting, especially if they tote Physic+ -- they’ll be able to heal at-range or provide an assist with a Wrathful and / or Dazzling attack, if need be.
Generalizing the General
If you’re worried about handling Narcian himself, you really shouldn’t be. Unlike most of the “bosses” on GHB maps, Narcian’s base kit makes him a rather big pushover. Furthermore, his status as a flier in the hands of the enemy AI somewhat hinders him instead of helping him -- his habit of making a beeline for the mountain range in order to target your Blue units makes him incredibly easy to bait, and splitting him up from his forces means that once he’s KO’d, you’ll have one less enemy to deal with.
To deal with Narcian, all you need is any decent melee Red unit (seriously, even a 4 star Olivia can fill this role), a Red unit who can reach 37 SPD or more when initiating, or a speedy / Brave Bow Archer. KOing him is really that simple, due to the built-in Triangle Adept effect on his weapon and the effective damage Archers will deal to him. Be warned, though -- due to this. if one of your Blue units is unfortunate enough to get in his way, they’ll pretty much be vaporized instantaneously.
Use Dancers
As always, dancers serve a valuable role refreshing your units and allowing them to get some KOs they cannot net outright. Some dancers can even provide valuable buffs that can help a unit either deal greater damage or survive a round of combat they would be KO’d by otherwise.
It’s Over, I Have The High Ground!
Part of the reason this map is one of the easier ones is definitely because of the layout, but the funnel effect this map has may prove challenging to you if you’ve never encountered it before. Combined with the plethora of enemies possessing an extended range due to their tomes, bows, and cavalry movement, it’s possible you may struggle with this GHB at first.
The solution to this problem is to build a balanced team (plus a dancer) who can handle more than one enemy on this map. In this GHB, it’s worthwhile to not put all your eggs in one basket -- if you're having issues, try to bring with you both strikers and tanks so as to be able to use the chokepoint to your advantage. Don’t forget that if your strikers have a color advantage and are able to counterattack, they should be able to bait, with Reinhardt being the sole exception due to his exceptionally low SPD. Buffs (especially class-specific buffs) may also provide your units with the extra boost of damage they need to net a tricky KO, or may raise their defenses to the point that they survive a hit they would not whether otherwise.
If At First You Don’t Succeed
As is true of all high difficulty content, the potential variance in unit builds that Skill Inheritance brought along with the random nature of summoning has resulted in pretty much every single player having different “building blocks” to work with. This, when combined with the high difficulty level of Infernal, may prove frustrating while someone is trying to find the right combination of units and moves. The key thing to keep in mind is that it may take multiple tries of the map and a few stamina potions for you to find a strategy that works for you. Every single turn you complete gets you one step closer to completing the puzzle. Reading about or watching videos of successful strategies may also help you break through a particularly difficult turn that you can’t complete, or may give you ideas of a new unit to use.
Map Enemies
- Normal
- Hard
- Infernal
| HP | ATK | SPD | DEF | RES | |
|---|---|---|---|---|---|
| 36 | 26 | 18 | 20 | 17 | |
| Weapon | Emerald Axe | A | Death Blow 2 | ||
| Support | B | ||||
| Special | Reprisal | C | Savage Blow 3 | ||
| HP | ATK | SPD | DEF | RES | |
|---|---|---|---|---|---|
| 32 | 27 | 19 | 19 | 14 | |
| Weapon | Steel Sword | A | |||
| Support | B | Axebreaker 2 | |||
| Special | Escutcheon | C | Threaten Res 2 | ||
| HP | ATK | SPD | DEF | RES | |
|---|---|---|---|---|---|
| 25 | 28 | 16 | 10 | 21 | |
| Weapon | Elwind | A | Death Blow 2 | ||
| Support | B | ||||
| Special | Reprisal | C | |||
| HP | ATK | SPD | DEF | RES | |
|---|---|---|---|---|---|
| 25 | 28 | 16 | 10 | 21 | |
| Weapon | Elthunder | A | Triangle Adept 2 | ||
| Support | Ardent Sacrifice | B | Swordbreaker 2 | ||
| Special | C | ||||
| HP | ATK | SPD | DEF | RES | |
|---|---|---|---|---|---|
| 31 | 26 | 18 | 18 | 9 | |
| Weapon | Steel Bow | A | Death Blow 2 | ||
| Support | B | ||||
| Special | Reprisal | C | Savage Blow 2 | ||
| HP | ATK | SPD | DEF | RES | |
|---|---|---|---|---|---|
| 48 | 37 | 24 | 28 | 22 | |
| Weapon | Emerald Axe+ | A | |||
| Support | B | Lancebreaker 3 | |||
| Special | Vengeance | C | Savage Blow 3 | ||
| HP | ATK | SPD | DEF | RES | |
|---|---|---|---|---|---|
| 42 | 38 | 26 | 26 | 18 | |
| Weapon | Silver Sword | A | |||
| Support | B | Axebreaker 2 | |||
| Special | Escutcheon | C | Threaten Res 2 | ||
| HP | ATK | SPD | DEF | RES | |
|---|---|---|---|---|---|
| 31 | 38 | 21 | 14 | 30 | |
| Weapon | Gronnraven | A | Death Blow 2 | ||
| Support | B | ||||
| Special | Reprisal | C | |||
| HP | ATK | SPD | DEF | RES | |
|---|---|---|---|---|---|
| 31 | 40 | 21 | 14 | 30 | |
| Weapon | Thoron | A | Triangle Adept 2 | ||
| Support | Ardent Sacrifice | B | Swordbreaker 3 | ||
| Special | C | ||||
| HP | ATK | SPD | DEF | RES | |
|---|---|---|---|---|---|
| 41 | 32 | 20 | 24 | 13 | |
| Weapon | Brave Bow | A | Death Blow 2 | ||
| Support | B | ||||
| Special | Reprisal | C | Savage Blow 2 | ||
| HP | ATK | SPD | DEF | RES | |
|---|---|---|---|---|---|
| 67 | 44 | 32 | 35 | 29 | |
| Weapon | Emerald Axe | A | Earth Boost 3 | ||
| Support | Rally Atk/Spd | B | Lancebreaker 3 | ||
| Special | Vengeance | C | Savage Blow 3 | ||
| HP | ATK | SPD | DEF | RES | |
|---|---|---|---|---|---|
| 61 | 48 | 34 | 33 | 25 | |
| Weapon | Zanbato+ | A | Darting Blow 3 | ||
| Support | B | Axebreaker 3 | |||
| Special | Escutcheon | C | Threaten Res 3 | ||
| HP | ATK | SPD | DEF | RES | |
|---|---|---|---|---|---|
| 46 | 50 | 28 | 19 | 38 | |
| Weapon | Gronnraven+ | A | Death Blow 3 | ||
| Support | B | Axebreaker 3 | |||
| Special | Reprisal | C | Panic Ploy 3 | ||
| HP | ATK | SPD | DEF | RES | |
|---|---|---|---|---|---|
| 55 | 54 | 28 | 30 | 29 | |
| Weapon | Slaying Bow+ | A | Fury 3 | ||
| Support | B | Bowbreaker 3 | |||
| Special | Moonbow | C | Atk Ploy 3 | ||
| HP | ATK | SPD | DEF | RES | |
|---|---|---|---|---|---|
| 46 | 52 | 28 | 19 | 38 | |
| Weapon | Thoron+ | A | Triangle Adept 3 | ||
| Support | B | Swordbreaker 3 | |||
| Special | C | Drive Def 2 | |||
| HP | ATK | SPD | DEF | RES | |
|---|---|---|---|---|---|
| 59 | 50 | 35 | 35 | 21 | |
| Weapon | Slaying Bow+ | A | Fury 3 | ||
| Support | B | G Tomebreaker 3 | |||
| Special | Reprisal | C | Panic Ploy 3 | ||
User Submitted Teams
*Note: Robin should have Reposition.
Steps:
1) Move Robin to lure out the blue cavalier and sword fighter. Have Priscilla stand behind him. (This will take two turns.)
2) Move Robin backwards and have Priscilla heal him.
3) You can put Narcian on the nearest forest tile if you haven't already.
4) Put Alfonse behind Priscilla if he isn't there yet. End your turn.
---Now, a sword fighter will be in front of Robin, and enemy Narcian will have attacked your Narcian.---
5) You can use your Narcian to attack the enemy Narcian if you want.
6) You can attack the enemy Narcian with Robin, but place him behind your Narcian.
7) Place Alfonse in front of Priscilla. End your turn, but heal Robin if you want.
---None of the enemy units have died yet, but the enemy Narcian is at low health, and so is your Alfonse.
8) Heal Alfonse.
9) Attack the enemy Narcian with your Narcian. End your turn.
---The sword fighter will be at 1 HP.---
10) Move Narcian one space to the right. End your turn.
---Alfonse and Priscilla will be at very low health.---
11) Heal Alfonse if needed.
12) Attack the archer with Narcian.
13) Move Alfonse behind Priscilla.
14) Move Robin next to Alfonse and use Reposition on him.
---The green cavalier will have attacked Narcian, and the blue cavalier will have attacked Priscilla.---
15) Attack the green cavalier with Narcian.
16) Attack the blue cavalier with Priscilla if you want.
---The blue cavalier will have attacked Narcian.---
17) Attack the blue cavalier with Narcian or Priscilla. Either way, the cavalier's dead.
Fourth slot can be anyone to help killing the sword user.
1st Let the "fortify res camilla" kill the archer and tank the others.
2nd (stay away from the range of the sword user) Kill Narcian with Narcian and kill one of the mage with Camilla
(I'm playing safe after this)
3rd Pull back and let the sword user and the other mage come to you. Kill the mage easily with Camilla and the sword user with any of your fave chars.


