


Map
- Normal
- Infernal

Grand Hero Battle: Berkut
Say Uncle! Returning from the depths of Grand Hero Battle purgatory is Berkut, giving you the chance to beat his map if you haven’t completed it already. This is a great opportunity if you’re a newer player or didn’t have the right units to beat Berkut the other times his map has been run. As per usual, you should expect some curveballs, but the lack of reinforcements and easy-to-use defense tiles should make completion of Infernal a bit easier than it normally is. While the strange starting positions may give you some pause, there’s no issue with trying out the map until you figure out where to properly position your units. Trial and error will likely be key here -- and will serve you well if you don’t allow it to try your patience.
Before you begin teambuilding, it’s completely possible you already possess everything you need to beat this map. Created by Gamepress staff member RedFerrari1998, the video guide below uses only F2P units, no Skill Inheritance, and Seals -- see the description for more details. If it doesn’t work for you, though, then read on!
Who To Use
As is generally true of Grand Hero Battles, the individual units used is very important as they will primarily inform a strategy. There are a few routes one can take depending on what units are personally available, and, of course, adjustment based on the units one possesses is always a possibility.
Baiters
Although the enemies on this map will start moving regardless of whether you bait, damage, or KO them, it’s advisable to use a baiter so that your other units won’t be overwhelmed by your advancing foes.
Armors such as Hector, Valentine Hector, Fallen Hardin, Black Knight, Zelgius, and Winter Tharja are able to hit hard very upon counterattacking, especially if they’re making use of Quick Riposte or Vengeful Fighter, and can make use of Armored Boots to extend their range as well as class-specific buffs. Cavalry tanks like Sigurd, Xander, and Camus perform particularly well with class-specific buffs, but may struggle to maneuver due to trees.
Nowi, Young Tiki, Adult Tiki, Fae, Myrrh, and Fallen Robin all boast decent mixed defenses and also have access to class-specific buffs. Legendary Robin is also a potential choice, but may struggle due to her lack of color advantage, and, like Myrrh, must be wary of archers if she does not run Dragonskin or Iote’s Shield.
Great F2P options include Legendary Ike, who natively sports Warding Breath which boosts his Resistance and grants him cooldown reduction, and Fjorm, who is able to tank the red mage with her high Resistance and battle ranged foes with her exclusive Special, Ice Mirror. Brave Ike is another potentially F2P option (depending on if he was chosen as one’s free hero or not) who also offers cooldown reduction.
Strikers
As per usual, strikers are a potent force who can usually take out most foes without breaking a sweat. Though they can get easily cornered on this map, skills like Escape Route and Wings Of Mercy can grant them even greater mobility than they already possess.
Archers are powerful strikers that can either finish off foes on their own or provide an assist. In particular, however, Brave Bow users can be incredibly potent on this map due to their ability to overpower and finish off any foes your tanks may otherwise struggle with. New Year Corrin, Brave Lyn, WF Hinoka, Bridal Cordelia, Klein, and Setsuna are potential strikers you may want to use, with a special mention going to New Year Corrin and Brave Lyn given their F2P status.
Alternatively, melee Brave users are able to hit foes twice without retaliation, and may even quad hit if they outspeed an enemy. Cherche, Cordelia, Hinoka, Elincia, and WT Reinhardt are all great Brave users who can make excellent use of class-specific buffs. Finn is a great F2P option who would work particularly well in a cavalry team.
Brave and Blade tome wielders can also serve to be useful if your team composition provides them with the appropriate buffs, though speedy mages can also be effective strikers. Tharja, Reinhardt, Tailtiu, Linde, Nino, and WT Olwen are potential options here, especially if they are equipped with a Breaker skill to add to their coverage and are provided with class-specific buffs or a buffbot like Eirika or Ephraim.
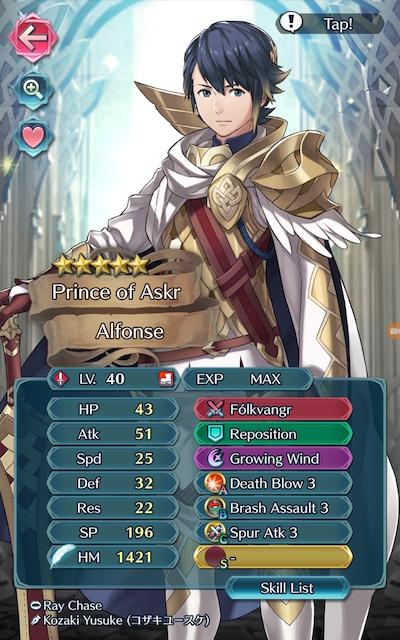
A striker, however, doesn’t always require heavy investment. Although Alfonse isn’t speedy and doesn’t possess a native Brave sword, Death Blow (which he naturally learns) ensures that he can heavily damage if not outright KO most green enemies. Additionally, his good physical bulk ensures he can survive a foe’s attack if he must.
Dancers
Dancers help provide support, may even have a decent offensive presence themselves, and can usually tank a hit or two, if need be. Olivia, Performing Olivia, Performing Inigo, Performing Shigure, Performing Azura, Azura, New Year Azura, and Ninian all give the refreshment that high-firepower units need while also possessing the ability to provide an assist to KO an enemy.
Healers
While not generally a great choice over units who can deal heavy damage or dancers, Healers can be incredibly useful in this Grand Hero Battle due to their ability to provide valuable healing to your tanks. Genny, Priscilla, Elise, Nanna, Wrys, and Lissa are potential additions to a team that may serve you well on this map.
Strategy
Strategizing for this Grand Hero Battle shouldn’t be too challenging due to the absence of reinforcements. While it can be difficult to exactly predict what will happen due to IV / Merge variance, here’s some general tips to get you started.
Stuck In The Middle With You
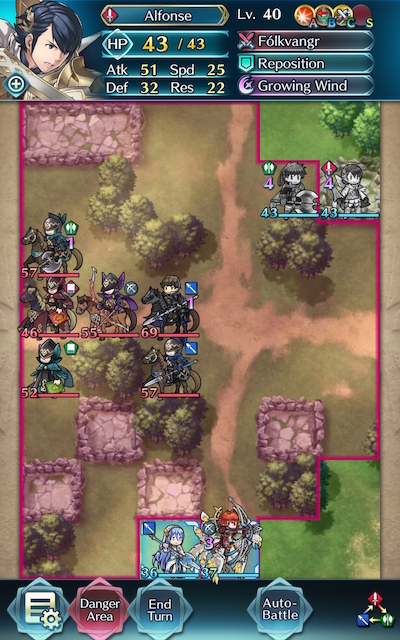
Berkut’s map certainly has unique starting positions, and that’s to put it lightly. Since it essentially forces you to split your forces, your first priority likely should be to either fortify your position or re-unite your team.
Ideally, you’ll want to influence the AI by at least having one baiter here, though if you can reach one of the defense tiles with a unit who can counterattack regardless of range, that may work as well. Otherwise, simply aim for KOing or heavily damaging one of the foes that charge forward. Do note that the archer carries a Firesweep bow and therefore can’t be KO’d on Enemy Phase.
Mad Skillz
If you’re using a striker or a dancer, you may want to consider allowing them to receive damage on this turn as well. Doing so will grant them the ability to use Escape Route to rejoin the rest of their teammates on the top of the map, and will also activate Wings of Mercy if any of your other units possess it. Since both of these skills are reasonably accessible (Escape Route 2 can be found on a 4 star Marth and Escape Route 3 can be found on a 4 star Cecilia, while Wings of Mercy 2 can be found on a 4 star Frederick and Palla and Wings of Mercy 3 can be found on a 4 star Cain) they shouldn’t require a lot of feather investment -- and unsurprisingly, teleporting around this map certainly makes it much easier to handle. Another handy tool is Savage Blow 3 (found on 4 star Camilla) and the Savage Blow Seal -- its AOE damage makes finishing off foes a less arduous task.
Two For The Price Of One
Unless your tank is desperately low on health, it’s almost always a good idea to bait more than one foe at once. Because almost every foe on this map is slow as molasses and they do not carry brave weapons, you don’t have to worry about being doubled -- meaning that even a disadvantageous matchup that pits the weapons triangle against you shouldn’t prove devastating. There’s no need to be overly cautious, especially one your team is reunited and you have numbers on your side.
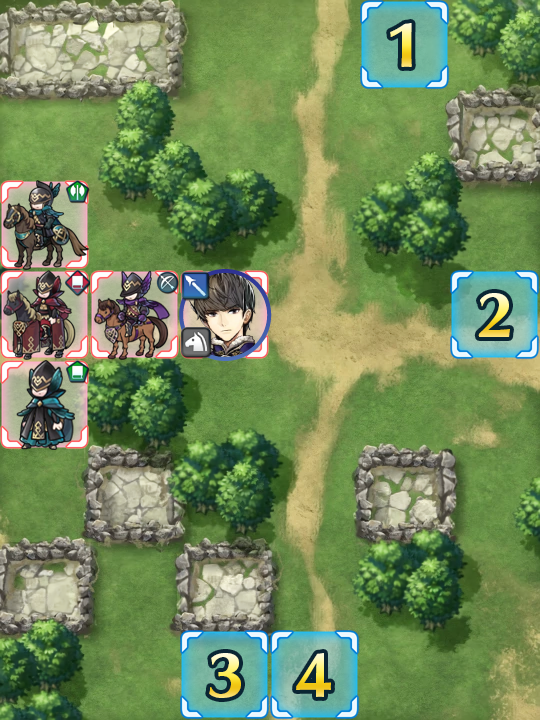
Manipulation Mastery
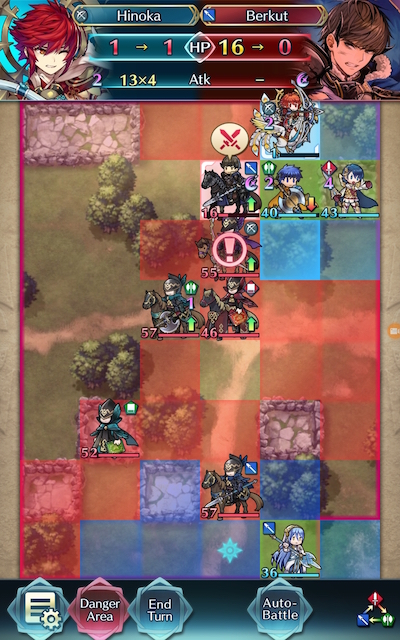
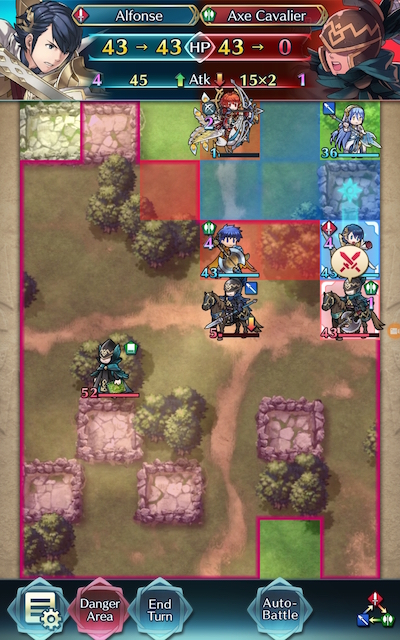
As with every map, it’s possible that the AI will act in unpredictable ways like how the lance cavalier attacked Brave Ike first in the screenshot below, causing the axe cavalier to advance. If this happens, don’t panic! Slow down and see if there’s an immediate solution to your issue -- it’s possible that you will be in an even better position than you were in before. If you’re well and truly stuck, you may want to try the map again while adjusting your positioning. Moving a unit one space up, down, right, or left can sometimes make all the difference.
The Key Of Caution
Nothing is worse than losing at the very last moment, so once you’re down to only one foe in the enemy’s forces, it’s always a good idea to take your time. They may have a special charged, or they could have a Defiant or Brazen skill active that you’re not expecting -- which, if it catches you off-guard, will cause you to curse your quick fingers. In general, being methodical with your moves and paying close attention to the battle forecast is a good habit to have, since it will grant you the ability to see if you need the help of Seals or skills to help you KO or survive a foe. Since there’s no benefit to performing your turns quickly, you can stare for as long as you want… and maybe the solution will come to you when you least expect it.

If At First You Don’t Succeed
Don’t be fooled by video walkthroughs of any Grand Hero Battle that you watch -- it’s very rare for anyone to beat high-difficulty content (or record a video of themselves doing so!) on their first try. Additionally, the potential variance in unit builds that Skill Inheritance brought along with the random nature of summoning has resulted in pretty much every single summoner having different “building blocks” to work with. This, when combined with the high difficulty level of Infernal, may prove frustrating while someone is trying to find the right combination of units and moves. The key thing to keep in mind is that it may take some light Skill Inheritance and Seal shuffling and multiple tries of the map to find a strategy that works for you. Every single turn you complete gets you one step closer to completing the puzzle. Finally, reading about or watching videos of successful strategies may also help you break through a particularly difficult turn that you can’t complete, or may give you ideas of a new unit to use.
Map Enemies
- Hard
- Lunatic
- Infernal
| HP | ATK | SPD | DEF | RES | |
|---|---|---|---|---|---|
| 45 | 41 | 16 | 24 | 18 | |
| Weapon | Berkut's Lance+ | A | Water Boost 3 | ||
| Support | B | ||||
| Special | Blazing Flame | C | Ward Cavalry | ||
| HP | ATK | SPD | DEF | RES | |
|---|---|---|---|---|---|
| 36 | 34 | 18 | 19 | 23 | |
| Weapon | Killer Axe | A | Life and Death 3 | ||
| Support | B | ||||
| Special | Moonbow | C | Breath of Life 2 | ||
| HP | ATK | SPD | DEF | RES | |
|---|---|---|---|---|---|
| 29 | 34 | 19 | 12 | 27 | |
| Weapon | Rauðrwolf | A | Distant Def 2 | ||
| Support | B | Axebreaker 2 | |||
| Special | C | Fortify Cavalry | |||
| HP | ATK | SPD | DEF | RES | |
|---|---|---|---|---|---|
| 34 | 31 | 25 | 15 | 20 | |
| Weapon | Gronnraven | A | Warding Blow 2 | ||
| Support | B | Seal Spd 3 | |||
| Special | C | Threaten Res 2 | |||
| HP | ATK | SPD | DEF | RES | |
|---|---|---|---|---|---|
| 34 | 35 | 18 | 19 | 23 | |
| Weapon | Firesweep Bow | A | Swift Sparrow 1 | ||
| Support | B | Seal Spd 2 | |||
| Special | C | Fortify Cavalry | |||
| HP | ATK | SPD | DEF | RES | |
|---|---|---|---|---|---|
| 60 | 49 | 23 | 31 | 25 | |
| Weapon | Berkut's Lance+ | A | Water Boost 3 | ||
| Support | B | ||||
| Special | Blazing Flame | C | Ward Cavalry | ||
| HP | ATK | SPD | DEF | RES | |
|---|---|---|---|---|---|
| 49 | 46 | 25 | 26 | 30 | |
| Weapon | Killer Axe+ | A | Life and Death 3 | ||
| Support | B | ||||
| Special | Moonbow | C | Breath of Life 3 | ||
| HP | ATK | SPD | DEF | RES | |
|---|---|---|---|---|---|
| 40 | 46 | 26 | 17 | 35 | |
| Weapon | Rauðrwolf+ | A | Distant Def 3 | ||
| Support | B | Axebreaker 3 | |||
| Special | C | Fortify Cavalry | |||
| HP | ATK | SPD | DEF | RES | |
|---|---|---|---|---|---|
| 45 | 42 | 32 | 20 | 28 | |
| Weapon | Gronnraven+ | A | Warding Blow 3 | ||
| Support | B | Seal Spd 3 | |||
| Special | C | Threaten Res 3 | |||
| HP | ATK | SPD | DEF | RES | |
|---|---|---|---|---|---|
| 48 | 47 | 23 | 25 | 24 | |
| Weapon | Firesweep Bow+ | A | Swift Sparrow 2 | ||
| Support | B | Seal Spd 3 | |||
| Special | C | Fortify Cavalry | |||
| HP | ATK | SPD | DEF | RES | |
|---|---|---|---|---|---|
| 69 | 52 | 25 | 34 | 27 | |
| Weapon | Berkut's Lance+ | A | Water Boost 3 | ||
| Support | B | Vantage 3 | |||
| Special | Blazing Flame | C | Ward Cavalry | ||
| HP | ATK | SPD | DEF | RES | |
|---|---|---|---|---|---|
| 57 | 54 | 32 | 23 | 28 | |
| Weapon | Killer Axe+ | A | Life and Death 3 | ||
| Support | B | Desperation 3 | |||
| Special | Moonbow | C | Breath of Life 3 | ||
| HP | ATK | SPD | DEF | RES | |
|---|---|---|---|---|---|
| 46 | 49 | 28 | 19 | 38 | |
| Weapon | Rauðrwolf+ | A | Distant Def 3 | ||
| Support | B | Axebreaker 3 | |||
| Special | C | Fortify Cavalry | |||
| HP | ATK | SPD | DEF | RES | |
|---|---|---|---|---|---|
| 52 | 45 | 35 | 22 | 31 | |
| Weapon | Gronnraven+ | A | Warding Blow 3 | ||
| Support | B | Seal Spd 3 | |||
| Special | C | Threaten Res 3 | |||
| HP | ATK | SPD | DEF | RES | |
|---|---|---|---|---|---|
| 55 | 50 | 25 | 27 | 26 | |
| Weapon | Firesweep Bow+ | A | Swift Sparrow 2 | ||
| Support | B | Seal Spd 3 | |||
| Special | C | Fortify Cavalry | |||
| HP | ATK | SPD | DEF | RES | |
|---|---|---|---|---|---|
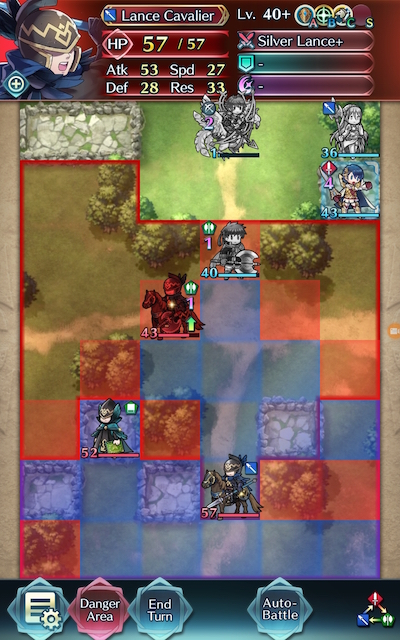
| 57 | 53 | 27 | 28 | 33 | |
| Weapon | Silver Lance+ | A | Grani's Shield | ||
| Support | B | Renewal 3 | |||
| Special | C | Goad Cavalry | |||
User Submitted Teams
Sharena the buff supporter, Tharja the magic nuke, Klein the sniper, and Nowi the tank.
All you need is them 4 star & 1 atk+ seal
https://www.youtube.com/watch?v=kzIpcMNbQXA
Nino: +spd/-def with fury, moonbow, and +3hp sacred seal
Reinhardt has Luna and pivot
Azura has hone atk 3
Start with nino and azura on bottom of the map, and Reinhardt on the very top.
Nino kills the lance cavalier and azura dances her to have nino drag her to the right. Reinhardt stays where he is and Xander moves out of danger. Then nino drags azura forward and gets danced to kill bow cavalier. Xander moves 2 spaces down and Reinhardt pivots to safety. Nino tanks a hit from berkut and should survive with 1 hp. After that it's pretty ez
After like 100 tries (not really) this team finally did it for me.
Camus:
gradivus, rising thunder, fury 3, vantage 3, threaten spd
Azura:
wings of mercy ****
Frederick:
brave axe+, reposition and wings of mercy ****
and Nino with death blow.
Wings of mercy is the most important thing.
Have Azura on top with Frederick to the east, Camus on bottom to the right and Nino to his left. Let Camus take a hit from the lance cavalier and move Nino to the opposite side of him. Put Frederick on the defense tile and have Azura dance for him directly above then move Frederick again to her left.
The bow knight should move down to the left so move Camus up to the defense tile and have Frederick teleport to his right side, following Azura to dance for Frederick and reposition her behind him and have Nino drag her away. Now from here lol I basically just ran away and used wings of mercy to far left of the map and had Frederick take out the green mage and Camus will end up taking out Berkut and the Red mage cavalier (?). Works whats best for you. Lol this probs isnt helpful
Numbers indicate position on the map each unit should occupy. Units listed are simply the exact ones I happened to have, and all their features may or may not be necessary. All units are assumed to be level 40 unless otherwise stated. Important skills are indicated by a *.
1. Olivia (4*, +HP, -DEF) - Silver Sword, Dance*, Hone Attack 3*
[Notes: IVs are not important, F2P.]
2. Frederick (5*, +ATK, -RES) - Brave Axe*, HP 1, Drag Back*, Fortify Defense 3, Luna* (Bonfire may work as well), Reposition*, Hone Resistance Seal
[Notes: Have enough to damage to 2 round KO Berkut. Easy to get unit.]
3. Camus (5*) - Gradivus*, Fury 3*, Vantage 3, Goad Cavalry 3, Growing Thunder, Reposition*, Spur Defense Seal
[Notes:]
4. Summer Tiki (5* +SPD, -ATK) - Melon Crusher+*, Close Defense 3*, Axe Valor 3, Sol
[Notes: Tiki must be able to one round KO the lance cavalier on the first turn. With melon crusher, this is possible with a neutral speed Tiki as she will still be able to double. However, a speed bane Tiki will not be able to accomplish this unless she has Quick Riposte. The boon should not matter. Replacements may include any physically tanky axe units with similar stats.]
Turn 1: Move Frederick to the defensive tile on the top right. Move Olivia into the forest and dance for Frederick. Have Frederick park at Olivia's direct left. Leave Camus and Tiki where they are.
(Enemy Phase: The lance cavalier should commit suicide on Tiki. Every other unit should move up toward Frederick and Olivia.)
Turn 2: Attack Berkut with Frederick, using Drag Back so that you end up on the defensive tile. Move Olivia down under Frederick and dance for him. Finish off Berkut with Frederick. Move Camus right 1 and up 2 spaces. Move Tiki directly below him.
(Enemy Phase: The bow cavalier should move up and right 1 space and attack Olivia, which she should be able to tank. The other units should approach closer.)
Turn 3: Move Frederick down 2 spaces and use Reposition on Olivia. Dance for Frederick. Move Frederick to the defensive tile at the bottom right. With Camus, move under Olivia and use Reposition. Move Tiki right one space.
(Enemy Phase: The bow cavalier should attack Camus. The red mage cavalier should move down, and the axe cavalier should move to the upper right next to the forest and under the defensive tile. The green mage should be lagging behind.)
Turn 4: Move Camus under the red mage cavalier and kill him. With Frederick, attack the bow cavalier, dragging him down. Finish off the bow cavalier with Tiki. Dance for Tiki, and move her up and right to block the axe cavalier's path.
(Enemy Phase: The axe cavalier should attack Tiki. The green mage should move closer.)
Turn 5: Finish off the axe cavalier with Frederick (or Tiki if you can). At this point, only the green mage should be left. This should be an easy kill: just position your units appropriately and ambush him with all your characters if necessary, though Frederick with a Goad Cavalry from Camus should be enough for the job.
As usual, I don't guarantee success because the AI may behave differently based on small changes. Good luck!


