


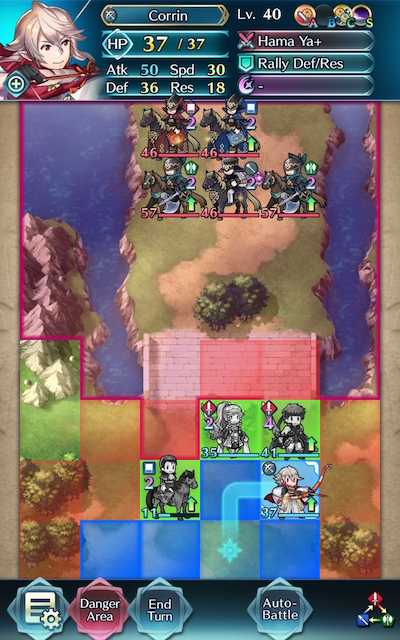
Map

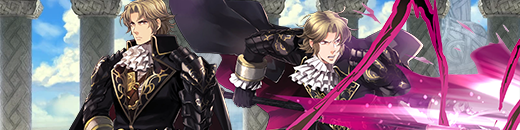
Camus: Sable Knight
Oh, Camus, how we’ve hoped and prayed for you to come back to us! As yet another returnee from Grand Hero Battle purgatory, Camus graces us with his knightly presence -- and has quite the entourage in tow. Like most of the older Grand Hero Battles, Camus’ map features no reinforcements, but don’t take that to mean he’s a pushover. Between the troubadour with a reduced cooldown Miracle and Rehabilitate, cavalry buffs galore, effective weaponry nullification abounds and foes carrying Pass (of all things!), it’s possible that you’ll find that despite Camus’ noble appearance, he’s the type to fight dirty. Don’t expect to bring Gerome and steamroll this map -- you’ll have to work harder than that to win.
That doesn’t mean all hope is lost, though! With careful exploitation of the AI, some seals, and, of course, copious amounts of patience, Camus will no doubt fall to the troops under your command. This battle may be hard to brute-force, but it’s far from impossible. With enough experimentation, you’ll no doubt find a strategy that works for you.
Who To Choose
As is generally true of Grand Hero Battles, the individual units used is very important as they will primarily inform a strategy. There are a few routes one can take depending on what units are personally available, and, of course, adjustment based on the units one possesses is always a possibility.
Baiters
Although you may want to get this map moving initially with a strike and retreat method, it’s advisable to bring a baiter of some sort to have a mixed-phase presence.
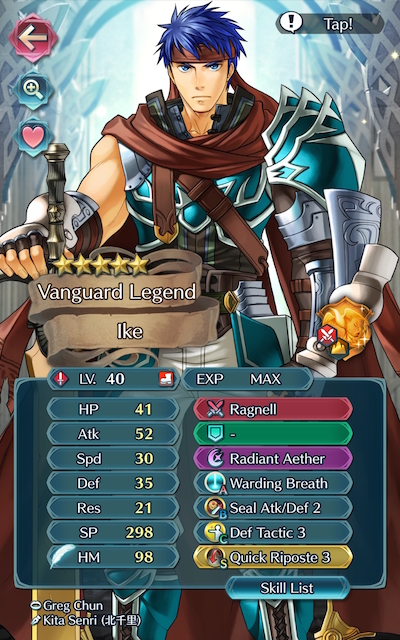
Armors such as Hector, Valentine Hector, Zelgius, and Winter Tharja are able to hit hard very upon counterattacking, especially if they’re making use of Quick Riposte or Vengeful Fighter. Cavalry tanks like Sigurd, Eldigan, Xander, and Camus perform particularly well with Fortify buffs. Nowi, Young Tiki, Adult Tiki, Fae, Myrrh, Male Kana, Female Kana, and Fallen Robin all boast decent mixed defenses. Legendary Robin is also a potential choice, but may struggle due to her lack of color advantage. Great F2P options include Black Knight, who can counterattack at any range and carries the powerful Black Luna, Legendary Ike, who natively sports Warding Breath which boosts his Resistance and grants him cooldown reduction, and Fjorm, who is able to tank the mages with her high Resistance and her exclusive Special, Ice Mirror.
Strikers
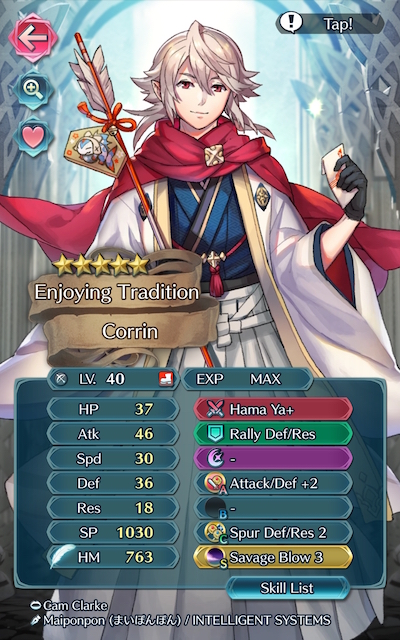
Archers are powerful strikers that can either finish off foes on their own or provide an assist. In particular, however, Brave Bow users can be incredibly potent on this map due to their ability to overpower and finish off any foes your tanks may otherwise struggle with. New Year Corrin, Brave Lyn, WF Hinoka, Bridal Cordelia, Klein, and Setsuna are potential strikers you may want to use, with a special mention going to New Year Corrin and Brave Lyn given their F2P status.
Alternatively, melee Brave users are able to hit foes twice without retaliation, and may even quad hit if they outspeed an enemy. Cherche, Cordelia, Hinoka, Elincia, and WT Reinhardt are all great Brave users who can make excellent use of class-specific buffs. Finn is a great F2P option who would work particularly well in a cavalry team.
Brave and Blade tome wielders can also serve to be useful if your team composition provides them with the appropriate buffs, though speedy mages can also be effective strikers. Tharja, Reinhardt, Tailtiu, Linde, Nino, and WT Olwen are potential options here, especially if they are equipped with a Breaker skill to add to their coverage and are accompanied by a buffbot like Eirika or Ephraim. Nino and WT Olwen are of particular note due to their weapons triangle advantage over Camus himself -- with the enough buffs, they should be able to ORKO him.
Dancers
Dancers help provide support, may even have a decent offensive presence themselves, and can usually tank a hit or two, if need be. Olivia, Performing Olivia, Performing Inigo, Performing Shigure, Performing Azura, Azura, New Year Azura, and Ninian all give the refreshment that high-firepower units need while also possessing the ability to provide an assist to KO an enemy.
Healers
While not generally a great choice over units who can deal heavy damage or dancers, Healers can be incredibly useful in this Bound Hero Battle due to their ability to provide valuable healing to your tanks. Genny, Priscilla, Elise, Nanna, Wrys, and Lissa are potential additions to a team that may serve you well on this map.
Strategy
Strategizing for this Grand Hero Battle shouldn’t be too challenging due to the absence of reinforcements. While it can be difficult to exactly predict what will happen due to IV / Merge variance, here’s some general tips to get you started.
Charge and Retreat
Looking at this map, there’s two immediately obvious places to bait -- the leftmost bridge and the rightmost bridge. With enough buffs, either of these positions will work, though you’re most likely much better off striking and retreating to save your units the pain of weathering multiple attacks in a row.
It should be noted, however, that striking and retreating with any ranged cavalry unit gives you a valuable opportunity to KO Camus outright, especially if they deal magic damage and carry Lancebreaker. Given the potency of cavalry buffs and Camus’ ability to counterattack at any range, it’s a good idea to try to get him off the battlefield as soon as possible. If you can’t (most likely due to needing to target his higher Defense), no need to worry -- applying a wide-ranged debuff with your chosen striker through use of a Smoke skill can cause the enemy to focus their energy in all the wrong places.
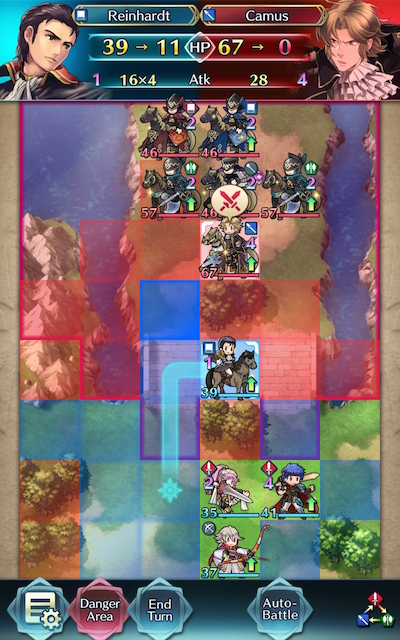
The One-Two Punch
Thankfully, the fact that you’re allowed to bring a four-unit team allows you to not have to commit to only one unit type. Just because you choose to bring a striker (or two) doesn’t mean you can’t bring a tank as well -- and once your striker retreats to safety, it’s now may be a good time for your baiter to do some work.
Choosing which side to bait on may take some trial and error, so if you need to do some seal shuffling, it’s best to try to not to get frustrated. Keep in mind key Speed thresholds and review your seal list, as you may have some new tools at your disposal that you don’t remember. Certain units also may serve a similar purpose to the ones you’re using with the added bonus of offering buffs, Drives, and/or Spurs.
Miraculous Miracle
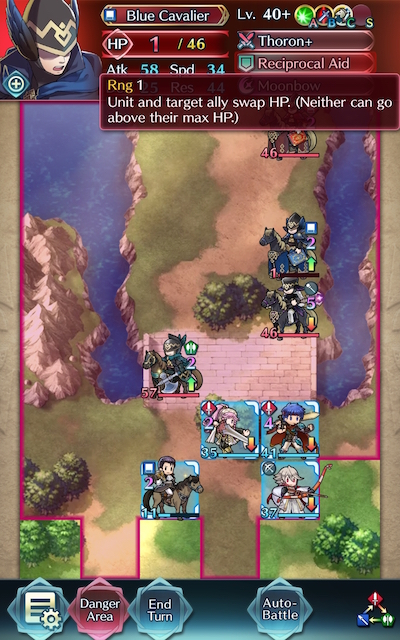
The good news is not every foe on this map possesses reduced cooldown. The bad news is that quite possibly the most annoying member of the enemy’s forces -- the troubadour -- is a great deal more persistent than they should be.
Unless you somehow can OHKO this healer, Miracle is going to activate and save them from being KO’d. This isn’t all bad, however; since the blue mage cavalier possesses Reciprocal Aid, it’s possible that they’ll swap HP with their wounded ally. This will make your job much easier, as that mage is a much more threatening foe. With only 1 HP remaining, almost any unit should be able to finish them off, which gets you one step closer to your victory.
A Sniper’s Pride
While it may seem like a strange choice, you may want to consider having one of your units carry Savage Blow. Generally, foes on Grand Hero Battle maps tend to group together, and the chip damage can prove incredibly useful when your units are low on HP and the enemy is closing in.

Targeting Troubles
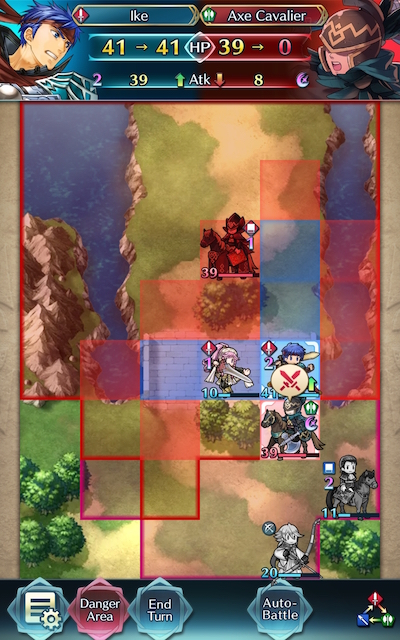
A big aspect of success in more difficult game modes (Infernal maps, the Arena, Arena Assault, etc) is understanding how the AI works, and while this guide won’t get too in-depth with the intricacies, a good rule of thumb is to remember that making one of your units a less attractive target can actually work in your favour. While a normal Silver Sword Olivia would be attacked by the axe cavalier, Ruby Sword Olivia is not, and NY Corrin in targeted instead. This allows me to use some maneuvering skill magic (thanks, Reinhardt!) to ensure NY Corrin can prove an assist to Legendary Ike, causing this foe to be KO’d.
If At First You Don’t Succeed
Don’t be fooled by video walkthroughs of any Grand Hero Battle that you watch -- it’s very rare for anyone to beat high-difficulty content (or record a video of themselves doing so!) on their first try. Additionally, the potential variance in unit builds that Skill Inheritance brought along with the random nature of summoning has resulted in pretty much every single summoner having different “building blocks” to work with. This, when combined with the high difficulty level of Infernal, may prove frustrating while someone is trying to find the right combination of units and moves. The key thing to keep in mind is that it may take some light Skill Inheritance and Seal shuffling, multiple tries of the map, and a few stamina potions to find a strategy that works for you. Every single turn you complete gets you one step closer to completing the puzzle. Finally, reading about or watching videos of successful strategies may also help you break through a particularly difficult turn that you can’t complete, or may give you ideas of a new unit to use.
Map Enemies
- Hard
- Lunatic
| HP | ATK | SPD | DEF | RES | |
|---|---|---|---|---|---|
| 44 | 41 | 26 | 23 | 12 | |
| Weapon | Gradivus | A | Grani's Shield | ||
| Support | B | ||||
| Special | Growing Thunder | C | Goad Cavalry | ||
| HP | ATK | SPD | DEF | RES | |
|---|---|---|---|---|---|
| 29 | 37 | 19 | 12 | 27 | |
| Weapon | Bolganone | A | Darting Blow 2 | ||
| Support | Rally Attack | B | |||
| Special | Moonbow | C | Goad Cavalry | ||
| HP | ATK | SPD | DEF | RES | |
|---|---|---|---|---|---|
| 36 | 38 | 18 | 19 | 23 | |
| Weapon | Silver Axe | A | Grani's Shield | ||
| Support | Rally Defense | B | Pass 2 | ||
| Special | C | Ward Cavalry | |||
| HP | ATK | SPD | DEF | RES | |
|---|---|---|---|---|---|
| 27 | 30 | 15 | 15 | 32 | |
| Weapon | Fear | A | |||
| Support | Rehabilitate | B | Wings of Mercy 3 | ||
| Special | Miracle | C | |||
| HP | ATK | SPD | DEF | RES | |
|---|---|---|---|---|---|
| 36 | 38 | 18 | 19 | 23 | |
| Weapon | Silver Axe | A | Grani's Shield | ||
| Support | Rally Defense | B | Pass 2 | ||
| Special | C | Ward Cavalry | |||
| HP | ATK | SPD | DEF | RES | |
|---|---|---|---|---|---|
| 58 | 48 | 33 | 31 | 17 | |
| Weapon | Gradivus | A | Grani's Shield | ||
| Support | B | ||||
| Special | Growing Thunder | C | Goad Cavalry | ||
| HP | ATK | SPD | DEF | RES | |
|---|---|---|---|---|---|
| 40 | 49 | 26 | 17 | 35 | |
| Weapon | Bolganone | A | Darting Blow 3 | ||
| Support | Rally Attack | B | |||
| Special | Moonbow | C | Goad Cavalry | ||
| HP | ATK | SPD | DEF | RES | |
|---|---|---|---|---|---|
| 49 | 50 | 25 | 26 | 30 | |
| Weapon | Silver Axe+ | A | Grani's Shield | ||
| Support | Rally Defense | B | Pass 3 | ||
| Special | C | Ward Cavalry | |||
| HP | ATK | SPD | DEF | RES | |
|---|---|---|---|---|---|
| 36 | 37 | 22 | 20 | 42 | |
| Weapon | Fear | A | |||
| Support | Rehabilitate | B | Wings of Mercy 3 | ||
| Special | Miracle | C | |||
| HP | ATK | SPD | DEF | RES | |
|---|---|---|---|---|---|
| 49 | 50 | 25 | 26 | 30 | |
| Weapon | Silver Axe+ | A | Grani's Shield | ||
| Support | Rally Defense | B | Pass 3 | ||
| Special | C | Ward Cavalry | |||
User Submitted Teams
The core of this team is Tiki and Nino.
Nino is used to trigger Camus (I think any fast green mage should be fine). Then Tiki with Reposition pulled Nino back from the threats. And I placed Reinheardt in the right, waiting for Camus.
The next turn, Reinheardt checked Camus and retreated with the help from Ninian, while Tiki baited all other threats. The red mage would be busy buffing the axe cavalier so I set Reinheardt stand-by.
Tiki will handle the axes effortlessly, then Reinheardt can zap the red mage.
After that, corner the healer to make him unable to attack and blow up with Tiki.
SETUP: Linde-Hector-Eirika-Nino
[1]
Eirika move in front of Hector w. Rally Defense.
Hector Pivot in front of Eirika.
Linde next to Hector and Nino next to Eirika.
(this way Hector will kill the healer and 1 axe user)
[2]
Rally Defense Hector.
Kill Camus w. Nino.
Kill Red Mage w. Linde.
Rally Defense Hector and Pivot him in front of Linde.
[3]
Kill the last axe user.
(Done)
This will take a few moves to set up, but what you want to do is get Camilla all the way to the left where she will be targeted by only the healer. I had Hinoka right under her so she can get the Hone Flier buff. Have Azura to the right of Hinoka and Lucina should be one to the right and down from Azura. They should both be just out of reach from Camus and the Axe Cavalier.
The healer will attack Camilla and after every enemy moves, Camus should be one space away from Lucina's front. Take Camilla and KO Camus. Have Lucina attack the healer, then have Azura sing so Lucina can finish off the healer. Grab Hinoka and have her go up one spot.
One of the Axe Cavaliers will attack Lucina and regret it. And when it's back on Player Turn, take Lucina straight up to deal with the other Axe user, Axer if you will. Hinoka won't be able to make it all the way to the Red Cavalier, so have Azura sing to her so she can initiate combat and kill him.
And done!
Video Guide: https://youtu.be/VM2Q3_qwU2c
In this team, Chrom has Fury 3, Nino is 4 star, Lucina has Aether for her special, and Ninian has Wings of Mercy 2 along with Fortify Def 2. Your first move should be moving Chrom to the right of the map, one space below the attack ranges of Camus, the Troubador and the Axe Cavalier, then put Ninian on the space below him, Nino on the space left of him, and Lucina on the space Left of Nino. That should end your turn. Next turn Chrom will get the Def buff from Ninian, move him to the attack range of the three horseman, then move Nino to the space below Chrom and Lucina to the space left of Nino. Ninian should not move on this turn. The next turn Chrom will get attacked by the Troubador and the Axe Cavalier, with the buff from Fortify Def, this leaves him with 1 HP after Fury damage. Camus will move to the left bridge of the map. On your turn attack Camus with Nino. Camus will put Nino in Wings of Mercy range, use Ninian to sing for Camus and then attack Camus again with Nino for the kill. Move Chrom back two spaces and have Lucina kill the first Axe Cavalier. Next the Red Mage and the Troubador should attack Lucina and then put her into Wings of Mercy range. Your turn. First attack the Red Mage to gain access to Aether, teleport Ninian to Lucina and sing for her, then with Aether activated, use that to kill the Troubador while gaining back HP. End your turn here, and on the enemy phase the second Axe Cavalier will attack Lucina and Lucina will end up killing the second Axe Cavalier. Congrats, you now have a 4 star Camus


