


Map
- Normal
- Infernal


Bound Hero Battle: Takumi and Hinoka
Here we are again, facing off against the sensational siblings Takumi and Hinoka! Compared to later maps, this one isn’t too difficult, but the varied mix of cavalry, flier, and infantry foes combined with the fact that your units start off cornered may prove difficult for some. Even without reinforcements, this Bound Hero Battle still manages to have its fair share of tricks.
Making matters more complicated are some annoying skills to watch out for like Lunge, Warding Stance, Drag Back, and Cancel Affinity, but if you take your time and make sure to adjust your strategy to get KOs whenever possible, you shouldn’t struggle too much. If one foe in particular is really giving you trouble, consider swapping around some skills and seals or taking advantage of buffs to give yourself more breathing room.
Who To Choose
As is generally true of Bound Hero Battles, the individual units used is very important as they will primarily inform a strategy. There are a few routes one can take depending on what units are personally available, and, of course, adjustment based on the units one possesses is always a possibility.
Baiters
Since the enemies on this map won’t start moving unless you KO, damage, or bait a foe, it’s advisable that you use a dedicated baiter. While striking and reatrating is technically an option, it’s undesirable given the far reach of the mage cavaliers. Although Triangle Adept Raven mages may seem like a good option here, don’t be fooled -- Takumi’s Cancel Affinity makes them ineffective at best and a downright liability at worse.
Thankfully, since Takumi is a colorless unit, you don’t need to worry about the weapons triangle when he attacks you. Armors such as Hector, Valentine Hector and Fallen Hardin are able to easily withstand physical hits and hit hard upon counterattacking. Cavalry tanks like Sigurd, Xander, and Camus perform particularly well with buffs. Nowi, Young Tiki, Fae, Myrrh, Female Kana, and Fallen Robin all boast decent mixed defenses, especially if they tote skills such as Triangle Adept to grant them more polarizing matchups. Legendary Robin is also a potential choice, but may struggle due to her lack of color advantage. Great F2P options include Legendary Ike, who natively sports Warding Breath which boosts his Resistance and grants him cooldown reduction, and Fjorm, who possesses naturally high Resistance and damage reduction from ranged foes through her exclusive Special, Ice Mirror.
Strikers
Given that two of the most threatening units on this map (that being the Wo Dao sword flier and Hinoka) take effective damage from archers, it logically follows that they’d be incredibly useful on this map. In particular, however, Brave Bow users can be incredibly potent on this map due to their ability to overpower finish off any foes your tanks may otherwise struggle with. It’s worth noting that due to the higher Resistance many foes on this map possess, archers are more useful than Brave and Blade tome users due to their ability to deal physical damage. New Year Corrin, Brave Lyn, WF Hinoka, Bridal Cordelia, Klein, and Setsuna are potential strikers you may want to use, with a special mention going to New Year Corrin and Brave Lyn given their F2P status.
Alternatively, melee Brave users are able to hit foes twice without retaliation, and may even quad hit if they outspeed an enemy. Cherche, Cordelia, Hinoka, Elincia, and WT Reinhardt are all great Brave users who can make excellent use of class-specific buffs. Finn is a great F2P option who would work particularly well in a cavalry team.
Brave and Blade tome wielders can also serve to be useful if your team composition provides them with the appropriate buffs, though speedy mages can also be useful. Tharja, Reinhardt, Tailtiu, Linde, Nino, Valentine Lilina, and WT Olwen are potential options here, especially if they are equipped with a Breaker skill to add to their coverage and are accompanied by a buffbot like Eirika or Ephraim.
Dancers
Dancers help provide support, may even have a decent offensive presence themselves, and can usually tank a hit or two, if need be. Olivia, Performing Olivia, Performing Inigo, Performing Shigure, Performing Azura, Azura, New Year Azura, and Ninian all give the refreshment that high-firepower units need while also possessing the ability to provide an assist to KO an enemy.
Healers
While not generally a great choice over units who can deal heavy damage or dancers, Healers can be incredibly useful in this Bound Hero Battle due to their ability to provide valuable healing to your tanks. Genny, Nanna, Elise, Wrys, and Lissa are potential additions to a team that may serve you well on this map.
Strategy
Strategizing for this Bound Hero Battle shouldn’t be too challenging due to the absence of reinforcements. While it can be difficult to exactly predict what will happen due to IV / Merge variance, here’s some general tips to get you started.
It’s A Trap!
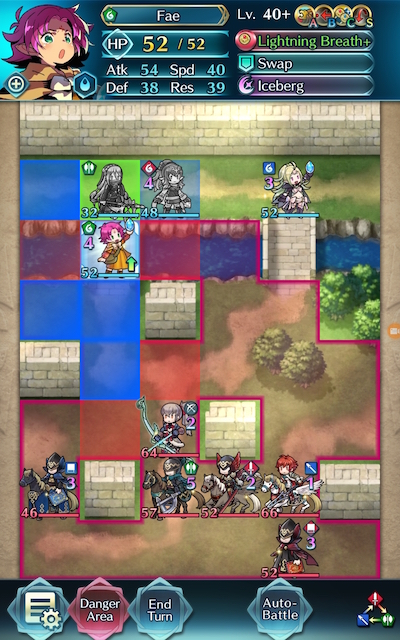
While it may at first seem that you have two options to bait here, tanking the right really shouldn’t be attempted. Not only will your unit have to withstand three attacks instead of two, one of those attacks will be from Hinoka, who is under the effect of a +6 Attack/Speed buff from Hone Fliers. Ouch. Because of this, you’re much better off starting from the left. Speaking of which...
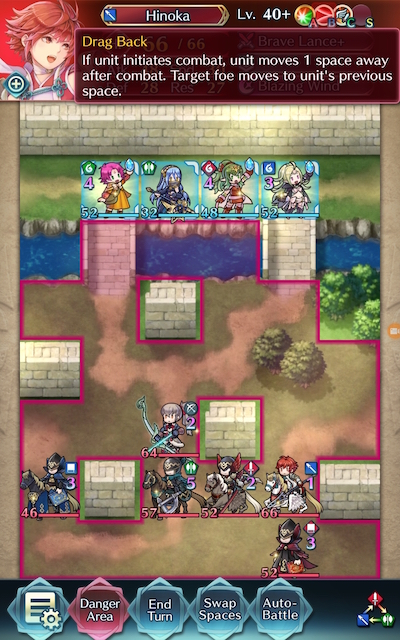
To The Left, To The Left
Now that you know you’re going to be starting on the left, it’s probably a good idea to buff up your unit, especially if they don’t have balanced defensive stats. Since ideally they’ll be taking both physical and magical hits here (because they’ll be KOing both Takumi and the blue cavalry mage), a boost to both Defense and Resistance can work wonders. This can be done through a Rally, a Hone skill and seal, or another skill that grants buffs. Combat buffs like Drives and Spurs can prove handy as well, though they are a little more limiting due to their positioning limitations.
It’s A One Hit Wonder!
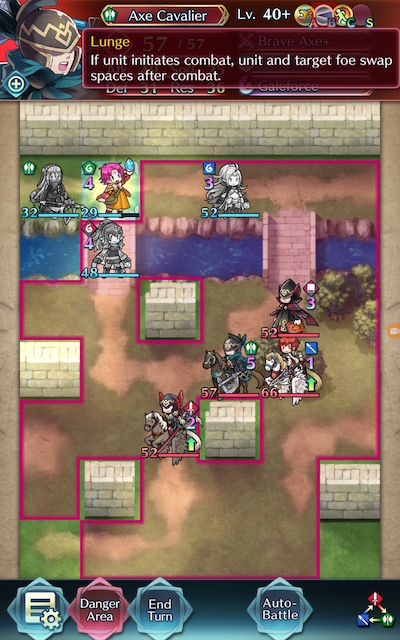
Hinoka’s not the only tricky foe on this map. Not only does the green axe cavalry unit have a Brave Axe (for twice the cleaning action), they also carry Lunge. If your unit is unfortunate enough to not KO them outright, it’s completely possible that this skill will put your poor Hero in the range of another unit that they really don’t want to handle. When you’re dealing with this foe, then, it would be wise to ensure that you try to knock them out within one round of combat. Otherwise, you may find yourself in an unfavourable situation afterwards.
The End Is Near...
Nearer than you may think, but that doesn’t mean that ending is in your favor. If you’re not familiar with the Wo Dao effect, here’s a refresher -- it adds +10 damage to a Special activation, which can really lay on the pain. If you’re not expecting the extra damage, it can and will KO your units, and nothing is worse than losing when victory is within your sights.
Luckily, this shouldn’t be much of a problem if you’re prepared for it. Triangle Adept 2 can do wonders for a blue unit’s striking or tanking potential, and most archers should be able to deal with this foe quite easily.
The Vantage Advantage
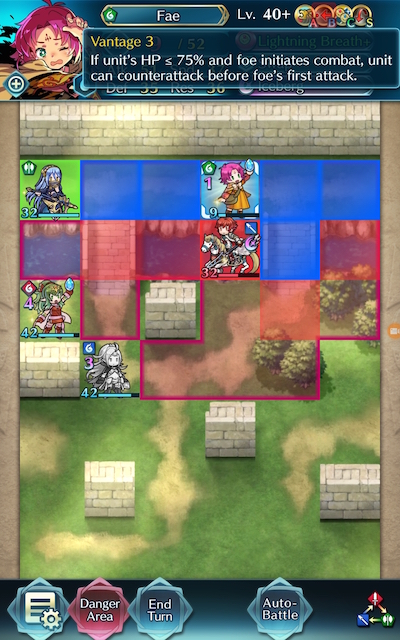
Vantage is a great skill in high difficulty maps because it can grant you a clutch win. Since it allows you to attack first on enemy phase, it’s a great way to finish off damaged foes that would KO your unit otherwise. It also synergizes well with Fury, Reciprocal Aid, Ardent Sacrifice, and Brazen Skills to boot. If you just need to get in one more hit, Vantage can be a great way to do so. It’s even available on a 4 star Lon Qu, meaning that you don’t even have to invest heavily in order to put it on your unit!
If At First You Don’t Succeed
Don’t be fooled by video walkthroughs of any Bound Hero Battle that you watch -- it’s very rare for anyone to beat high-difficulty content (or record a video of themselves doing so!) on their first try. Additionally, the potential variance in unit builds that Skill Inheritance brought along with the random nature of summoning has resulted in pretty much every single summoner having different “building blocks” to work with. This, when combined with the high difficulty level of Infernal, may prove frustrating while someone is trying to find the right combination of units and moves.
The key thing to keep in mind is that it may take some light Skill Inheritance, seal shuffling, and multiple tries of the map to find a strategy that works for you. Every single turn you complete gets you one step closer to completing the puzzle. Finally, reading about or watching videos of successful strategies may also help you break through a particularly difficult turn that you can’t complete, or may give you ideas of a new unit to use.
Map Enemies
- Hard
- Lunatic
- Infernal
| HP | ATK | SPD | DEF | RES | |
|---|---|---|---|---|---|
| 42 | 35 | 20 | 19 | 18 | |
| Weapon | Brave Lance+ | A | Swift Sparrow 2 | ||
| Support | B | Drag Back | |||
| Special | Blazing Wind | C | Hone Fliers | ||
| HP | ATK | SPD | DEF | RES | |
|---|---|---|---|---|---|
| 41 | 39 | 26 | 19 | 13 | |
| Weapon | Fujin Yumi | A | Close Counter | ||
| Support | B | Cancel Affinity 3 | |||
| Special | Vengeance | C | Threaten Spd 3 | ||
| HP | ATK | SPD | DEF | RES | |
|---|---|---|---|---|---|
| 34 | 29 | 28 | 15 | 29 | |
| Weapon | Wo Dao | A | Darting Blow 2 | ||
| Support | B | Desperation 2 | |||
| Special | Moonbow | C | Hone Fliers | ||
| HP | ATK | SPD | DEF | RES | |
|---|---|---|---|---|---|
| 36 | 34 | 15 | 21 | 25 | |
| Weapon | Brave Axe | A | Fury 2 | ||
| Support | B | Lunge | |||
| Special | Galeforce | C | Hone Spd 3 | ||
| HP | ATK | SPD | DEF | RES | |
|---|---|---|---|---|---|
| 29 | 34 | 19 | 12 | 27 | |
| Weapon | Blárwolf | A | Defiant Spd 2 | ||
| Support | B | Poison Strike 2 | |||
| Special | Iceberg | C | Drive Atk 2 | ||
| HP | ATK | SPD | DEF | RES | |
|---|---|---|---|---|---|
| 56 | 46 | 34 | 26 | 18 | |
| Weapon | Fujin Yumi | A | Close Counter | ||
| Support | B | Cancel Affinity 3 | |||
| Special | Vengeance | C | Threaten Spd 3 | ||
| HP | ATK | SPD | DEF | RES | |
|---|---|---|---|---|---|
| 57 | 44 | 27 | 26 | 25 | |
| Weapon | Brave Lance+ | A | Swift Sparrow 2 | ||
| Support | B | Drag Back | |||
| Special | Blazing Wind | C | Hone Fliers | ||
| HP | ATK | SPD | DEF | RES | |
|---|---|---|---|---|---|
| 45 | 41 | 36 | 22 | 37 | |
| Weapon | Wo Dao+ | A | Darting Blow 3 | ||
| Support | B | Desperation 3 | |||
| Special | Moonbow | C | Hone Fliers | ||
| HP | ATK | SPD | DEF | RES | |
|---|---|---|---|---|---|
| 49 | 46 | 23 | 29 | 33 | |
| Weapon | Brave Axe+ | A | Fury 3 | ||
| Support | B | Lunge | |||
| Special | Galeforce | C | Hone Spd 3 | ||
| HP | ATK | SPD | DEF | RES | |
|---|---|---|---|---|---|
| 40 | 46 | 26 | 17 | 35 | |
| Weapon | Blárwolf+ | A | Defiant Spd 3 | ||
| Support | B | Poison Strike 3 | |||
| Special | Iceberg | C | Drive Atk 2 | ||
| HP | ATK | SPD | DEF | RES | |
|---|---|---|---|---|---|
| 64 | 49 | 37 | 28 | 20 | |
| Weapon | Fujin Yumi | A | Close Counter | ||
| Support | B | Cancel Affinity 3 | |||
| Special | Vengeance | C | Threaten Spd 3 | ||
| HP | ATK | SPD | DEF | RES | |
|---|---|---|---|---|---|
| 66 | 48 | 30 | 28 | 27 | |
| Weapon | Brave Lance+ | A | Swift Sparrow 2 | ||
| Support | B | Drag Back | |||
| Special | Blazing Wind | C | Hone Fliers | ||
| HP | ATK | SPD | DEF | RES | |
|---|---|---|---|---|---|
| 52 | 44 | 39 | 24 | 40 | |
| Weapon | Wo Dao+ | A | Darting Blow 3 | ||
| Support | B | Desperation 3 | |||
| Special | Moonbow | C | Hone Fliers | ||
| HP | ATK | SPD | DEF | RES | |
|---|---|---|---|---|---|
| 52 | 45 | 35 | 22 | 31 | |
| Weapon | Rauðrraven+ | A | Warding Stance 3 | ||
| Support | Pivot | B | Guard 3 | ||
| Special | Draconic Aura | C | Spur Def/Res 2 | ||
| HP | ATK | SPD | DEF | RES | |
|---|---|---|---|---|---|
| 57 | 49 | 25 | 31 | 36 | |
| Weapon | Brave Axe+ | A | Fury 3 | ||
| Support | B | Lunge | |||
| Special | Galeforce | C | Hone Spd 3 | ||
| HP | ATK | SPD | DEF | RES | |
|---|---|---|---|---|---|
| 46 | 49 | 28 | 19 | 38 | |
| Weapon | Blárwolf+ | A | Defiant Def 3 | ||
| Support | B | Poison Strike 3 | |||
| Special | Iceberg | C | Drive Atk 2 | ||
User Submitted Teams
video (infernal mode): goo.gl/vsXS3S
1.) sigurd (+def/-spd) → divine tyrfing, reposition, bonfire; close defense 3, crusader's ward, atk smoke 3; deflect magic +1
2.) m!robin (+atk/-res) → blárraven+, reposition, bonfire; triangle adept 3, swordbreaker 3, hone atk 3; close defense +2
3.) hector (+hp/-def) → armads, swap, pavise; distant counter, vantage 3, threaten def 3; attack +3
4.) takumi +1 (+atk/-res) → brave bow+, reposition, luna; life & death 3, desperation 3, threaten spd 3; resistance +1
Well moonbow Reinhardt with quickened pulse. What can I say? Also Fae with lighting breath+ can really tank those hits.
Nino needs Fury 3 and some manner of def or res increasing seal (ideally Distant Def 3) in order to survive the first round, in which she will bait and kill Takumi and the cavalry mage. She'll take out Hinoka as well when there's an opening to do so safely.
Ike has Swordbreaker (to deal with the sword flier) and Hone Speed (to buff Nino, mainly). He'll bait the axe cavalry on turn 2 and the sword flier later. His ranged counter doesn't come into play here, so any sword unit with Hone Speed and the ability to duel both the aforementioned units should work.
Shigure has his native Geyser Dance and Hone Attack to buff Nino. He won't be fighting. Any dancer with fortify def 2-3 and fortify res 2-3 could get the job done as well, as Nino needs both buffs to survive the first round but has enough attack with that hone attack probably isn't necessary. Giving Ike one fortify seal and the dancer the other would work as well.
Reinhardt could really be any unit that can duel the red mage and manage to keep out of the way of the other three. Note that if you try to attack the red mage first with Reinhardt he will fail to kill it, charge its special, and die to the counterattack. Baiting the mage is safe, though, and brings it low enough to finish it off with Dire Thunder the next turn.
BLyn: Reposition, Moonbow, C Fort Cav, S Hardy Bearing 2
Sigurd: Std + Hone Cavalry, Deflect Magic 2 Seal
Titania: Std, needs her Reciprocal Aid, C Hone Cavalry S HP +3
Rein: Std, A Attack + 3, B needs Lancebreaker 1, S Attack + 2
What's important: BLyn needs enough firepower to bait and ORKO Takumi. Reinhardt (or another ranged) needs Lancebreaker 1 for Hinoka. Titania (or someone) needs to be able to swap health with Sigurd. Sigurd (or another tanky cav) needs to survive turn 1.
Turn 1:
From left to right: Sigurd, Brave Lyn, Titania, Reinhardt, so Sigurd gets Fortify. Move Sigurd down 1 to bait on top left bridge. Titania moves behind. Sigurd tanks blue mage.
Turn 2:
Titania uses Recip Aid Sigurd to heal him up. Brave Lyn moves left out of harms way. Rein moves right to keep safe. Sigurd attacks blue mage. Takumi and green axe cav attack Sigurd, who kills the Cav.
Turn 3:
Rein kills Hinoka utilizing lancebreaker. Brave Lyn repositions him behind her. Sigurd gets the hell outta there, moving top left. Titania moves 1 right to avoid damage. Takumi attacks Brave Lyn and dies to her counter attack (Should double Takumi and use Moonbow on the 2nd attack).
Turn 4:
Brave Lyn kills red flier. Sigurd boldly goes after the Red Mage with like no hp left. Rein moves in to clean up.
Black Knight should be fine just vanilla. I do have Quick Riposte 1 and Atk Smoke 1 seal on a +1 mergd BK and he is also Fortify Res 1 and Fortify Def 3 supported. It is possible that one of these is required. I am not sure.
Brave Ike can OHKO Hinoka with Ignis. But Aether is probably fine too. My Brave Ike has -Atk IV (cries). So I need the Hone Atk support from Olivia. Otherwise, he can kill the Red Mage in two hits with any dancer. Olivia can finish off the Axe Cavalier if Ike doesn't have Ignis and needs to hit Hinoka one more time. So that is nice.
The healer needs Rehabilitate. I just happen to have it on Sakura. If you don't have Atk Smoke seal for BK. Try putting on Fortify Def seal on the healer to be safe.
Stay defensive and only move BK by one tile to bait Blue Cavalier. It is important to sit Brave Ike in first round. The bridge and water tiles means it is impossible to Dance + Reposition Ike or any other unit out of enemy range on the right. The Red Mage will Pivot forward in the first round if you position right. Otherwise, this BHB is pretty straight forward.
---------------
For substitute, if you use Hector instead of BK, his healer may need to have enough Spd to avoid double by Takumi. (e.g. Maria) The positioning of enemy units is such that if Hector needs to move down one more tile to finish Takumi, he will be lunged by the Axe Cavalier and subsequently ORKO'd by Red Mage, and if not, by Red Flier with Wo Dao. Bonfire can help Hector ORKO Takumi if you happen to have it.
Brave Ike can be substituted by any green tank. (P!Azura or the like doesn't count. The green tank will need to be able to tank Axe Cavalier. The AI will attack your low defense unit.) A green unit can tank Axe Cavalier, Hinoka and kite Red Mage to trigger his Pivot all at once. Just be sure your tank can either OHKO Hinoka and/or survive her quad. (Or use Lancebreaker.) Use Quickened Pulse to trigger Ignis early if needed.


