


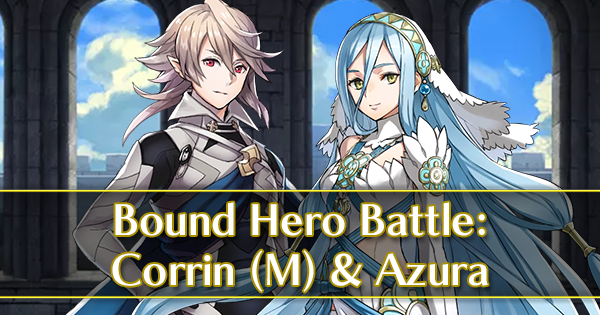
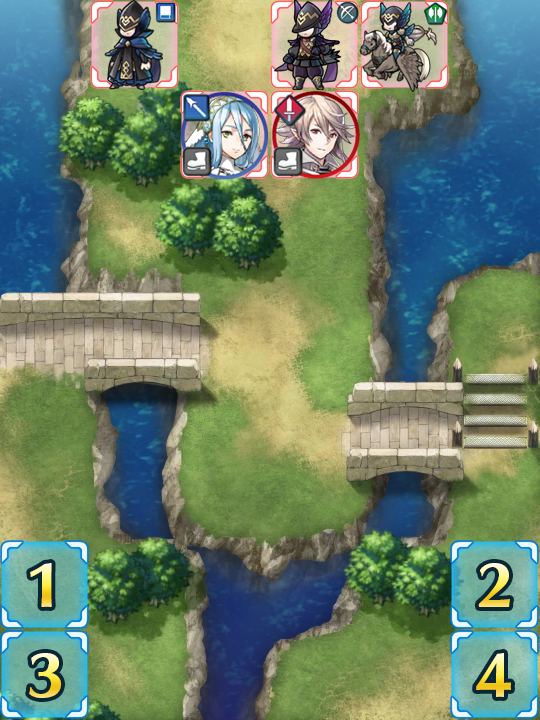
Map
- Normal
- Infernal
Bound Hero Battle: Corrin & Azura
Fresh from Fateslandia comes Corrin and Azura, ready and waiting to do battle once again in this Bound Hero Battle! As one of the less difficult infernal maps, this ranks of this BHB may have a refresher in their midsts, but does not feature reinforcements spawns -- or the requirement to bait or strike to get the map moving. This time, your foes will come to you, therefore making your job much, much easier. With a strong enough tank, you shouldn’t need to do a lot of complex maneuvering; and though Corrin may present a threat (more on that later) dealing with him really isn’t that difficult if you bring the right units into the fray.
Before you begin teambuilding, though it’s completely possible you already possess everything you need to beat this map. Created by Gamepress staff member RedFerrari1998, the video guide below uses only F2P units, one instance Skill Inheritance, and some Seals -- see the description for more details. If it doesn’t work for you, though, then read on!
Who to Choose
As is generally true of Bound Hero Battles, the individual units used is very important as they will primarily inform your strategy. There are a few routes one can take depending on what units are available to you, and, of course, adjustment based on the units one possesses is always a possibility.
Tanks
Since this map is split up into two chokepoints, you’ll likely want to bring at least one tank to hold the line. You don’t have to worry about baiting here since the enemies will move regardless, but that definitely doesn’t mean you have to go an all-striker route.
Armors such as Zelgius, Black Knight, Winter Tharja, Fallen Hardin, Hector, LA Hector, Legendary Hector, and Fallen Robin are able to hit hard very upon counterattacking, especially if they’re making use of Quick Riposte or Vengeful Fighter. Calvary tanks like Xander, Camus, and Sigurd perform better with class-specific buffs -- Sigurd is notable for his ability to tank a fair bit of magic damage due to Divine Tyrfing and the Crusader’s Ward. An amazing F2P option is Fjorm, who is able to tank ranged foes extremely well with her exclusive Special, Ice Mirror, and Legendary Ike, whose native Warding Breath grants him accelerated cooldown and extra Resistance.
Dragons are also very strong tanks, especially when they’re equipped with Lightning Breath (or another Breath and Distant Counter, if you’re feeling fancy). Nowi, Female Corrin, Male Kana, Fae, Myrrh, Legendary Robin, Female Kana, Adult Tiki, Young Tiki, and/or Summer Young Tiki will all likely be able to do the job and do it well.
Strikers
Although slightly less necessary than usual, the lack of exceptionally powerful foes on this map means that strikers will easily overpower foes and break through enemy lines. Do note that fliers are preferable here for their maneuverability -- cavalry and infantry do risk getting stuck in a dead end.
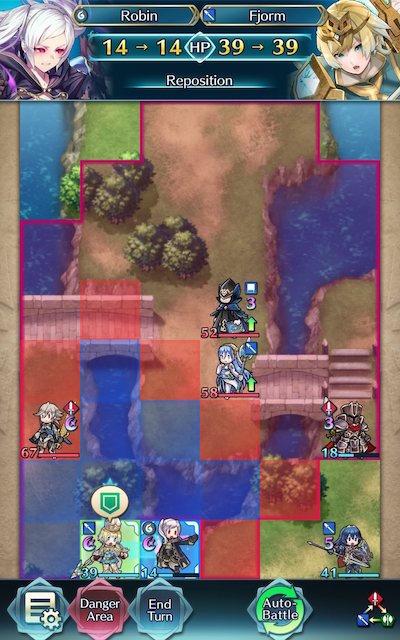
Fliers also can make excellent use of Skills like Reposition, Hit and Run, Drag Back, Guidance, and Flier Formation since they have no terrain restrictions. In fact, you can reunite your forces quite easily with a flier, given that the stream that separates both sides of the map is only one space wide.
In particular, archers can be incredibly potent strikers due to their ability to overpower and/or finish off any enemies your tank may otherwise struggle with, especially if they are equipped with a Brave Bow. Brave Lyn, WF Hinoka, Bridal Cordelia, Summer Takumi, Setsuna, and Klein are potential strikers you may want to use, with a special mention going to Brave Lyn given her F2P status.
Alternatively, melee Brave users are able to hit foes twice without retaliation, and may even quad hit if they outspeed an enemy. Cherche, Cordelia, Elincia, and WT Reinhardt are all great Brave users who can make excellent use of class-specific buffs. Finn is an F2P option who would work particularly well in an all-cavalry team.
Brave and Blade tome wielders can also serve to be useful if your team composition provides them with the appropriate buffs, though speedy mages can also be powerful strikers. Tharja, Bridal Tharja, Reinhardt, Tailtiu, Ishtar, Linde, WT Olwen, SF Nino, and Nino are potential options here, especially if they are equipped with a Breaker skill to add to their coverage.
Healers
While not generally a great choice over units who can deal heavy damage or dancers, Healers can be incredibly useful in this Bound Hero Battle due to their ability to provide valuable healing to your tanks. Genny, Priscilla, Elise, Nanna, Wrys, and Lissa are potential additions to a team that may serve you well on this map.
Buffers
As units that offer extra utility, buffers typically fit one of the above roles while also supporting your other units. Since one of the easiest ways to beat this map is to establish chokepoints, buffers can help reduce chip damage on your tanks and assist them in netting key KOs.
Because of Skill Inheritance, any unit can be a buffer with enough investment -- many Drives, Spurs, Hones, Fortifies, and Dual Rallies are readily accessible on 4 star units, and can be further stacked with seals for maximum coverage. Notable options who natively provide buffs through their exclusive weapons include YT Olivia, Performing Azura, Eirika, and Ephraim, while Brave Lucina, New Year Corrin, and New Year Azura are able to stack Drives through theirs.
Strategy
Strategizing for this Bound Hero Battle should be fairly simple due to the absence of reinforcements. While it can be difficult to exactly predict what will happen due to IV / Merge variance, here’s some general tips to get you started.
Identify Yourself!
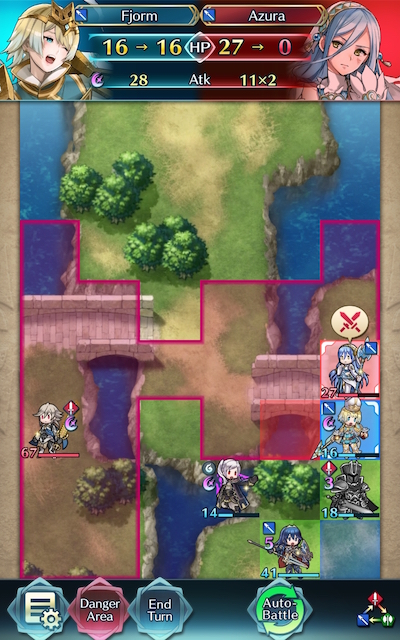
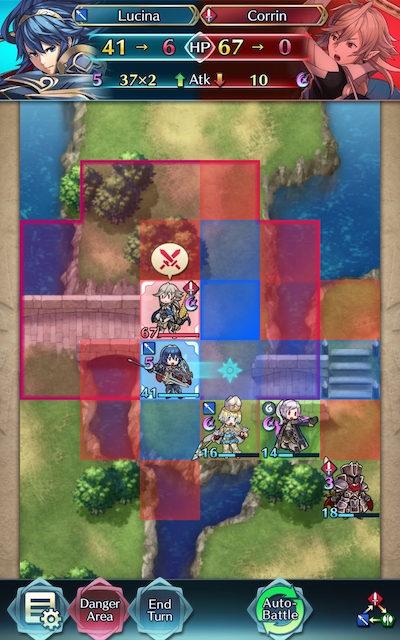
As per usual, you’ll likely want to start off this map by browsing through the foes you’ll be facing, taking note of any particularly potent threats. Given the relatively low Speed and average Attack of most of these enemies, the most obvious threat are, well, Azura and Corrin. No big surprises there.
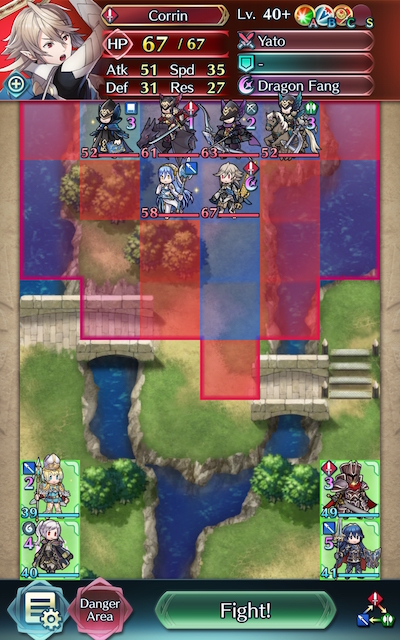
Thankfully, neither of them have particularly high Defense or Resistance -- any unit with a Weapons Triangle Advantage or an appropriate Breaker Skill should be able to handle them fairly handily. The hardest part about dealing with them is making sure they don’t catch you off guard -- either by getting refreshed in Corrin’s case, or by taking advantage of her Sapphire Lance in Azura’s.
Bountiful Boosts
If you’re making use of Hones, Fortifies, Rallies, or Spurs to help your bulky units tank more effectively, you’ll want to keep in mind your positioning so that your stat boosts will actually take effect. Drives are a bit less stringent in this regard -- requiring the unit with the Drive Skill to be within 2 spaces of the unit they’re boosting instead of adjacent to them. Given their reasonable accessibility, you may want to use them instead, assuming they offer a potent enough stat boost to get you through.
Hop, Skip, Jump
While this map seems to expect you to deal with having your forces split up, fliers sort of split it wide open. By using Guidance or Reposition to sling a unit over the gap that separates the two starting positions, you can easily reunite your forces and lead any foes that are trailing behind you in the dust. This can present a valuable opportunity to regroup once the map is nearly completed, and given the relative lack of archers on this map (there’s only one!) is reason enough to make use of a flier here.
Perfect Positioning
Buffs and Spurs aren’t the only reason you’ll want to keep your positioning tight -- Bond Skills can also make the difference between netting a KO or taking a loss. This is particularly notable with Fjrom due to her native Atk/Def Bond; often, being next to an ally can offer her a significant offensive and defensive boost. The same is true for any unit that makes use of Owl tomes or Innes when he’s using Nidhogg; since their activation effects are dependent on allies being adjacent to them, units making use of these weapons will likely want an ally (or three) close by.
Burly Breakers
If you need a dedicated check to a particular unit and none of your available units are making the cut, Breaker Skills can be a great low-cost way to ensure you’re able to KO that last tricky unit. They’ll also prevent follow-ups by that specific weapon type from being performed on your unit with the Breaker Skill (assuming your unit’s HP is ≥ 50%), making them as defensively useful as they are offensively potent.
If At First You Don’t Succeed
Don’t be fooled by video walkthroughs of any Bound Hero Battle that you watch -- it’s very rare for anyone to beat high-difficulty content (or record a video of themselves doing so!) on their first try. Additionally, the potential variance in unit builds that Skill Inheritance brought along with the random nature of summoning has resulted in pretty much every single summoner having different building blocks to work with. This, when combined with the high difficulty level of Infernal, may prove frustrating while someone is trying to find the right combination of units and moves. The key thing to keep in mind is that it may take some light Skill Inheritance and seal shuffling as well as multiple tries of the map to find a strategy that works for you. Every single turn you complete gets you one step closer to completing the puzzle. Finally, reading about or watching videos of successful strategies may also help you break through a particularly difficult turn that you can’t complete, or may give you ideas of a new unit to use.
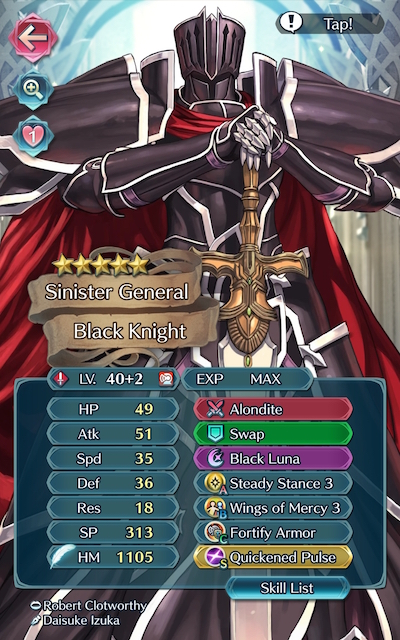
Map Enemies
- Hard
- Lunatic
- Infernal
| HP | ATK | SPD | DEF | RES | |
|---|---|---|---|---|---|
| 33 | 32 | 24 | 14 | 20 | |
| Weapon | Blárblade | A | Death Blow 2 | ||
| Support | B | Poison Strike 3 | |||
| Special | Moonbow | C | Drive Res 1 | ||
| HP | ATK | SPD | DEF | RES | |
|---|---|---|---|---|---|
| 40 | 33 | 22 | 21 | 11 | |
| Weapon | Guard Bow+ | A | HP/Atk 2 | ||
| Support | B | G Tomebreaker 3 | |||
| Special | Reprisal | C | Hone Spd 2 | ||
| HP | ATK | SPD | DEF | RES | |
|---|---|---|---|---|---|
| 33 | 27 | 24 | 17 | 30 | |
| Weapon | Brave Axe | A | Fury 2 | ||
| Support | B | Obstruct 3 | |||
| Special | Iceberg | C | Threaten Def 2 | ||
| HP | ATK | SPD | DEF | RES | |
|---|---|---|---|---|---|
| 37 | 34 | 28 | 15 | 21 | |
| Weapon | Sapphire Lance+ | A | Speed +3 | ||
| Support | Sing | B | Gale Dance 3 | ||
| Special | C | Hone Atk 3 | |||
| HP | ATK | SPD | DEF | RES | |
|---|---|---|---|---|---|
| 44 | 40 | 24 | 20 | 17 | |
| Weapon | Yato | A | Swift Sparrow 2 | ||
| Support | B | Hit and Run | |||
| Special | Dragon Fang | C | Drive Def 2 | ||
| HP | ATK | SPD | DEF | RES | |
|---|---|---|---|---|---|
| 44 | 44 | 32 | 20 | 28 | |
| Weapon | Blárblade+ | A | Death Blow 3 | ||
| Support | B | Poison Strike 3 | |||
| Special | Moonbow | C | Drive Res 2 | ||
| HP | ATK | SPD | DEF | RES | |
|---|---|---|---|---|---|
| 55 | 46 | 29 | 29 | 16 | |
| Weapon | Guard Bow+ | A | HP/Atk 2 | ||
| Support | B | G Tomebreaker 3 | |||
| Special | Reprisal | C | Hone Spd 3 | ||
| HP | ATK | SPD | DEF | RES | |
|---|---|---|---|---|---|
| 44 | 39 | 33 | 24 | 39 | |
| Weapon | Brave Axe+ | A | Fury 3 | ||
| Support | B | Obstruct 3 | |||
| Special | Iceberg | C | Threaten Def 3 | ||
| HP | ATK | SPD | DEF | RES | |
|---|---|---|---|---|---|
| 50 | 43 | 36 | 21 | 28 | |
| Weapon | Sapphire Lance+ | A | Speed +3 | ||
| Support | Sing | B | Gale Dance 3 | ||
| Special | C | Hone Atk 3 | |||
| HP | ATK | SPD | DEF | RES | |
|---|---|---|---|---|---|
| 58 | 48 | 32 | 28 | 24 | |
| Weapon | Yato | A | Swift Sparrow 2 | ||
| Support | B | Hit and Run | |||
| Special | Dragon Fang | C | Drive Def 2 | ||
| HP | ATK | SPD | DEF | RES | |
|---|---|---|---|---|---|
| 52 | 47 | 35 | 22 | 31 | |
| Weapon | Blárblade+ | A | Death Blow 3 | ||
| Support | B | Poison Strike 3 | |||
| Special | Moonbow | C | Drive Res 2 | ||
| HP | ATK | SPD | DEF | RES | |
|---|---|---|---|---|---|
| 61 | 52 | 32 | 39 | 21 | |
| Weapon | Slaying Edge+ | A | HP/Spd 2 | ||
| Support | B | Hit and Run | |||
| Special | Sacred Cowl | C | Guidance 3 | ||
| HP | ATK | SPD | DEF | RES | |
|---|---|---|---|---|---|
| 63 | 49 | 32 | 32 | 17 | |
| Weapon | Guard Bow+ | A | HP/Atk 2 | ||
| Support | B | G Tomebreaker 3 | |||
| Special | Reprisal | C | Hone Spd 3 | ||
| HP | ATK | SPD | DEF | RES | |
|---|---|---|---|---|---|
| 52 | 42 | 36 | 26 | 42 | |
| Weapon | Brave Axe+ | A | Fury 3 | ||
| Support | B | Obstruct 3 | |||
| Special | Iceberg | C | Threaten Def 3 | ||
| HP | ATK | SPD | DEF | RES | |
|---|---|---|---|---|---|
| 58 | 46 | 39 | 23 | 31 | |
| Weapon | Sapphire Lance+ | A | Speed +3 | ||
| Support | Sing | B | Drag Back | ||
| Special | C | Hone Atk 3 | |||
| HP | ATK | SPD | DEF | RES | |
|---|---|---|---|---|---|
| 67 | 51 | 35 | 31 | 27 | |
| Weapon | Yato | A | Swift Sparrow 2 | ||
| Support | B | Hit and Run | |||
| Special | Dragon Fang | C | Drive Def 2 | ||
User Submitted Teams
For this to work you need the following on each Heroes
Key- * = Must Have on Unit
[Left Side]
Brave Lyn
Weapon: Mulagir*
Reposition*
Draconic Aura*
Swift Sparrow (A)*
Sacae's Blessing (B)*
Atk Smoke 3 (C)*
Distant Def 3 (S)*
Reinhart
Weapon: Dire Thunder*
Reposition*
Luna*
Death Blow 2/3 (A)*
Lancebreaker 2/3 (B)
Hone Atk 2 (C)*
Quickened Pulse (S)*
[Right Side]
Nephenee
Weapon: Slaying Lance+ (+Hp/+Def) *
Reposition
Bonfire*
Fury 3* (A)
Wrath 3* (B)
Spur Def 3* (C)
Close Def 3 (S)
Performance Azura
Weapon: Uror*
Sing
Luna*
Triangle Adept 3 (A)*
Wings of Mercy 3 (B)*
Drive Res 2 (C)
Hone Atk 2 (S)
Strategy.
First off, move Nephenee to the top of the steps where the Cavalry can't move past in one turn, but also make you give a stat boost from Azura's Sing so Nephenee can tank the upcoming Axe Flyer with 0 damages. Make sure you lure all the enemies minus the ranged enemies like the Blue Mage and the Archer. Just rinse and repeat, just be careful not to get Azura lured in too close or she'll become a target by the Red flyers. Make sure Nephenee can get stat boosted as much as possible and she can tank Corrin/Azura/Red Flier with 0 damages on the same spot you put her in.
Meanwhile on the left side, have Brave Lyn take care of the Blue Mage, but also use Reinhart's Reposition to get Lyn out of trouble from the Archer coming up. Just make sure once it leaves up to the Archer/Azura, make sure the Archer isn't in the range of Nephenee and use Azura's Wings of Mercy to lure the archer to her rather than Lyn/Reinhart. Don't worry with Nephenee since she gets 0 damage against Azura. Once Per. Azura takes the hit from the archer, use her to attack the Archer and finish him off with Reinhart.
It takes some trial and errors but once you get the pattern, this should be plausible.
Here's how i did it. Note this could be done with similar units, but idk how the ai will act. I know Micaiah and PA Azura might be hard to get, so if you don't have any of these units then try using someone who fits the requirements below.
-Defensive sword unit with 2 or more movement (that can take a hit from the brave axe flier and kill the next turn)
-Blue Mage with swordbreaker 1 (Needs to orko corrin, so choose someone with high attack as speed isnt important)
-Any dancer with wings of mercy (preferably 3, but 2 might work)
-Axe Flier with high def, lancebreaker, ignis, iotes shield seal + a weapon that accelerates special trigger. I used Michalis for this as he's fairly easy to get and has most of these properties, but you could use someone with a slaying weapon maybe, or minerva.
Micaiah and Azura on left, with Micaiah on the higher space and Azura on the lower, the other two on the left with Laslow on the higher space and Michalis on the lower.
T1
-Move laslow onto the trench terrain
-Move michalis two spaces left
-Move micaiah and azura up
T2
-Finish the axe flier with laslow who should have flown to him thanks to the enemy azura
-Kill corrin with micaiah, attacking from the bridge tile, then use dance behind her and put micaiah behind azura out of harms way
-Move michalis 1 space up (not 2 or he dies to sword flier), he should kill azura during enemy phase thanks to lancebreaker
T3
-Kill sword flier with micaiah, who should still have enough hp for swordbreaker
-Kill blue mage with michalis's ignis activation. Dont worry about the archer, because michalis has iotes shield and will live.
T4
-Attack archer with michalis, using wings of mercy, dance and attack again, activating ignis
Nino: Gronnblade+, Draw Back, Moonbow, Fury 3, Desperation 3, Threaten Res 3
LA Hector: Berserk Armads, Swap, Ignis, Distant Counter, Wary Fighter, Quickened Pulse (Glimmer might work as well)
Fjorm: Leiptr, Reposition, Ice Mirror, Atk/Def Bond 3, Shield Pulse 3, Drive Atk 2, Fortify Def 2 Seal
NY Azura: Sing, Fury 3, Wings of Mercy 3, Hone Fliers, Guidance 2 seal (should be a dancer that can live a Blue Mage, but might vary depending on set)
The dancer moves forward two spaces; Nino does the same and uses draw back to position herself right outside the enemies' range. Fjorm moves forward two spaces as well and repositions Hector. Hector does nothing. The Axe flier will kill himself on Hector in enemy phase.
Have Nino go down two spaces and use draw back, then move the dancer down two spaces. Have Fjorm reposition Hector, then have Hector swap with Fjorm.
Nino attacks Corrin, gets danced, then attacks again for the kill. Hector and Fjorm both move up one space.
Nino uses her now charged moonbow to kill the sword dragon, gets danced, then kills the blue mage. Fjorm repositions Hector in between the archer and Azura, and he takes out the archer. Azura kills herself on Hector, and you win!
Linde: +def/-hp
Blarblade+ (need)
Draiconic Aura
Rally attack
Fury 3 (need)
Desperation 3
Fortify Res 3
Preforming Azura: +atk/-hp (aka Axezura)
Uror (need)
Dance (need)
Night sky
Fury 2
Escape route 3
Drive res 2
SS: Speed +2
Cherche: +res/ -spd
Brave Axe+ (need)
Pivot
Luna (need)
Atk+ 3 (need or atk boon)
Axe Breaker 3 (need)
Fortify def 3 (need)
SS: atk +3
Ninian: spd+/-atk
Light breath+
Dance (need)
Triangle adept 1 (need)
Wings of mercy 3
Fortify def 1
SS: distant defense 3 (need)
Notes: I think just about any blue dancer with high speed will work here, and defensive stats in the 20’s. Also, any blue blarblade user with fury (needs a speed of 40min) will work in steed if Linde. Also, my Linde is my summoner S support, so that may impact things too.
Put Linde and Axezura on the left (in that order) and Cherche and Ninian on the right.
Turn 1: leave Linde and Axezura where they are. Move Cherche up 2 and Ninian underneath her.
Enemy Phase: The axe flier will advance, and Azura will sing to them and they’ll attack Cherche, who will take damage but counter and kill them. All other enemy units will advance, with corrin below Azura, the bow unit above her, the dragon to her right and the mage above them.
Turn 2: Move Cherche below Ninian, then move Ninian below her and sing to her. Move Cherche to the left of Ninian. Again, leave Axezura and Linde where they are.
Enemy Phase: Corrin will Go left, and azura will sing to him so he ends two spaces up a space away from Linde. The bowman, dragon, and mage should be in the middle of the map (in that order)
Turn 3: Have Linde attack and kill Corrin. She’ll need to do this is one move. Next, sing to her and move her one space up, into the Bowman’s range. Leave Cherche and Ninian where they are.
Enemy Phase: The bowman will attack Linde, who should survive and counter kill him. Azura will move to the left above her and dragon and mage will advance.
Turn 4: Linde should have her special ready, so attack and mortally would azura. Have Axezura sing to her, then move Linde below Axezura. (Rally her attack if you feel like it). The right is where things get dicey. Before either Cherche or Ninian has acted, Ninian should be the only one of the two who is clear. Move Ninian up one (in range if both the dragon and mage) and Cherche into the corner.
Enemy Phase: Azura will attack Axezura, who will counter and kill her. On the right, the mage will attack Ninian, then the dragon. She should barely survive these encounters.
Turn 5: Have Cherche go kill the mage. Move Linde to the right, the have Axezura sing to her left and move Linde into the trees to attack and kill the dragon. If for some reason she doesn’t, have Ninian finish it off.


