


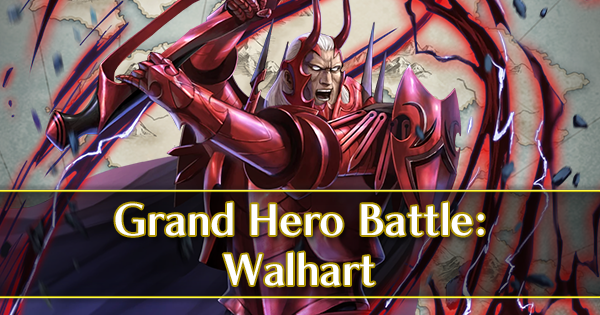
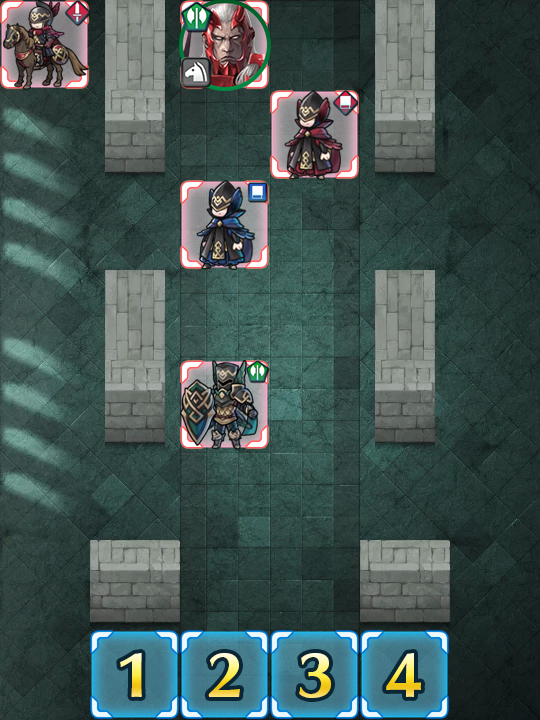
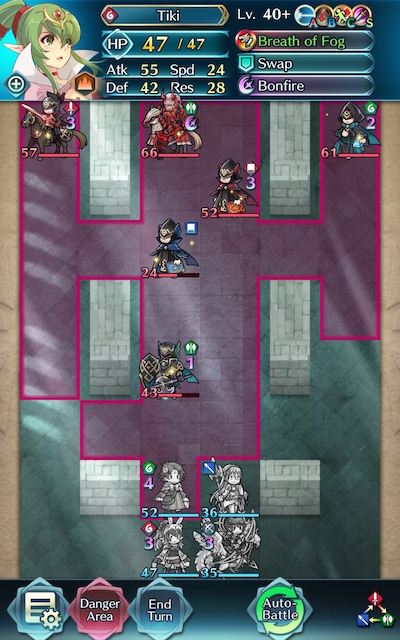
Map
- Normal
- Infernal
Grand Hero Battle: Walhart
Enemies of Valm beware! This Grand Hero Battle sees Walhart the conqueror take center stage, complete with his fearsome army in tow. In lieu of actual character development, Walhart himself displays overwhelming strength, and the reinforcements on his map will no doubt prove to be a rather difficult challenge.
If you want to succeed here, timing will be everything and patience will be key. Brute forcing this map is possible but somewhat ill-advised -- unlike most Infernal maps, just because you can net a KO doesn’t mean you necessarily should. Prepare yourself: it may take you multiple tries just to get past a single turn, but remember that every bit of progress takes you one step closer to victory. You’re fighting a war of attrition, and if you’re determined it will be a war you win.
Who to Choose
As is generally true of Grand Hero Battles, the individual units used is very important as they will primarily inform your strategy. There are a few routes one can take depending on what units are available to you, and, of course, adjustment based on the units one possesses is always a possibility.
Tanks
Since the enemies on this map won’t move unless baited or struck, you’ll likely want to include at least one tank in your team. Even if you decide to start the map with a strike and retreat method, a powerful tank will help you establish chokepoints and protect your squishier units from harm.
Armors such as Zelgius, Black Knight, Winter Tharja, Fallen Hardin, Hector, LA Hector, Legendary Hector, and Fallen Robin are able to hit hard very upon counterattacking, especially if they’re making use of Quick Riposte or Vengeful Fighter. Calvary tanks like Xander, Camus, and Sigurd perform better with class-specific buffs -- Sigurd is notable for his ability to tank a fair bit of magic damage due to Divine Tyrfing and the Crusader’s Ward. An amazing F2P option is Fjorm, who is able to tank ranged foes extremely well with her exclusive Special, Ice Mirror, and Legendary Ike, whose native Warding Breath grants him accelerated cooldown and extra Resistance.
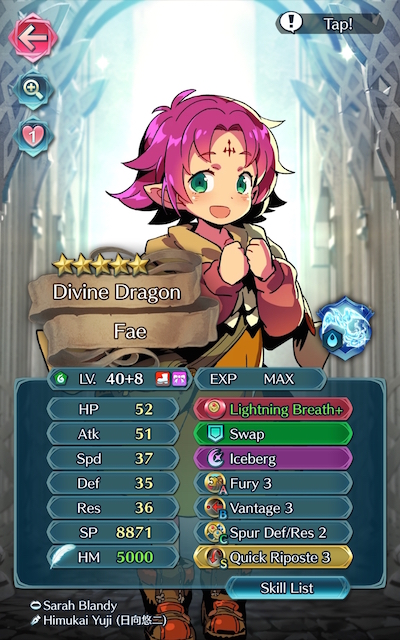
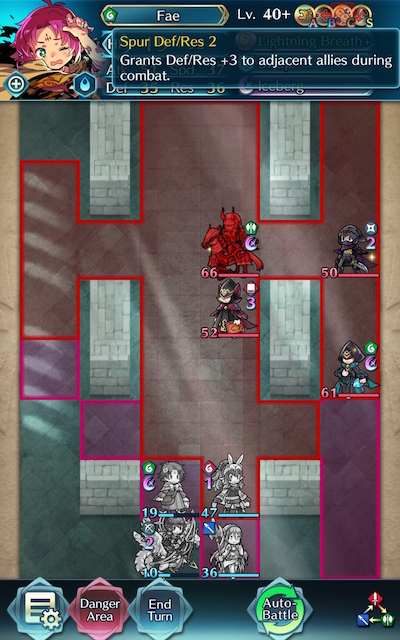
Dragons are also very strong tanks, especially when they’re equipped with Lightning Breath (or another Breath and Distant Counter, if you’re feeling fancy). Nowi, Female Corrin, Male Kana, Fae, Myrrh, Legendary Robin, Female Kana, Adult Tiki, Young Tiki, and/or Summer Young Tiki will all likely be able to do the job and do it well.
Strikers
Because of the amount of enemies that will rush you on this map, it is highly recommended that you use a striker if you can. A Brave striker + 3 Refreshers team composition is perfectly viable here, though a mixed team composition will likely require less support.
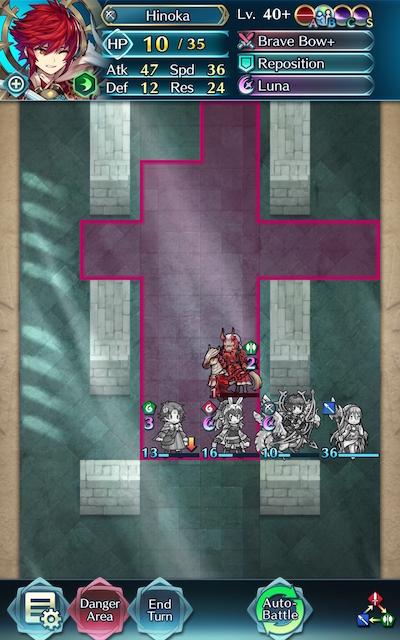
In particular, archers can be incredibly potent strikers due to their ability to overpower and/or finish off any enemies your tank may otherwise struggle with, especially if they are equipped with a Brave Bow. Brave Lyn, WF Hinoka, Bridal Cordelia, Summer Takumi, Setsuna, and Klein are potential strikers you may want to use, with a special mention going to Brave Lyn given her F2P status.
Brave and Blade tome wielders can also serve to be useful if your team composition provides them with the appropriate buffs, though speedy mages can also be powerful strikers. Tharja, Reinhardt, Tailtiu, Ishtar, Linde, WT Olwen, SF Nino, and Nino are potential options here, especially if they are equipped with a Breaker skill to add to their coverage.
Refreshers
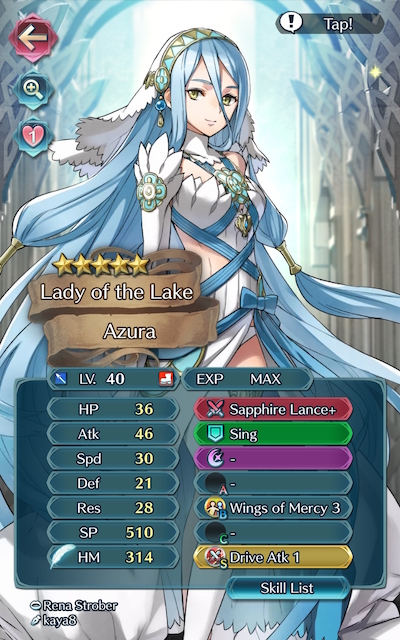
Refreshers help provide support, may even have a decent offensive presence themselves, and can usually tank a hit or two, if need be. Lene, Olivia, Performing Olivia, YT Olivia, Performing Inigo, Performing Shigure, Performing Azura, Azura, New Year Azura, Bridal Ninian, and Ninian all give the refreshment that high-firepower units need while also possessing the ability to provide an assist to KO an enemy.
Buffers
As units that offer extra utility, buffers typically fit one of the above roles while also supporting your other units. Because of the high difficulty of this map bringing some extra buff skills will likely help ease some of the burden, especially if you make use of class-specific ones.
Because of Skill Inheritance, any unit can be a buffer with enough investment -- many Drives, Spurs, Hones, Fortifies, and Dual Rallies are readily accessible on 4 star units, and can be further stacked with seals for maximum coverage. Notable options who natively provide buffs through their exclusive weapons include YT Olivia, Performing Azura, Eirika, Ephraim, Delthea, and Linde, while Brave Lucina, New Year Corrin, and New Year Azura are able to stack Drives through theirs.
Strategy
Strategizing for this Grand Hero Battle may prove to be a bit difficult due to the reinforcements -- and their awful timing. While it can be difficult to exactly predict what will happen due to IV / Merge variance, here’s some general tips to get you started.
Between A Rock...
Like most Bound Hero and Grand Hero Battle guides advocate, most of these maps are won or lost before they even start. While it may be tempting to jump right in, knowing (and loving!) your enemy will help you not only choose your units, but also figure out where to begin.
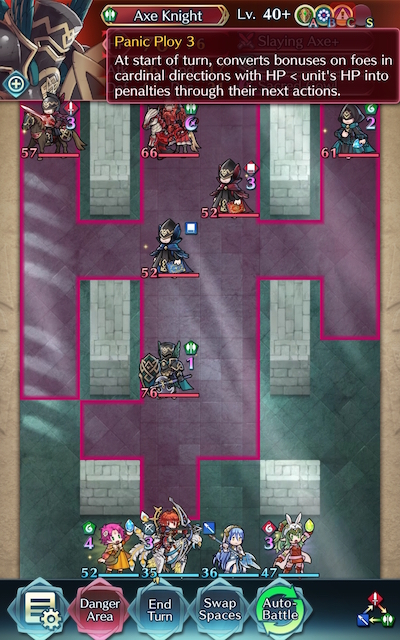
While there are a few approaches you can take to start off this map, the most advisable one is to target the axe armor due to his short range and low speed. There are a few things to note about him though -- mainly, the fact that he’s carrying Wary Fighter as well as Panic Ploy. While Wary Fighter will prevent your units from performing follow up attacks on him while he has ≥ 50% HP (unless they have a Skill or weapon that overrides it), Panic Ploy will turn your buffs (bonuses that appear on your stats in blue) against you if your unit’s HP is lower than this foes’. Given that this enemy has 76 (!!!) HP, it’s exceedingly likely -- if not guaranteed -- that this Skill will activate, so it’s definitely something to watch out for.
Also of note is the fact that this unit carries Svalinn’s Shield, which prevents effective weaponry from being, well, effective against him. So it may be best to leave your Hammers, Slaying Spears, and Armorsmashers at home -- they won’t be doing much good.
Savagery! Savagery!
Although it’s possible (and likely) that you won’t be able to finish off the axe armor this turn, you can actually use that to your advantage. On maps like these, the double Savage Blow (Savage Blow Skill + Seal) combo can be a lifesaver. Because it allows you to deal 14 chip damage to the highly inflated HP of your enemies at a distance every time you attack, it can often make the difference between netting an important KO and being KO’d yourself. If you’re using a ranged unit, consider trying it -- the results may surprise you… in a good way!
Give And Take
If you’re making use of Skills that require your units to be damaged such as Escape Route, Wings of Mercy, and Vantage, you may have to not always use the single best unit for a certain job. While it’s always satisfying to take no damage (or only a bit of chip damage) from a foe, sometimes it can be worthwhile to have a unit take more damage than they need to in order to allow these Skills to activate.
Another thing you’ll want to be mindful of is the speed of which you KO foes. Since the reinforcements will spawn depending on how many enemies you defeat in the turn prior, even if you can net an immediate KO, it might not be advisable to do so. Conversely, if you know where reinforcements are going to appear and you’re prepared for them, netting a certain KO may put you in a better position than you would be in otherwise. It’s all about give and take!
Annoying Adepts
Triangle Adept + Gronnraven is a potent combination that is useful in a wide variety of game modes. Unfortunately, it’s just as powerful when it’s used against you and will send your colorless and blue units running for cover (unless they’re running Cancel Affinity, but that’s a rather rare Skill). The good news is that any red unit who attacks the mage toting this combination will wipe them out of existence -- Triangle Adept, after all, is a double-edged sword. The bad news is that if you’re using a colorless or blue unit, you may have to adjust your prior turn to ensure you’re in the proper position to take this enemy out right away.
In The Line Of Fire
Understanding the enemy AI’s logic can be a crucial aspect to surviving any Infernal map, and this one is no different. If you’re trying to conserve a certain unit’s HP, you may want to consider putting another unit in the line of fire who will be prioritized by your foes. Units who can’t counterattack, Refreshers, and Healers are often (but not always) targeted by the AI first, so it may be worthwhile to put a unit in harm’s way if you have something to gain from it -- and won’t lose in the process.
Enter the Conqueror
When you finally cut through his throngs of soldiers to reach the Emperor of Valm himself, be prepared for a hard-won fight. Walhart’s Chill Def Skill will heavily debuff the unit on your team with the most Defense (aka the one you brought with to fight him!), and his axe, the Wolf Berg, makes him surprisingly tanky. If you can, use magical attacks to break through his bulk -- otherwise, Special activations are likely your best bet to take him down. Also keep in mind that weaponry effective against calvary will not deal effective damage to him due to him carrying Grani’s Shield -- you’ll have to break through his defenses the good ol’ fashioned way.
If At First You Don’t Succeed
Don’t be fooled by video walkthroughs of any Grand Hero Battle that you watch -- it’s very rare for anyone to beat high-difficulty content (or record a video of themselves doing so!) on their first try. Additionally, the potential variance in unit builds that Skill Inheritance brought along with the random nature of summoning has resulted in pretty much every single summoner having different building blocks to work with. This, when combined with the high difficulty level of Infernal, may prove frustrating while someone is trying to find the right combination of units and moves. The key thing to keep in mind is that it may take some light Skill Inheritance and seal shuffling as well as multiple tries of the map to find a strategy that works for you. Every single turn you complete gets you one step closer to completing the puzzle. Finally, reading about or watching videos of successful strategies may also help you break through a particularly difficult turn that you can’t complete, or may give you ideas of a new unit to use.
Map Enemies
- Hard
- Lunatic
- Infernal
| HP | ATK | SPD | DEF | RES | |
|---|---|---|---|---|---|
| 42 | 45 | 19 | 31 | 11 | |
| Weapon | Wolf Berg | A | Grani's Shield | ||
| Support | B | Chill Def 3 | |||
| Special | Luna | C | |||
| HP | ATK | SPD | DEF | RES | |
|---|---|---|---|---|---|
| 33 | 29 | 24 | 14 | 24 | |
| Weapon | Bolganone | A | Fortress Res 2 | ||
| Support | B | Vantage 2 | |||
| Special | Iceberg | C | Spd Ploy 3 | ||
| HP | ATK | SPD | DEF | RES | |
|---|---|---|---|---|---|
| 49 | 40 | 11 | 32 | 13 | |
| Weapon | Slaying Axe | A | Svalinn Shield | ||
| Support | B | Wary Fighter 3 | |||
| Special | Sacred Cowl | C | Panic Ploy 2 | ||
| HP | ATK | SPD | DEF | RES | |
|---|---|---|---|---|---|
| 36 | 28 | 19 | 20 | 25 | |
| Weapon | Firesweep Sword | A | Fury 2 | ||
| Support | B | Seal Res 2 | |||
| Special | Sol | C | Atk Tactic 3 | ||
| HP | ATK | SPD | DEF | RES | |
|---|---|---|---|---|---|
| 33 | 36 | 28 | 10 | 16 | |
| Weapon | Thoron | A | Life and Death 2 | ||
| Support | Rally Def/Res | B | Swordbreaker 2 | ||
| Special | C | Res Tactic 3 | |||
| HP | ATK | SPD | DEF | RES | |
|---|---|---|---|---|---|
| 57 | 53 | 27 | 39 | 16 | |
| Weapon | Wolf Berg | A | Grani's Shield | ||
| Support | B | Chill Def 3 | |||
| Special | Luna | C | |||
| HP | ATK | SPD | DEF | RES | |
|---|---|---|---|---|---|
| 44 | 41 | 32 | 20 | 33 | |
| Weapon | Bolganone+ | A | Fortress Res 3 | ||
| Support | B | Vantage 3 | |||
| Special | Iceberg | C | Spd Ploy 3 | ||
| HP | ATK | SPD | DEF | RES | |
|---|---|---|---|---|---|
| 66 | 52 | 16 | 40 | 19 | |
| Weapon | Slaying Axe+ | A | Svalinn Shield | ||
| Support | B | Wary Fighter 3 | |||
| Special | Sacred Cowl | C | Panic Ploy 3 | ||
| HP | ATK | SPD | DEF | RES | |
|---|---|---|---|---|---|
| 49 | 52 | 27 | 28 | 33 | |
| Weapon | Firesweep Sword+ | A | Fury 3 | ||
| Support | B | Seal Res 3 | |||
| Special | Sol | C | Atk Tactic 3 | ||
| HP | ATK | SPD | DEF | RES | |
|---|---|---|---|---|---|
| 44 | 49 | 37 | 15 | 23 | |
| Weapon | Thoron+ | A | Life and Death 3 | ||
| Support | Rally Def/Res | B | Swordbreaker 3 | ||
| Special | C | Res Tactic 3 | |||
| HP | ATK | SPD | DEF | RES | |
|---|---|---|---|---|---|
| 66 | 56 | 30 | 43 | 17 | |
| Weapon | Wolf Berg | A | Grani's Shield | ||
| Support | B | Chill Def 3 | |||
| Special | Luna | C | Atk Smoke 3 | ||
| HP | ATK | SPD | DEF | RES | |
|---|---|---|---|---|---|
| 52 | 44 | 35 | 22 | 36 | |
| Weapon | Bolganone+ | A | Fortress Res 3 | ||
| Support | B | Vantage 3 | |||
| Special | Iceberg | C | Spd Ploy 3 | ||
| HP | ATK | SPD | DEF | RES | |
|---|---|---|---|---|---|
| 76 | 56 | 17 | 44 | 21 | |
| Weapon | Slaying Axe+ | A | Svalinn Shield | ||
| Support | B | Wary Fighter 3 | |||
| Special | Sacred Cowl | C | Panic Ploy 3 | ||
| HP | ATK | SPD | DEF | RES | |
|---|---|---|---|---|---|
| 57 | 55 | 30 | 31 | 36 | |
| Weapon | Firesweep Sword+ | A | Fury 3 | ||
| Support | B | Seal Res 3 | |||
| Special | Sol | C | Atk Tactic 3 | ||
| HP | ATK | SPD | DEF | RES | |
|---|---|---|---|---|---|
| 52 | 52 | 40 | 17 | 26 | |
| Weapon | Thoron+ | A | Life and Death 3 | ||
| Support | Rally Def/Res | B | Swordbreaker 3 | ||
| Special | C | Res Tactic 3 | |||
| HP | ATK | SPD | DEF | RES | |
|---|---|---|---|---|---|
| 61 | 49 | 33 | 32 | 31 | |
| Weapon | Water Breath+ | A | Death Blow 3 | ||
| Support | B | Shield Pulse 3 | |||
| Special | Sacred Cowl | C | Res Ploy 3 | ||
User Submitted Teams
The key is to have a unit that stall the firesweep sword cavalier and then deal with the incoming enemies
Demonstration:
https://youtu.be/MfrTaaRNikI
The tactic itself is straight forward as long as the set up is right.
Both Lyn and Gunnthra needs Hone Cavalry. Gunnthra needs enough attack to reduce the Axe Knight to below half health. In my case, I have a +8 merged +Atk Gunnthra with Death Blow 3. Without the merging, a +Atk seal is probably required. Aside, L! Ike may need QR3 skill or seal.
As long as the first attack by Gunnthra can bring the Axe Knight down past Wary Fighter 3 range, he can be killed with dancer assist. The blue mage will easily die to Gunnthra with cav buff in enemy phase. In player phase, either Lyn or Gunnthra can kill the Red Mage. (But Lyn may have a hard time with the Lance Fighter. So choose target according to your build.) From here on, it is simply killing as many enemies as possible in one turn to avoid being swarmed. There won't be many possibilities for different actions.
p.s. I use HB 3 and Growing Wind on Gunnthra. Though that's probably not required.
Team layout:
Your Reinhardt must have Moonbow and Quickened Pulse with Deathblow 3 and at least Swordbreaker 1.
A Good fast green mage is needed, I used Nino. A fast blue unit with reposition is needed as well, I used Catria. Masked Marth can be any fast red unit, they just need Luna and Vantage 3.
https://www.youtube.com/watch?v=2bVjcxelIRs
Corrin (F) +4 merged, +Atk-HP
->Dark Breath+ (Res)
Pivot
Aegis/Blazing Wind
Distant Counter
Shield Pulse 3/Wrath 3
Savage Blow 3
Deflect Magic 3 SS
(S Summoner Support)
(S support to Azura)
Azura +Res-Spd
Slaying Lance+(+Spd)
->Sing
Glimmer
Triangle Adept 3
Geyser Dance 2
Spur Atk 3
Spur Spd 3 SS
(S support to Corrin)
Marth +5, +Spd-HP
->Falchion(Eff)
Reposition
Luna
Close Defense 3
Swordbreaker 3
Drive Spd 2
Drive Atk 2 SS
(S support to Lyn)
Bridal Lyn +1 merged +HP-Atk
Candleligh+(Wrath)
Recover+/->Rehabilitate
Miracle
HP+5
Dazzling Staff
Infantry Pulse 3
HP+5 SS
(S support to Marth)
Damn, even with full skills that one took many, MANY tries. The biggest pain in the butt was preventing the knight from commiting suicide and keeping Azura out of the line of fire. I am sorry, but there is no chance of me going the "least skills possible" route on this one. Literally everything has to be done perfectly and with all available resources and anti-AI tricks.
https://www.youtube.com/watch?v=RpzQL-QFgk0
I'll give credit when credit is due. Maybe it was for the wrong reasons, but IS, you FINNALLY remembered that Grand Hero Battles and Bond Hero Battles are supposed to be hard
https://www.youtube.com/watch?v=Z2TJnu5tgUg&t=1s


