


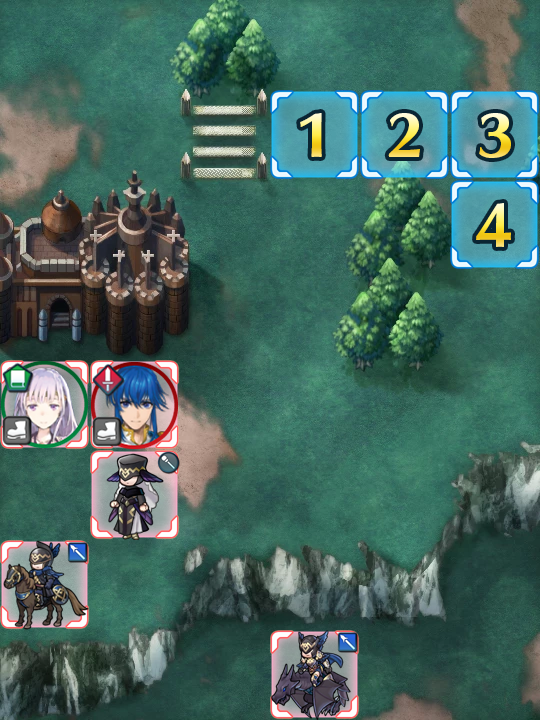
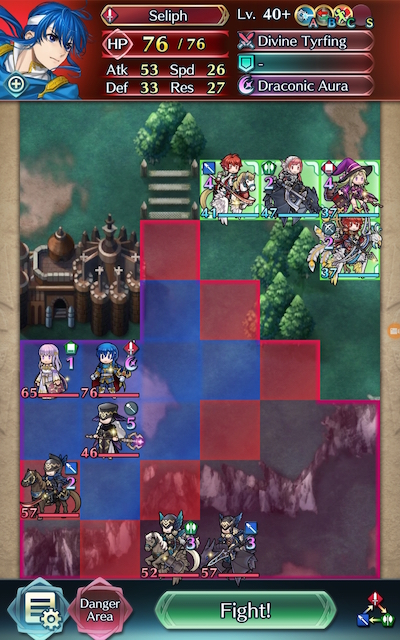
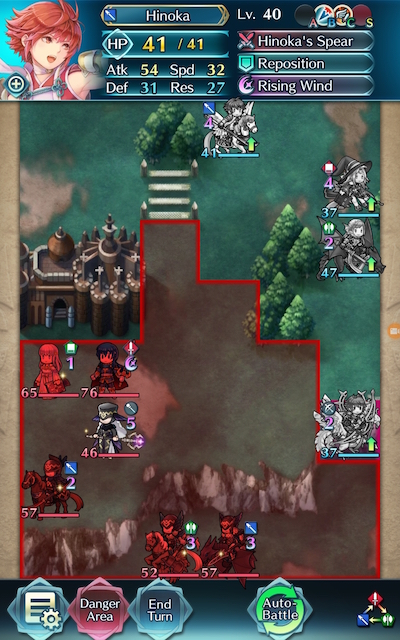
Map
- Normal
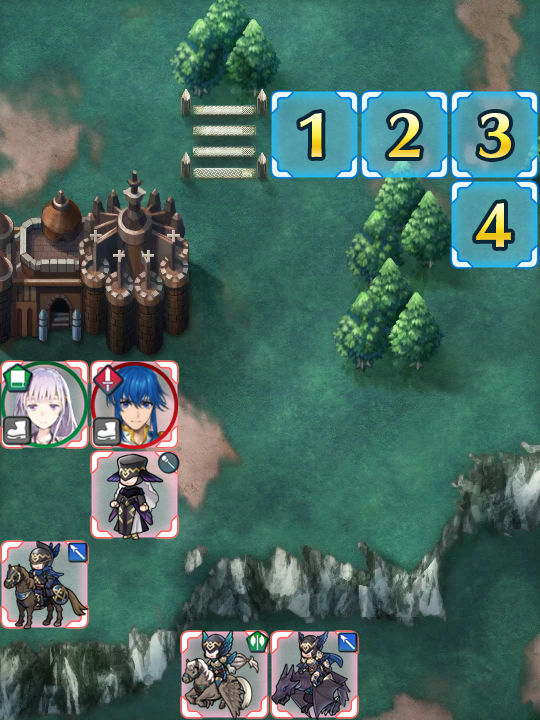
- Infernal
Bound Hero Battle: Seliph and Julia
Showcasing the power of the bond between siblings, it’s time for another Bound Hero Battle, and this time the main attractions are Seliph and Julia! While this map features no reinforcements, your foes won’t start moving until you bait them or attack them, making the choice of where to begin very important indeed. Additionally, Seliph and Julia’s refined weaponry (and in Seliph’s case, his skills) can make them surprisingly tanky -- so while this Bound Hero Battle is definitely not the hardest Infernal map on record, there’s still a few things that may catch you by surprise.
The good news is that since none of the fliers carry Iote’s Shield, you can deal effective damage to them with bows. Moreover, Seliph and Julia’s low Speed and Julia’s low Defense does make them significantly less threatening to bait -- and will hopefully enable you to KO them within one or two rounds of combat. If you stay persistent, you’ll persevere; the key is to not get frustrated in the process.
Before you begin teambuilding, it’s completely possible you already possess everything you need to beat this map. Created by Gamepress staff member RedFerrari1998, the video guide below uses only F2P units, some light Skill Inheritance, and some Seals -- see the description for more details. If it doesn’t work for you, though, then read on!
As is generally true of Bound Hero Battles, the individual units used is very important as they will primarily inform a strategy. There are a few routes one can take depending on what units are personally available, and, of course, adjustment based on the units one possesses is always a possibility.
Baiters
Since the enemies on this map won’t move unless baited and the units you can reach to strike and retreat are quite tanky, you’ll likely want to include a baiter in your team composition. Even if you end up using a striker to start the map (more on that later), being able to tank either physical or magical damage (or both!) can potentially prove very useful when you need to deal some chip damage to ensure a KO.
Armors such as Zelgius and Black Knight are able to hit hard upon counterattacking, especially if they’re making use of Quick Riposte or Vengeful Fighter. Moreover, their color and very strong Special makes them good candidates for KOing Julia outright. Calvary tanks like Xander and Sigurd perform particularly well with class-specific buffs, but may struggle with the trench. Although more offensively oriented, Legendary Ryoma can use his flier movement to tank and KO the healer on the bottom right cliff and get the map started. An amazing F2P option is Fjorm, who comes natively with Atk/Def Bond, and Legendary Ike, whose native Warding Breath grants him accelerated cooldown.
Fliers can also be great tanks here due to their excellent mobility and access to class-specific buffs, especially when they’re used in conjunction with one another and the Flier Formation skill/seal.
Do note that while dragons are typically very strong tanks, if you choose to use Nowi, Female Corrin, Male Kana, Fae, Myrrh, Fallen Robin, Legendary Robin, Female Kana, Adult Tiki, and/or Young Tiki, Julia’s Divine Naga will deal effective damage to them. This makes them less effective than they'd usually be, as they must take caution to avoid one of the foes they should be tanking.

Strikers
Given that two foes here take effective damage from bows and two other enemies have low Defense, it logically follows that archers would be incredibly useful on this map. In particular, however, Brave Bow users can be incredibly potent strikers due to their ability to overpower and/or finish off any enemies your tank may otherwise struggle with. New Year Corrin, Brave Lyn, WF Hinoka, Bridal Cordelia, Klein, and Setsuna are potential strikers you may want to use, with a special mention going to New Year Corrin and Brave Lyn given their F2P status.
Alternatively, melee Brave users are able to hit foes twice without retaliation, and may even quad hit if they outspeed an enemy. Cherche, Cordelia, Elincia are all great Brave users who can make excellent use of class-specific buffs. Finn is a great F2P option who would work particularly well in a cavalry team along with WT Reinhardt, but one must be mindful of the trench when using him.
Brave and Blade tome wielders can also serve to be useful if your team composition provides them with the appropriate buffs, though speedy mages can also be powerful strikers. Do note, however, that they may be less effective than usual due to Seliph carrying the Divine Tyrfing, which reduces damage deal from the first hit by magic foes by 50%. Tharja, Bridal Tharja, Reinhardt, Tailtiu, Ishtar, Linde, and Nino are potential options here, especially if they are equipped with a Breaker skill to add to their coverage and/or are accompanied by a buffbot like Eirika or Ephraim.
Refreshers
Refreshers help provide support, may even have a decent offensive presence themselves, and can usually tank a hit or two, if need be. Lene, Olivia, Performing Olivia, Performing Inigo, Performing Shigure, Performing Azura, Azura, New Year Azura, Bridal Ninian, and Ninian all give the refreshment that high-firepower units need while also possessing the ability to provide an assist to KO an enemy.
Healers
While not generally a great choice over units who can deal heavy damage or dancers, Healers can be incredibly useful in this Bound Hero Battle due to their ability to provide valuable healing to your tanks. Genny, Priscilla, Elise, Nanna, Wrys, and Lissa are potential additions to a team that may serve you well on this map.
Strategy
Strategizing for this Bound Hero Battle should be fairly simple due to the absence of reinforcements. While it can be difficult to exactly predict what will happen due to IV / Merge variance, here’s some general tips to get you started.
Before The Battle
Before you start, there is something you definitely should be aware of. While you can get this map moving by striking at Seliph, refreshing your striker, and then using a movement skill like Reposition to get your refresher out of danger, you should be aware that Seliph’s refined weapon, Divine Tyrfing, reduces the damage dealt by the first hit by any magic wielding foe by 50%. Additionally, he also carries Distant Def, further strengthening his ability to tank hits from ranged units. This significantly reduces the effectiveness of magical striking mainstays like Reinhardt and Blade tome users, and also makes archers less effective, so be warned -- you may have to change up your usual strategy before you even begin.
Oncoming Onslaught
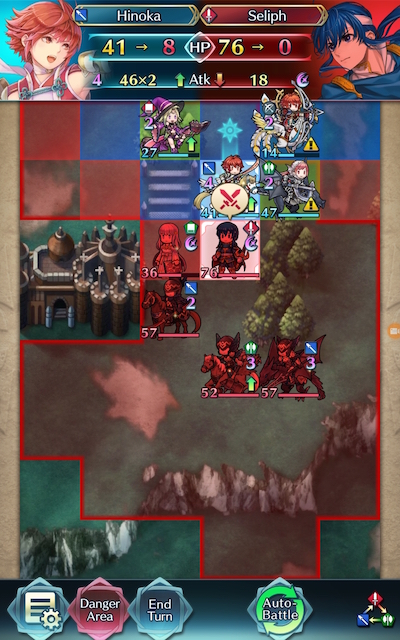
We open this Bound Hero Battle with the age-old question: where should you begin? While it may seem that your only choice is to tank Seliph and the Healer or Seliph and Julia all in one go, you actually have a second option which tends to break this map wide open.
On the bottom right corner of the danger zone, there’s a space that requires you to only tank a hit from the Cleric -- and if you’re using a skill that is activated when your unit is damaged like a Brazen skill, Vantage, Escape Route, this can be your chance to safely get into the HP range you need. The only snag that you may hit is that you’ll require a flier to make this strategy work, and that flier should preferably be ranged so they can KO or damage the foe they’re baiting.
If this space doesn’t work for you, don’t sweat it. Julia’s low Speed means that she can really only hit your baiter once. Seliph is also slow, and must fall under 50% HP to activate Brash Assault -- which will likely be quite difficult for him, given his good Defense and high HP. Tanking his Special may hurt a bit, but with buffs, you should be able to whether the storm.

Manipulation Madness
One final thing to consider is where you want your enemies to go. It’s tempting to just bunch your units together as closely as possible -- especially if you’re using class-specific buffs -- but if you can split up the enemy’s forces, you’ll have a much easier time KOing them on the next turn. Generally, the AI will move towards units that they can deal the most damage to, and you can use this to your advantage by baiting certain colored foes away from their army. Keep in mind that you may have to experiment with your seals and positioning -- eventually, you’ll find a way to get the AI to move the way you want.
Marvelously Methodical
While we all can sometimes get impatient (I know I certainly do!), when you’re challenging any kind of Infernal map it’s always a good idea to slow down and pay close attention to how much damage your units are dealing and taking. If they miss out on a KO or are KO’d themselves, you may be able to use skills or seals to ensure they deal or tank a few extra points of damage. Drive skills are particularly useful for this due to their availability as seals and relatively low upgrade cost.
Terrific Tanking
Unless your strikers are particularly frail, you shouldn’t worry about having them tank a hit. Strikers with high Speed will deny follow-ups and live to see another turn, while slower strikers with higher Defense or Resistance can take advantage of their bulk. Remember -- there’s no prize for finishing a map with units who have full health, so unless you desperately need to keep a Breaker skill or another skill with a higher HP threshold like Quick Riposte active, you don’t have to worry about keeping your unit’s HP high when you’re nearing the end of the map. Who knows -- you may even net a KO in the process of putting your striker in danger.
What A Drag!
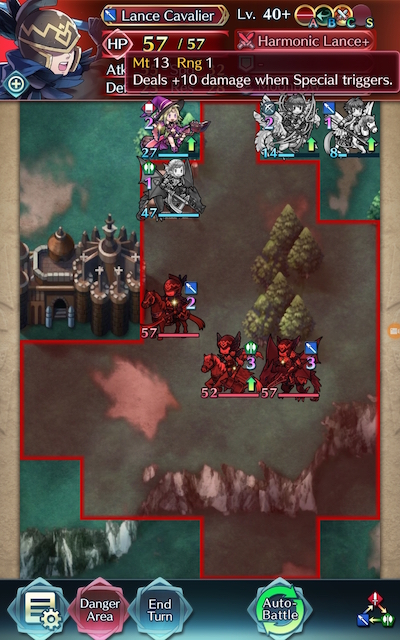
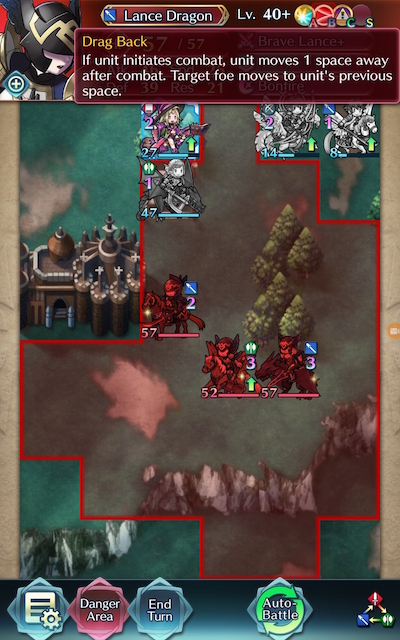
Something else to be aware of is that the Lance flier carries Drag Back, meaning that it can potentially drag your units into the range of a stronger foe if they initiate. While this isn’t an issue if you KO this foe outright, if you’re baiting them it’s important to account for the potential danger this could pose.
Effectively Effortless
While the weapons triangle will usually suffice, if you’re struggling with these fliers, you may want to try bringing a dedicated archer to snipe them from the skies. With the effective damage boost, KOing them should be much easier than all the other challenges you’ve had to face.
If At First You Don’t Succeed
Don’t be fooled by video walkthroughs of any Bound Hero Battle that you watch -- it’s very rare for anyone to beat high-difficulty content (or record a video of themselves doing so!) on their first try. Additionally, the potential variance in unit builds that Skill Inheritance brought along with the random nature of summoning has resulted in pretty much every single summoner having different “building blocks” to work with. This, when combined with the high difficulty level of Infernal, may prove frustrating while someone is trying to find the right combination of units and moves. The key thing to keep in mind is that it may take some light Skill Inheritance and seal shuffling as well as multiple tries of the map to find a strategy that works for you. Every single turn you complete gets you one step closer to completing the puzzle. Finally, reading about or watching videos of successful strategies may also help you break through a particularly difficult turn that you can’t complete, or may give you ideas of a new unit to use.
Map Enemies
- Hard
- Lunatic
- Infernal
| HP | ATK | SPD | DEF | RES | |
|---|---|---|---|---|---|
| 49 | 42 | 18 | 23 | 19 | |
| Weapon | Divine Tyrfing | A | Distant Def 3 | ||
| Support | B | Brash Assault 3 | |||
| Special | Draconic Aura | C | Drive Spd 2 | ||
| HP | ATK | SPD | DEF | RES | |
|---|---|---|---|---|---|
| 43 | 41 | 19 | 12 | 26 | |
| Weapon | Divine Naga | A | HP/Res 2 | ||
| Support | B | Bowbreaker 3 | |||
| Special | Dragon Fang | C | Breath of Life 3 | ||
| HP | ATK | SPD | DEF | RES | |
|---|---|---|---|---|---|
| 30 | 26 | 20 | 17 | 27 | |
| Weapon | Fear | A | Atk/Spd Bond 2 | ||
| Support | Recover | B | Wrathful Staff 2 | ||
| Special | Miracle | C | Spur Def/Res 2 | ||
| HP | ATK | SPD | DEF | RES | |
|---|---|---|---|---|---|
| 36 | 39 | 21 | 14 | 19 | |
| Weapon | Harmonic Lance | A | Life and Death 2 | ||
| Support | B | Pass 2 | |||
| Special | Moonbow | C | Hone Atk 3 | ||
| HP | ATK | SPD | DEF | RES | |
|---|---|---|---|---|---|
| 36 | 32 | 14 | 28 | 13 | |
| Weapon | Brave Lance | A | Bracing Blow 2 | ||
| Support | B | Drag Back | |||
| Special | Bonfire | C | Panic Ploy 2 | ||
| HP | ATK | SPD | DEF | RES | |
|---|---|---|---|---|---|
| 65 | 50 | 24 | 30 | 25 | |
| Weapon | Divine Tyrfing | A | Distant Def 3 | ||
| Support | B | Brash Assault 3 | |||
| Special | Draconic Aura | C | Drive Spd 2 | ||
| HP | ATK | SPD | DEF | RES | |
|---|---|---|---|---|---|
| 56 | 49 | 26 | 17 | 34 | |
| Weapon | Divine Naga | A | HP/Res 2 | ||
| Support | B | Bowbreaker 3 | |||
| Special | Dragon Fang | C | Breath of Life 3 | ||
| HP | ATK | SPD | DEF | RES | |
|---|---|---|---|---|---|
| 40 | 40 | 28 | 23 | 35 | |
| Weapon | Fear+ | A | Atk/Spd Bond 3 | ||
| Support | Recover+ | B | Wrathful Staff 3 | ||
| Special | Miracle | C | Spur Def/Res 2 | ||
| HP | ATK | SPD | DEF | RES | |
|---|---|---|---|---|---|
| 49 | 52 | 29 | 20 | 25 | |
| Weapon | Harmonic Lance+ | A | Life and Death 3 | ||
| Support | B | Pass 3 | |||
| Special | Moonbow | C | Hone Atk 3 | ||
| HP | ATK | SPD | DEF | RES | |
|---|---|---|---|---|---|
| 49 | 43 | 22 | 36 | 19 | |
| Weapon | Brave Lance+ | A | Bracing Blow 2 | ||
| Support | B | Drag Back | |||
| Special | Bonfire | C | Panic Ploy 3 | ||
| HP | ATK | SPD | DEF | RES | |
|---|---|---|---|---|---|
| 76 | 53 | 26 | 33 | 27 | |
| Weapon | Divine Tyrfing | A | Distant Def 3 | ||
| Support | B | Brash Assault 3 | |||
| Special | Draconic Aura | C | Drive Spd 2 | ||
| HP | ATK | SPD | DEF | RES | |
|---|---|---|---|---|---|
| 65 | 52 | 29 | 18 | 37 | |
| Weapon | Divine Naga | A | HP/Res 2 | ||
| Support | B | Bowbreaker 3 | |||
| Special | Dragon Fang | C | Breath of Life 3 | ||
| HP | ATK | SPD | DEF | RES | |
|---|---|---|---|---|---|
| 46 | 43 | 31 | 25 | 38 | |
| Weapon | Fear+ | A | Atk/Spd Bond 3 | ||
| Support | Recover+ | B | Wrathful Staff 3 | ||
| Special | Miracle | C | Spur Def/Res 2 | ||
| HP | ATK | SPD | DEF | RES | |
|---|---|---|---|---|---|
| 57 | 55 | 32 | 23 | 28 | |
| Weapon | Harmonic Lance+ | A | Life and Death 3 | ||
| Support | B | Pass 3 | |||
| Special | Moonbow | C | Hone Atk 3 | ||
| HP | ATK | SPD | DEF | RES | |
|---|---|---|---|---|---|
| 57 | 46 | 25 | 39 | 21 | |
| Weapon | Brave Lance+ | A | Bracing Blow 2 | ||
| Support | B | Drag Back | |||
| Special | Bonfire | C | Panic Ploy 3 | ||
| HP | ATK | SPD | DEF | RES | |
|---|---|---|---|---|---|
| 52 | 45 | 38 | 23 | 39 | |
| Weapon | Slaying Hammer+ | A | Swift Sparrow 2 | ||
| Support | B | Lancebreaker 3 | |||
| Special | Iceberg | C | Fortify Fliers | ||
User Submitted Teams
Reinhardt needs Swordbreaker so he can eliminate Seliph. Chrom has Hone Cavs, so Rein and Leo get offensive buffs for Turn One. Both reds have Reposition, while Camus has Smite. Both blues have kept their Goads, while Reinhardt runs Spur Atk and Camus Drive Atk seals. Everyone has kept their prfs, while Leo has a +eff refine.
Leo needed an attack-buffing A skill to eliminate the staff on Enemy Phase, due to having an attack bane. If yours doesn't have this bane, then TA would work in its place. He's also given a Distant Def seal so he can more easily stay in QR range, as well as Moonbow.
To start tirn 1, have Reinhardt engage Seliph. He'll need Chrom's Hove Cavalry or he can't ORKO. Chrom repositions Leo so Leo can reposition Reinhardt out of Julia's range. The staff will SD on Leo, while Julia attacks. Don't worry if you don't defeat her right away.
Once turn 2 starts, retreat. Reposition Leo after moving him. The green and blue foes will split up. On turn 3, Camus can smite Chrom to deal with the greens. Chrom finishes Julia if she's still standing, then deals with the axe flier on enemy phase. Camus handles the lance cavalier, then Rein finishes off the lance flier.
So the members are flexible besides hinoka, you send camilla/an axe flier on the far right in range of the lance flier, and hinoka above. I used fortify fliers but my hinoka is -res so it doesn’t matter. Clair follows behind and your healer, who MUST have wings of mercy, goes up. Then just send everyone to the very bottom, WoM your healer to the bottom and let them come to you. Clair deals with seliph but any lance flier should work
Video: https://youtu.be/nE1jwhF9txY
New Year Camilla [+Def, -Res]: S-Summoner Support, Earth Blessed.
Slaying Edge+ (Def), Bonfire, Spd/Def Bond 3, Ward Fliers
5* Camilla +5 [+Spd, -HP]: Earth Blessed
Camilla's Axe (Eff), Draconic Aura, Fury 3, Goad Fliers
Spring Camilla [+HP, -Def]: Earth Blessed
Gronnraven+, Draw Back, Triangle Adept 3, Goad Fliers
Legendary Robin (F) +2 [+Res, -HP]: Earth Blessing (Spd)
Expiration, Dragonskin, Goad Fliers
Really easy map.
Link: https://youtu.be/7zPGWKfWelQ
Palla +10: +ATK -RES
Wo Dao+ +spd, Reposition, Aether, Life & Death, Hone Speed 3 seal.
Cordelia +9: +Atk -Res
Reposition, Life & Death, Wings of Mercy, Goad Fliers, Heavy Blade 3 Seal.
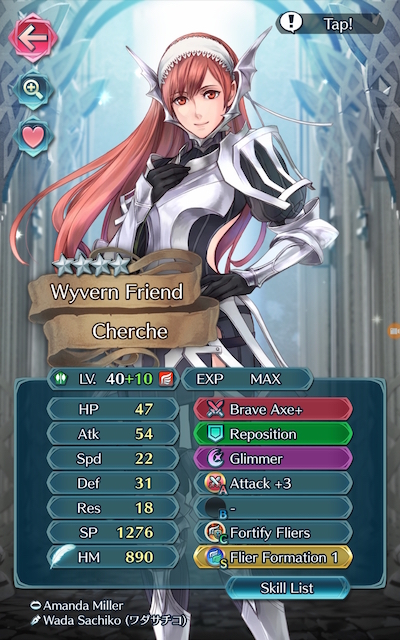
Cherche +9: +ATK -SPD
Brave Axe, Reposition, Aether, Death Blow, Wings of Mercy, Goad Fliers, Deflect Magic 3 Seal.
Catria +9: +ATK -HP
Slaying Lance +SPD, Reposition, Aether, Fury, Wings of Mercy, Goad Fliers, Hone Atk 3 seal.


