


Event History
| Start | End |
|---|---|
Map
- Normal
- Infernal


Kana: Dragon Spawn
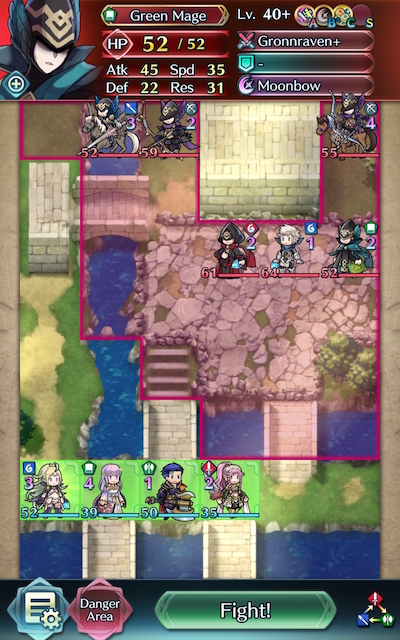
RAWRRR! However you feel about dragons, there’s no denying their effectiveness, and for proof of this you need not look any further than Kana’s Grand Hero Battle. Featuring a grand total of two dragon enemies, two archers, one mage, and a single lance flier, class-specific dragon buffs, trenches, and defense tiles, there’s certainly a great deal of factors that appear to complicate completion. Since this is definitely one of the less populated maps we’ve seen, though, bringing a check for almost every foe is far from infeasible. Additionally, since there’s no reinforcements to worry about, what you’ll see is what you’ll get here -- a factor that makes strategizing much more simple.
That doesn’t mean that Grand Hero Battle is completely a walk in the park, though. As with most Infernal maps, there’s a few curveballs like a Cancel Affinity archer and a Raven mage to account for, but if you take your time, stay calm, and adjust your approach when necessary, Kana and his friends shouldn’t give you too much trouble.
Before you begin teambuilding, it’s completely possible you already possess everything you need to beat this map. Created by Gamepress staff member RedFerrari1998, the video guide below uses only F2P units, one instance of Skill Inheritance, and Seals -- see the description for more details. If it doesn’t work for you, though, then read on!
Who To Choose
As is generally true of Grand Hero Battles, the individual units used is very important as they will primarily inform a strategy. There are a few routes one can take depending on what units are personally available, and, of course, adjustment based on the units one possesses is always a possibility.
Baiters
Since the enemies on this map won’t start moving unless you KO, damage, or bait a foe, it’s advisable that you use a dedicated baiter. While striking and retreating is technically an option, the presence of trenches make this difficult to do with cavalry, who are usually a favourable option due to their superior range and access to class-specific buffs.
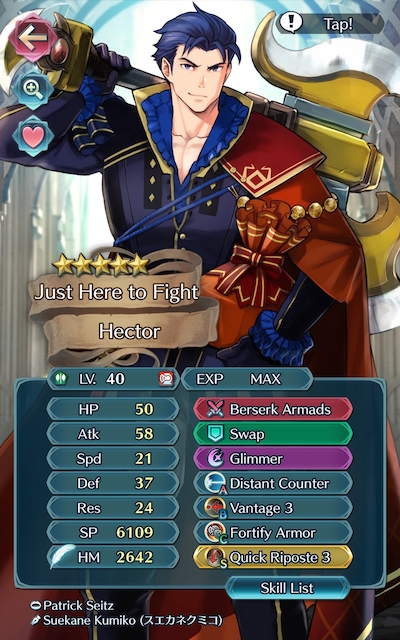
Armors such as Hector, Valentine Hector, Fallen Hardin, Black Knight, Zelgius, and Winter Tharja are able to hit hard very upon counterattacking, especially if they’re making use of Quick Riposte or Vengeful Fighter. Cavalry tanks like Sigurd, Xander, Camus, and Titania perform particularly well with buffs, but may struggle to maneuver due to the trench. Nowi, Young Tiki, Adult Tiki, Fae, Female Kana, Myrrh, and Fallen Robin all boast decent mixed defenses, especially if they tote skills such as Triangle Adept to grant them more polarizing matchups. Legendary Robin is also a potential choice, but may struggle due to her lack of color advantage, and, like Myrrh, must be wary of archers if she does not run Dragonskin or Iote’s Shield. Brave Ike takes reduced damage from mages with Beorc's Blessing and has great self-sustain with Steady Breath. Great F2P options include Legendary Ike, who natively sports Warding Breath which boosts his Resistance and grants him cooldown reduction, and Fjorm, who is able to tank the dragons with her high Resistance and battle ranged foes with her exclusive Special, Ice Mirror.
Do note that while Triangle Adept Raven mages may seem like an attractive option, the fact that one of the archers carries Cancel Affinity makes them significantly less effective baiters than they would be otherwise.
Strikers
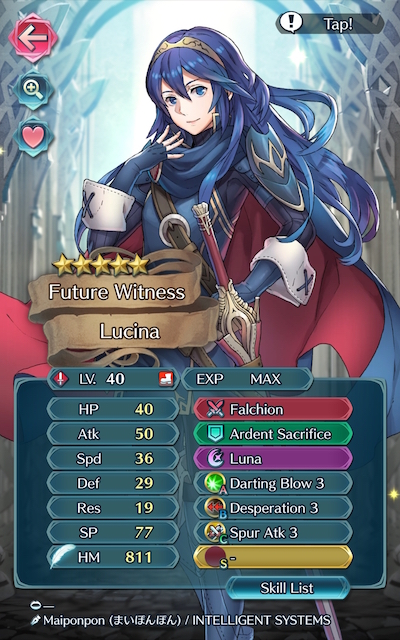
First and foremost, the fact that a good portion of your foes are composed of dragon units means that strikers who can deal effective damage to them will prove to be incredibly useful here. Lucina, Masked Marth, Marth, Chrom, Exalted Chrom, Alm, and Roy with the refined Binding Blade are all red units who deal effective damage to dragons when wielding the appropriate weaponry, and also have a color advantage over the green mage to boot! Deirdre and Julia are green options who also deal effective damage when they carry the tome Naga or Divine Naga, but they may have problems checking other foes on this map.
Although slightly less useful in this Grand Hero Battle due to the presence of the Raven mage, archers are still powerful strikers that can either finish off foes on their own or provide an assist. In particular, however, Brave Bow users can be incredibly potent on this map due to their ability to overpower and finish off any foes your tanks may otherwise struggle with. New Year Corrin, Brave Lyn, WF Hinoka, Bridal Cordelia, Klein, and Setsuna are potential strikers you may want to use, with a special mention going to New Year Corrin and Brave Lyn given their F2P status.
Alternatively, melee Brave users are able to hit foes twice without retaliation, and may even quad hit if they outspeed an enemy. Cherche, Cordelia, Hinoka, Elincia, and WT Reinhardt are all excellent Brave users who can make excellent use of class-specific buffs. Finn is a great F2P option who would work particularly well in a cavalry team.
Brave and Blade tome wielders can also serve to be useful if your team composition provides them with the appropriate buffs, though speedy mages can also be effective Strikers. Tharja, Reinhardt, Tailtiu, Linde, Nino, and WT Olwen are potential options here, especially if they are equipped with a Breaker skill to add to their coverage and are accompanied by class-specific buffs or a buffbot like Eirika or Ephraim.
Dancers
Dancers help provide support, may even have a decent offensive presence themselves, and can usually tank a hit or two, if need be. Olivia, Performing Olivia, Performing Inigo, Performing Shigure, Performing Azura, Azura, New Year Azura, and Ninian all give the refreshment that high-firepower units need while also possessing the ability to provide an assist to KO an enemy.
Healers
While not generally a great choice over units who can deal heavy damage or dancers, Healers can be incredibly useful in this Grand Hero Battle due to their ability to provide valuable healing to your tanks. Genny, Priscilla, Elise, Nanna, Wrys, and Lissa are potential additions to a team that may serve you well on this map.
Strategy
Strategizing for this Grand Hero Battle shouldn’t be too challenging due to the absence of reinforcements. While it can be difficult to exactly predict what will happen due to IV / Merge variance, here’s some general tips to get you started.
False Starts
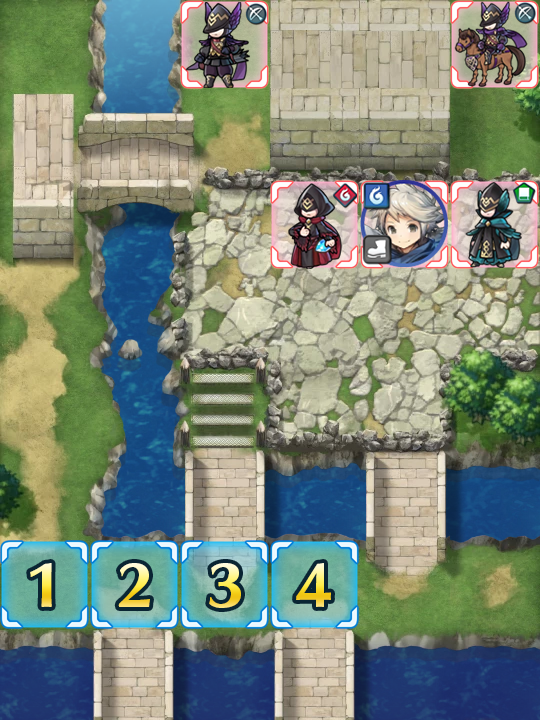
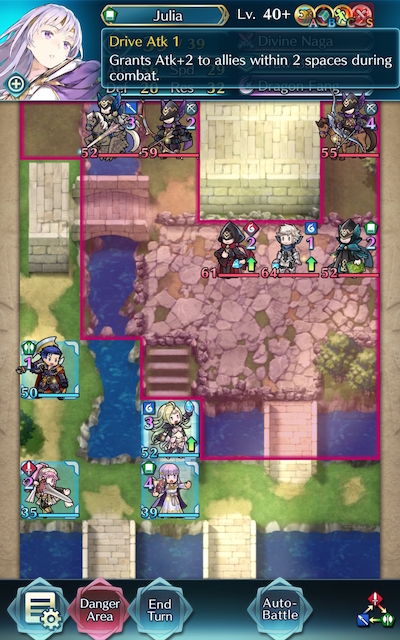
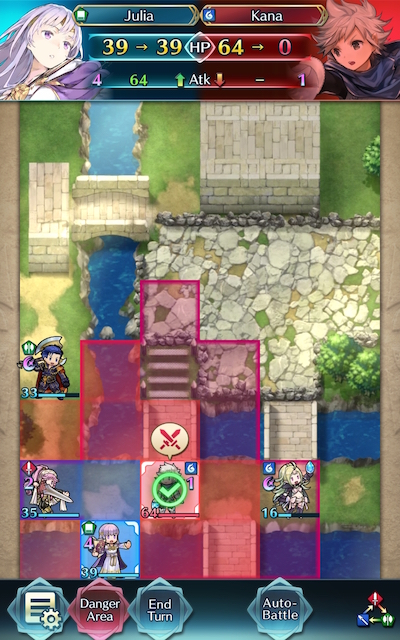
Looking at this map, there’s two immediately obvious places to bait -- the leftmost bridge with the trench and the rightmost bridge without one. Either of these positions will work, though the leftmost bridge is preferable given that it doesn’t limit your maneuvering room so severely.
There are other factors to consider too -- the rightmost bridge exposes you to the Raven mage that carries Guard which could prove to be problematic. For that reason it’s best to focus on the alternative route, assuming that the trench doesn’t completely ruin your strategy.
If weathering multiple attacks is proving to be too difficult, a blue flier can alternatively bait on the space in between both bridges and will only be subject to one attack from the red dragon. A red or green flier can also bait on the space directly to the right of the rightmost bridge, though they will obviously perform best if they have access to Fortify buffs and either Distant Counter proper or a Distant Counter effect.
Drive That Riposte!
Since you’d ideally like to net at least one KO on this turn, you may have to turn to skills and Seals in order to accomplish this goal. Straight stat boosts from skills like Fury, Attack +3, or Speed +3 always work, but if you’re only missing out on a few points of damage (or just barely being KO’d yourself) than the Drive seals are a great option that may not even need to be fully upgraded. While overkill is great, it’s really unnecessary -- only exact damage matters, and there is no prize for dealing excessive damage. Quick Riposte (and Vengeful Fighter) are other great options that instead rely on guaranteeing follow-ups to boost damage output, though you may need to bring a healer in order to ensure that they stay active.
Resisting Temptation
Although you may be tempted to deploy your bait to the defense tiles to further boost their tanking prowess, don’t be fooled. Camping out on these tiles will in most cases cause you to become overextended. Moreover, the fact that these tiles are placed in a patch rather than being localized to a single space means that your foes can -- and will! -- take advantage of them just as much as you can. Surprisingly, you’re better off trying to fight these foes on uneven footing, especially since the AI isn’t smart enough to camp out on these tiles once it’s on the offensive. If you do your best to lead them off these tiles, you should be able to KO them.
Have No Fear…
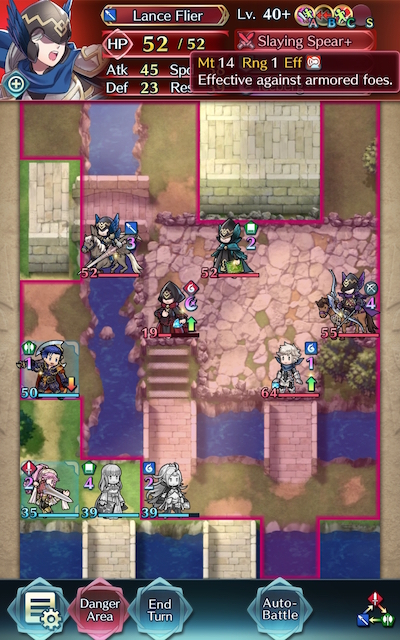
And no, that isn’t just because Hector is here. Once the lance flier has moved down, most strong green units (or archers) should be able to KO it regardless of the effective damage to armors it deals. Your unit may even be able to handle the bow cavalry and green mage too depending on their stats/builds -- though if you’re not sure if they’ll survive or not, it’s probably best to just keep them as out of the way as possible while still taking care of the lance flier.
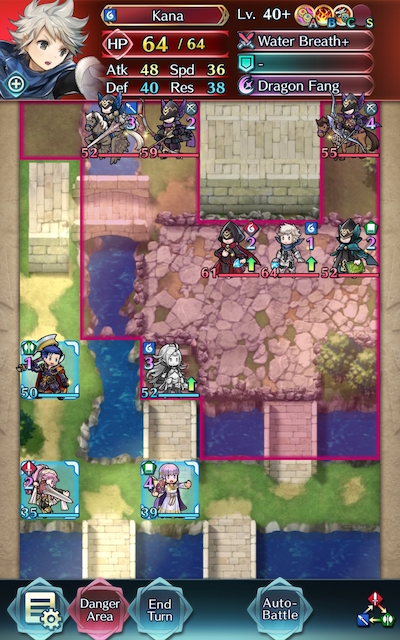
The Man Of The Hour
It’s entirely possible that Kana will be one of the last foes you confront, and if you can, it will make your life much easier if you’re able to defeat him within one round of combat. Combining Brazen Def/Res with Water Breath and his already inflated stats, after all, makes him surprisingly difficult to KO, and his high Speed makes it hard to double him without taking advantage of a Brave Weapon. Effective damage is obviously the best way to heavily damage him, if not KO him outright, but assuming your other units aren’t too heavily damaged, remember that they can always provide a helpful assist. Luring Kana off the defense tiles will also make him that much easier to defeat in battle, and ranged units can attack him for free due to his lack of Lightning Breath.
If At First You Don’t Succeed
Don’t be fooled by video walkthroughs of any Grand Hero Battle that you watch -- it’s very rare for anyone to beat high-difficulty content (or record a video of themselves doing so!) on their first try. Additionally, the potential variance in unit builds that Skill Inheritance brought along with the random nature of summoning has resulted in pretty much every single summoner having different “building blocks” to work with. This, when combined with the high difficulty level of Infernal, may prove frustrating while someone is trying to find the right combination of units and moves. The key thing to keep in mind is that it may take some light Skill Inheritance and Seal shuffling and multiple tries of the map to find a strategy that works for you. Every single turn you complete gets you one step closer to completing the puzzle. Finally, reading about or watching videos of successful strategies may also help you break through a particularly difficult turn that you can’t complete, or may give you ideas of a new unit to use.
Map Enemies
- Hard
- Lunatic
- Infernal
| HP | ATK | SPD | DEF | RES | |
|---|---|---|---|---|---|
| 41 | 35 | 25 | 22 | 21 | |
| Weapon | Water Breath+ | A | Brazen Def/Res 3 | ||
| Support | B | ||||
| Special | Dragon Fang | C | Fortify Dragons | ||
| HP | ATK | SPD | DEF | RES | |
|---|---|---|---|---|---|
| 37 | 32 | 22 | 21 | 11 | |
| Weapon | Slaying Bow | A | Brazen Atk/Def 3 | ||
| Support | B | Swordbreaker 2 | |||
| Special | Vengeance | C | Drive Def 1 | ||
| HP | ATK | SPD | DEF | RES | |
|---|---|---|---|---|---|
| 35 | 35 | 16 | 17 | 18 | |
| Weapon | Guard Bow | A | Brazen Atk/Def 3 | ||
| Support | B | Cancel Affinity 2 | |||
| Special | Blazing Wind | C | Drive Res 1 | ||
| HP | ATK | SPD | DEF | RES | |
|---|---|---|---|---|---|
| 38 | 35 | 25 | 23 | 22 | |
| Weapon | Dark Breath | A | Fury 2 | ||
| Support | B | Vantage 2 | |||
| Special | Noontime | C | Fortify Dragons | ||
| HP | ATK | SPD | DEF | RES | |
|---|---|---|---|---|---|
| 33 | 30 | 24 | 14 | 20 | |
| Weapon | Gronnraven | A | Brazen Atk/Spd 3 | ||
| Support | B | Guard 2 | |||
| Special | Moonbow | C | Spur Def/Res 1 | ||
| HP | ATK | SPD | DEF | RES | |
|---|---|---|---|---|---|
| 56 | 45 | 33 | 31 | 29 | |
| Weapon | Water Breath+ | A | Brazen Def/Res 3 | ||
| Support | B | ||||
| Special | Dragon Fang | C | Fortify Dragons | ||
| HP | ATK | SPD | DEF | RES | |
|---|---|---|---|---|---|
| 51 | 44 | 29 | 29 | 16 | |
| Weapon | Slaying Bow+ | A | Brazen Atk/Def 3 | ||
| Support | B | Swordbreaker 3 | |||
| Special | Vengeance | C | Drive Def 2 | ||
| HP | ATK | SPD | DEF | RES | |
|---|---|---|---|---|---|
| 48 | 47 | 22 | 24 | 23 | |
| Weapon | Guard Bow+ | A | Brazen Atk/Def 3 | ||
| Support | B | Cancel Affinity 3 | |||
| Special | Blazing Wind | C | Drive Res 2 | ||
| HP | ATK | SPD | DEF | RES | |
|---|---|---|---|---|---|
| 52 | 48 | 33 | 32 | 31 | |
| Weapon | Dark Breath+ | A | Fury 3 | ||
| Support | B | Vantage 3 | |||
| Special | Noontime | C | Fortify Dragons | ||
| HP | ATK | SPD | DEF | RES | |
|---|---|---|---|---|---|
| 44 | 42 | 32 | 20 | 28 | |
| Weapon | Gronnraven+ | A | Brazen Atk/Spd 3 | ||
| Support | B | Guard 3 | |||
| Special | Moonbow | C | Spur Def/Res 2 | ||
| HP | ATK | SPD | DEF | RES | |
|---|---|---|---|---|---|
| 64 | 48 | 36 | 34 | 32 | |
| Weapon | Water Breath+ | A | Brazen Def/Res 3 | ||
| Support | B | Wrath 3 | |||
| Special | Dragon Fang | C | Fortify Dragons | ||
| HP | ATK | SPD | DEF | RES | |
|---|---|---|---|---|---|
| 52 | 45 | 38 | 23 | 39 | |
| Weapon | Slaying Spear+ | A | Brazen Atk/Spd 3 | ||
| Support | B | Desperation 3 | |||
| Special | Iceberg | C | Drive Spd 2 | ||
| HP | ATK | SPD | DEF | RES | |
|---|---|---|---|---|---|
| 59 | 47 | 32 | 32 | 17 | |
| Weapon | Slaying Bow+ | A | Brazen Atk/Def 3 | ||
| Support | B | Swordbreaker 3 | |||
| Special | Vengeance | C | Drive Def 2 | ||
| HP | ATK | SPD | DEF | RES | |
|---|---|---|---|---|---|
| 55 | 50 | 24 | 27 | 25 | |
| Weapon | Guard Bow+ | A | Brazen Atk/Def 3 | ||
| Support | B | Cancel Affinity 3 | |||
| Special | Blazing Wind | C | Drive Res 2 | ||
| HP | ATK | SPD | DEF | RES | |
|---|---|---|---|---|---|
| 61 | 51 | 36 | 35 | 34 | |
| Weapon | Dark Breath+ | A | Fury 3 | ||
| Support | B | Vantage 3 | |||
| Special | Noontime | C | Fortify Dragons | ||
| HP | ATK | SPD | DEF | RES | |
|---|---|---|---|---|---|
| 52 | 45 | 35 | 22 | 31 | |
| Weapon | Gronnraven+ | A | Brazen Atk/Spd 3 | ||
| Support | B | Guard 3 | |||
| Special | Moonbow | C | Spur Def/Res 2 | ||
User Submitted Teams
https://twitter.com/13s_hion/status/1051231004508254208?s=21
(you can find my units’ skills in the tweet under the video)
Everyone is Neutral, but Fjorm is 5*+1. She will do most of the job, blocking the enemies, while the healers take care of her and B!Lyn shoots her arrows. Veronica will take one hit from the cavalry archer, and Fjorm needs to kill him or Veronica won’t survive.
When Kana is the only one left, Ethlyn needs to attack him despite not damaging him just to activate her weapon’s effect, otherwise Kana will kill Fjorm in his turn.
ethlyn was used to bait out the pegasus knight on the left, bridal tharja for her attack and speed buff assist and azura for sing. tiki essentially did everything on this map. i just used their default skillset, no skill inheritance. dd3 on leg! tiki to help her tank hits from mage and kana.
This comp is very specifically tailored for GHB Kana, with heavy dependence on some key seals and skills. I'm sure there are more effective builds out there but this one works for me.
My main difficulty with the map is that it is extremely hard to nuke Kana and his special hits too hard even with color disadvantage. Fallen Robin is a decent Kana killer on the counter, so this build resolves around him.
Fallen Robin with his default build+Pivot. However, a Close Def 3/TA 3 seal (or skill) is required to ensure survival against the little brat Kana. Robin's role in this build is to counter-kill Kana.
Ninian with Guard as B-skill. A level of 1 would suffice. Other than that just her regular build.
Elincia and Cordelia with DB 3, Hit & Run, Reposition and ideally Hone Fliers. I equipped Elincia with Hardy Bearings 3 seal, which is not essential. However, it is crucial that Cordelia is equipped with Iote's Shield seal. Galeforce is helpful, but not required.
At the start, move your units horizontally to the right against the right border. From the left to right the line-up should be: Robin, Ninian, Cordelia, Elincia.
Flip Elincia up with Cordelia so that she can kill the green mage. Dance on Cordy so that she can flip Elincia back out of the archer's range. Note that by doing so Cordelia with be within the mounted archer's reach. This is why she must have Iote's Shield.
This turn, Robin moves a space to the left. At the end of the turn Ninian tanks the hit from Kana while Cordelia takes a shot from the mounted archer. All enemies are of course mobilized.
Because Ninian has Guard, Kana's terrifying special doesn't immediately go off and kill her. Now you can move Robin 1 space right and hide Ninian to his left. Cordelia kills the mounted archer, proc's Galeforce and retreats with Elincia to the bottom of the map.
This turn Robin will counter-kill Kana, and the rest will be easy.
With a lot of luck, courage and Lucius attracting enemies you can overcome any level.


