


Map
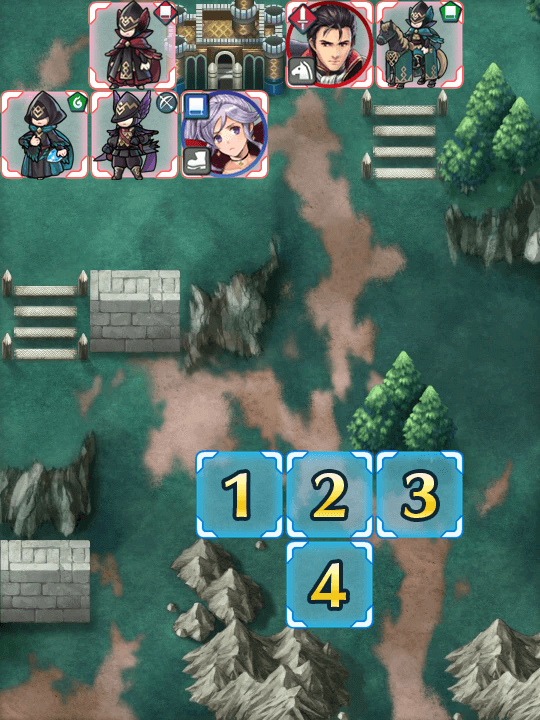
- Normal
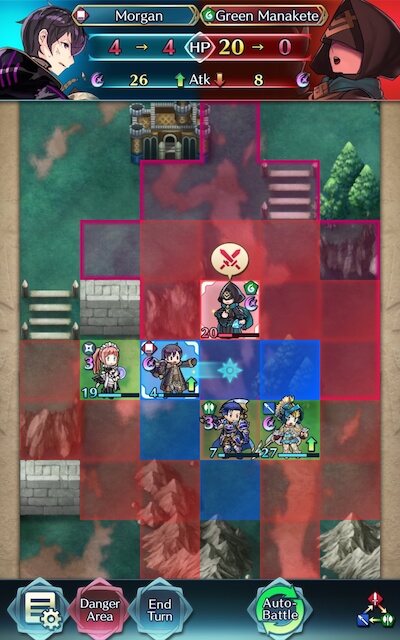
- Infernal

Bound Hero Battle: Reinhardt and Ishtar
Beware of the man with tiny hands… and his fearsome companion! This Bound Hero Battle pits us against Reinhardt in his sword variant and Ishtar -- you won’t have to deal with Reinhardt’s MAGIC IS EVERYTHING tome-wielding variant, but don’t let that lull you into a false sense of security. Ishtar’s charged Special makes her particularly deadly, and Reinhardt’s guaranteed follow-ups granted to him by the Meisterschwert make him an annoying foe to deal with as well.
Thankfully, there’s still a few things on this map that are in your favor. Thankfully, there’s no reinforcements to deal with, and once you deal with Ishtar and Reinhardt, the rest of the units here don’t pose too much of a threat. As always, there’s a few tricky Skills and weapons to deal with here, but if you start off strong and keep your wits about you, victory shall be yours!
Who to Choose
As is generally true of Bound Hero Battles, the individual units used is very important as they will primarily inform your strategy. There are a few routes you can take depending on what units are available to you, and, of course, adjustment based on the units you possess is always a possibility.
Tanks
The enemies on this map won’t move unless you bait or strike them, so you’ll most likely want to use a tank to survive the initial onslaught. The more damage a unit can soak up and the stronger their Special activations are, the more useful they’ll be here -- if you have a powerful new unit you’ve been waiting to try out, now’s the time to use them. Also note that no enemy totes effective weapons against cavalry or armored units, and there’s only one bow wielder; almost any unit class of tank will work here.
Armors such as Zelgius, Black Knight, Winter Tharja, Fallen Hardin, Hector, LA Hector, Legendary Hector, Brave Ephraim, Fallen Robin, and Legendary Tiki are able to hit hard very upon counterattacking, especially if they’re making use of Quick Riposte or Vengeful Fighter. All the green Hectors and Fallen Robin will do well tanking Ishtar due to their Weapons Triangle Advantage -- though Legendary Hector and Fallen Robin are particularly notable due to Hector’s ability to deny follow-ups and Robin’s damage-seeking against ranged foes.
Calvary tanks like Xander, Camus, Quan, and Sigurd perform better with class-specific buffs, and Sigurd is notable for his ability to tank a fair bit of magic damage due to Divine Tyrfing and the Crusader’s Ward.
An amazing F2P option is Fjorm, who is able to tank ranged foes extremely well with her exclusive Special, Ice Mirror, Legendary Ike, whose native Warding Breath grants him accelerated cooldown and extra Resistance.
Dragons are also very strong tanks, especially when they’re equipped with Lightning Breath (or another Breath and Distant Counter, if you’re feeling fancy). Nowi, Female Corrin, Male Kana, Fae, Myrrh, Legendary Robin, Female Kana, Adult Tiki, Young Tiki, and/or Summer Young Tiki will all likely be able to do the job and do it well. They are also incredibly useful due to their damage-seeking effect against ranged foes -- since ⅔ of the foes here are mages or archers, being able to target the lower of their defensive stats will prove incredibly handy.
Strikers
While not strictly necessary, a striker is almost always a good choice for an Infernal map due to their ability to deal heavy damage -- if not KO foes outright. When paired with a refresher, their destructive prowess is impressive; just make sure to keep them out of harm’s way.
In particular, archers can be incredibly potent strikers due to their ability to overpower and/or finish off any enemies your tank may otherwise struggle with, especially if they are equipped with a Brave Bow. Brave Lyn, WF Hinoka, Bridal Cordelia, Summer Takumi, Setsuna, and Klein are potential strikers you may want to use, with a special mention going to Brave Lyn given her F2P status.
Alternatively, melee Brave users are able to hit foes twice without retaliation, and may even quad hit if they outspeed an enemy. Cherche, Cordelia, Elincia, and WT Reinhardt are all great Brave users who can make excellent use of class-specific buffs.
Brave and Blade tome wielders can also serve to be useful if your team composition provides them with the appropriate buffs, though speedy mages can also be powerful strikers. Tharja, Bridal Tharja, Reinhardt, Tailtiu, Ishtar, Linde, Ophelia, WT Olwen, Lewyn, SF Nino, and Nino are potential options here, especially if they are equipped with a Breaker skill to add to their coverage.
Refreshers
Refreshers help provide support, may even have a decent offensive presence themselves, and can usually tank a hit or two, if need be. Lene, Silvia, Olivia, Performing Olivia, YT Olivia, Performing Inigo, Performing Shigure, Performing Azura, Azura, New Year Azura, Bridal Ninian, and Ninian are all examples of refreshers -- though really, any of them will do the trick.
Healers
Due to every healer having access to the Wrathful Staff refinement, they can serve as incredibly potent colorless pseudo-mages -- who can heal to boot! Brave Veronica is particularly notable due to her excellent exclusive weapon that prevents counterattacks (among other things), access to the Wrathful Staff Skill, and great support unity, but other healers like Genny, Priscilla, Elise, Maribelle, Nanna, Ethlyn, Wrys, and Lissa are potential additions to a team that may serve you well.
Supporters
As units that offer extra utility, supporters typically fit one of the above roles while also providing some sort of assist to your other units. Buffers, debuffers, and drivers all can play a valuable role in your team composition by making use of their incredible utility.
Because of Skill Inheritance, any unit can be a buffer with enough investment -- many Drives, Spurs, Hones, Fortifies, and Dual Rallies are readily accessible on 4 star units, and can be further stacked with seals for maximum coverage. Tactics seals are also easily accessible and provide a hefty +6 boost to one stat. Notable options who natively provide buffs through their exclusive weapons include YT Olivia, Performing Azura, Brave Veronica, Eirika, and Ephraim, while Brave Lucina, New Year Corrin, and New Year Azura are able to stack Drives through theirs.
Debuffers can make use of weaponry, Skills, or Seals to help de-fang the enemy team and make them significantly less threatening. Ploys, Chills, and Smokes especially are wide-reaching and potent debuffs that can easily turn the tide of the battle at a pivotal moment. Lilina and Soren have a Chill effect on their refined weapons, while Male Morgan has a unique buff/debuff dual effect on his. Dagger units also inflict debuffs when they attack, which can be very useful to cut through an Infernal foes’ inflated HP.

Strategy
Strategizing for this Bound Hero Battle should be a relatively simple matter due to the absence of reinforcements. While it can be difficult to exactly predict what will happen due to IV / Merge variance, here’s some general tips to get you started.
In the Beginning...
If you’re a dedicated reader of these guides, you’ll know by now that most of these maps are won or lost before they even start. While it may be tempting to jump right in, knowing (and loving!) your enemy will help you not only choose your units, but also figure out where to begin.
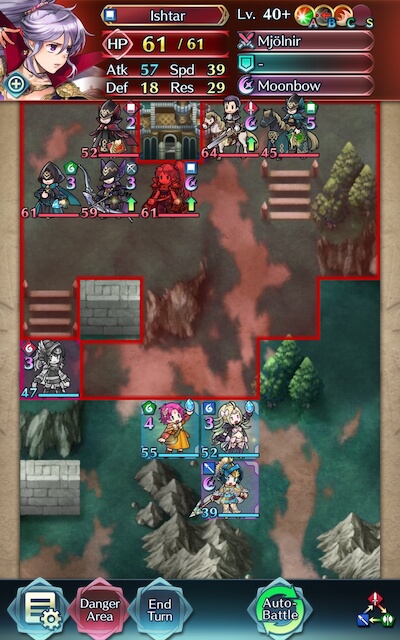
The elephant in the room here is most definitely Ishtar -- her pre-charged Special really lays on the pain, and she’s not even the only foe your unit will have to withstand. That’s right: this is one of those kinds of maps where you can’t bait one unit at a time. Isn’t this game fun? If you’re using a flying ranged striker, you can fly over the cliff and target Ishtar directly. Otherwise, you’ll have to bait her, which may prove to be a bit… difficult.
If you absolutely can’t find a way to survive Ishtar’s Moonbow, you can try avoiding her entirely and baiting in the one space she can’t reach. If you have a Brave weapon user that can target her Defense, then you may be able to safely sniper her down in your next turn. If you’re confident your unit will survive her, though, continue reading for a helpful tip.
Aiming the AI
If you don’t understand why the AI is doing what it’s doing, don’t worry -- you’re not alone. While there do seem to be some more concrete rules that inform its behaviour, more often than not you may find yourself in a position where you have to experiment to get the result you want.
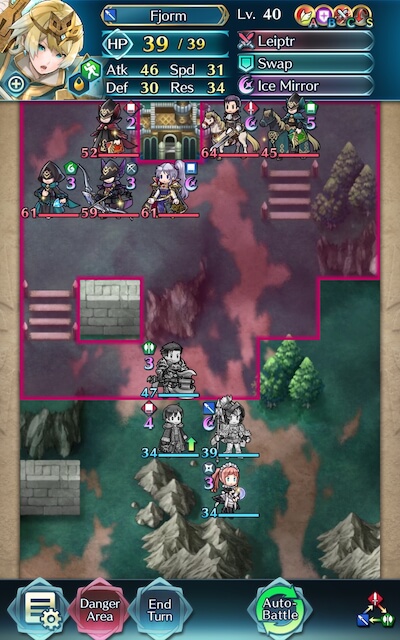
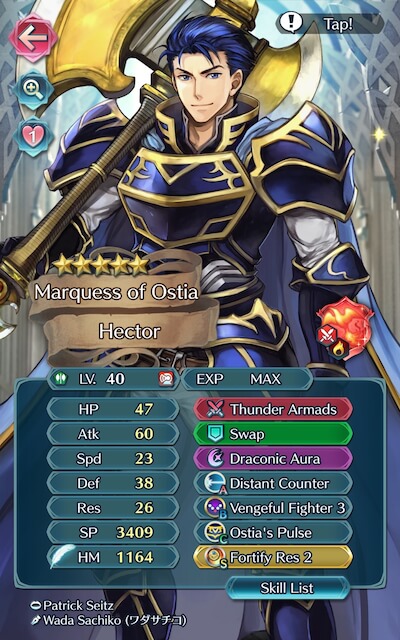
At first, this team layout may seem pretty optimized -- Morgan is positioned to Spur Hector’s Defense and Resistance, while Fjorm is close by to provide him with Drive Attack. But…
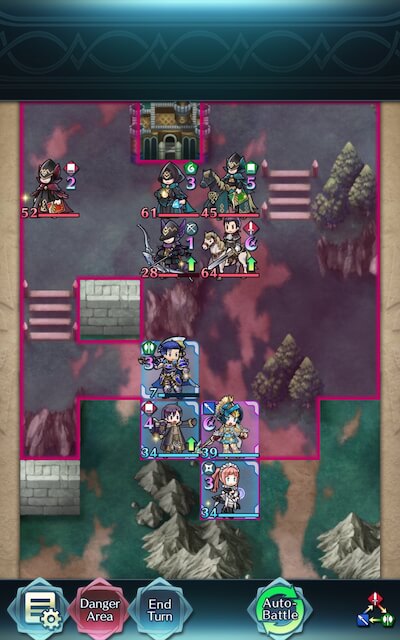
Since Ishtar attacks Hector first, he’s knocked out of Vengeful Fighter range, leaving the archer with enough HP that Felicia can’t KO them. To make matters worse, the cavalry has arrived, which puts Hector in a sticky situation.
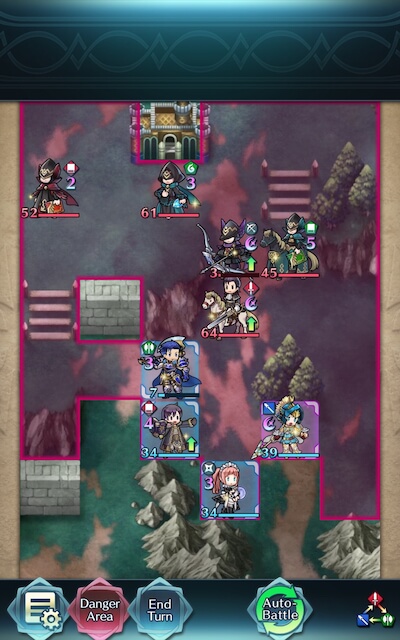
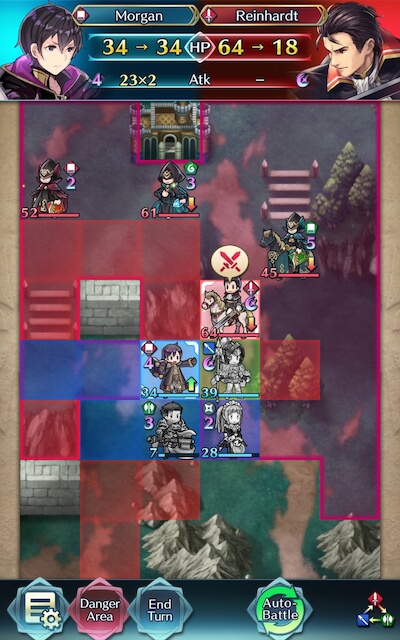
But there is a way this could go better -- if the archer attacks Hector before Ishtar, he’ll hit them twice with Vengeful Fighter, then activate his Special to KO the Thunder Goddess in one hit. So, how do we make this happen? The answer, of course, is positioning!
So if you see that one small difference in the way the enemy moves might grant you a big advantage, trial and error will likely be your best option to achieve your goal. Don’t be afraid to restart a map a few times to figure out which positioning works best for you -- since there’s no stamina cost, there’s literally no downside to testing out your options.
Delectable Debuffs
Speaking of debuffs, you may want to sometimes consider attacking a foe simply to activate debuffs on them. Skills like Attack Smoke, Speed Smoke, and Res Smoke -- as well as daggers and some other weapons -- have far-reaching debuffs that can make the enemy’s entire team a non-issue, or net you a key KO by decreasing the enemy’s defenses. This is especially true on maps like Grand Hero and Bound Hero Battles where foes tend to like to group together. If chip damage is more your speed, consider using Savage Blow; though you best watch out for enemies toting Vantage. Speaking of which…
Party Hardy
It’s always a good idea to keep in mind what seals you have available to you, and one often overlooked tool in most player’s kits is the Hardy Bearing seal. Enemy Dragons with Lightning Breath and Vantage can really ruin your day, especially if they’re the last foe you have to deal with and your units are already limping and wounded -- but never fear! With the Hardy Bearing seal, you can bypass the effects of Vantage and KO this foe as you normally would. While you may have to pay badges and sacred coins to upgrade this seal all the way (it’s not exactly a priority, after all), it’s a much easier option than having to start your strategy over from scratch.
If At First You Don't Succeed...
Don’t be fooled by video walkthroughs of any Bound Hero Battle that you watch -- it’s very rare for anyone to beat high-difficulty content (or record a video of themselves doing so!) on their first try. Additionally, the potential variance in unit builds that Skill Inheritance brought along with the random nature of summoning has resulted in pretty much every single summoner having different building blocks to work with. This, when combined with the high difficulty level of Infernal, may prove frustrating while someone is trying to find the right combination of units and moves. The key thing to keep in mind is that it may take some light Skill Inheritance and seal shuffling as well as multiple tries of the map to find a strategy that works for you. Every single turn you complete gets you one step closer to completing the puzzle. Finally, reading about or watching videos of successful strategies may also help you break through a particularly difficult turn that you can’t complete, or may give you ideas of a new unit to use.
Map Enemies
- Hard
- Lunatic
- Infernal
| HP | ATK | SPD | DEF | RES | |
|---|---|---|---|---|---|
| 41 | 38 | 12 | 23 | 20 | |
| Weapon | Meisterschwert | A | Death Blow 3 | ||
| Support | B | Vantage 3 | |||
| Special | Pavise | C | Spur Atk/Def 2 | ||
| HP | ATK | SPD | DEF | RES | |
|---|---|---|---|---|---|
| 39 | 40 | 28 | 12 | 19 | |
| Weapon | Mjölnir | A | Swift Sparrow 2 | ||
| Support | B | Vantage 3 | |||
| Special | Moonbow | C | Odd Atk Wave 3 | ||
| HP | ATK | SPD | DEF | RES | |
|---|---|---|---|---|---|
| 38 | 33 | 25 | 23 | 22 | |
| Weapon | Lightning Breath | A | Fury 2 | ||
| Support | B | Vantage 2 | |||
| Special | Moonbow | C | Drive Atk 2 | ||
| HP | ATK | SPD | DEF | RES | |
|---|---|---|---|---|---|
| 37 | 32 | 22 | 21 | 11 | |
| Weapon | Guard Bow | A | Darting Stance 2 | ||
| Support | B | Guard 2 | |||
| Special | Vengeance | C | Spur Spd/Res 2 | ||
| HP | ATK | SPD | DEF | RES | |
|---|---|---|---|---|---|
| 29 | 33 | 18 | 12 | 26 | |
| Weapon | Gronnowl | A | Distant Def 2 | ||
| Support | Draw Back | B | Vantage 2 | ||
| Special | Miracle | C | Fortify Cavalry | ||
| HP | ATK | SPD | DEF | RES | |
|---|---|---|---|---|---|
| 56 | 46 | 18 | 31 | 28 | |
| Weapon | Meisterschwert | A | Death Blow 3 | ||
| Support | B | Vantage 3 | |||
| Special | Pavise | C | Spur Atk/Def 2 | ||
| HP | ATK | SPD | DEF | RES | |
|---|---|---|---|---|---|
| 53 | 48 | 36 | 17 | 26 | |
| Weapon | Mjölnir | A | Swift Sparrow 2 | ||
| Support | B | Vantage 3 | |||
| Special | Moonbow | C | Odd Atk Wave 3 | ||
| HP | ATK | SPD | DEF | RES | |
|---|---|---|---|---|---|
| 52 | 46 | 33 | 32 | 31 | |
| Weapon | Lightning Breath+ | A | Fury 3 | ||
| Support | B | Vantage 3 | |||
| Special | Moonbow | C | Drive Atk 2 | ||
| HP | ATK | SPD | DEF | RES | |
|---|---|---|---|---|---|
| 51 | 44 | 29 | 29 | 16 | |
| Weapon | Guard Bow+ | A | Darting Stance 3 | ||
| Support | B | Guard 3 | |||
| Special | Vengeance | C | Spur Spd/Res 2 | ||
| HP | ATK | SPD | DEF | RES | |
|---|---|---|---|---|---|
| 39 | 45 | 25 | 17 | 34 | |
| Weapon | Gronnowl+ | A | Distant Def 3 | ||
| Support | Draw Back | B | Vantage 3 | ||
| Special | Miracle | C | Fortify Cavalry | ||
| HP | ATK | SPD | DEF | RES | |
|---|---|---|---|---|---|
| 64 | 49 | 20 | 34 | 31 | |
| Weapon | Meisterschwert | A | Death Blow 3 | ||
| Support | B | Vantage 3 | |||
| Special | Pavise | C | Spur Atk/Def 2 | ||
| HP | ATK | SPD | DEF | RES | |
|---|---|---|---|---|---|
| 61 | 51 | 39 | 18 | 29 | |
| Weapon | Mjölnir | A | Swift Sparrow 2 | ||
| Support | B | Vantage 3 | |||
| Special | Moonbow | C | Odd Atk Wave 3 | ||
| HP | ATK | SPD | DEF | RES | |
|---|---|---|---|---|---|
| 61 | 49 | 36 | 35 | 34 | |
| Weapon | Lightning Breath+ | A | Fury 3 | ||
| Support | B | Vantage 3 | |||
| Special | Moonbow | C | Drive Atk 2 | ||
| HP | ATK | SPD | DEF | RES | |
|---|---|---|---|---|---|
| 52 | 44 | 35 | 22 | 31 | |
| Weapon | Rauðrowl+ | A | Atk/Spd Bond 3 | ||
| Support | B | Quick Riposte 3 | |||
| Special | Glimmer | C | Even Spd Wave 3 | ||
| HP | ATK | SPD | DEF | RES | |
|---|---|---|---|---|---|
| 59 | 47 | 32 | 32 | 17 | |
| Weapon | Guard Bow+ | A | Darting Stance 3 | ||
| Support | B | Guard 3 | |||
| Special | Vengeance | C | Spur Spd/Res 2 | ||
| HP | ATK | SPD | DEF | RES | |
|---|---|---|---|---|---|
| 45 | 48 | 28 | 18 | 37 | |
| Weapon | Gronnowl+ | A | Distant Def 3 | ||
| Support | Draw Back | B | Vantage 3 | ||
| Special | Miracle | C | Fortify Cavalry | ||
User Submitted Teams
+2 Reinhardth (+Atk, -Res)
Dire Thunder
Reciprocal Aid
Luna
Brazen Atk/Spd 3
Desperation 3
Goad Cavalry
Brash Assault 3 SS
S supported with
+6 Cecilia (neutral)
Gronraven+
Repositon
Luna
Triangle Adept 3
Bowbreaker 3
Fortify Cavalry
Hardy Bearing 3 SS
+3 Xander
Siegfried
Reposition
Ignis
Distant Defense 3
Quick Riposte 3
Hone Cavalry
Distant Defense 3 SS
S supported with
+1 Brave Lyn (+Spd,-Def)
Mulagir
Draw Back
Draconic Aura
Swift Sparrow 2
Sacae's Blessing
Goad Cavalry
Speed Smoke 3 SS
Sir Quadhart rides again alongside his trusty teammates, to completely demolish this GHB without even Trying!.
Ishtar and the archer are no match for Cecilia, and Xander will receive literally no damage from the green mage. Meanwhile, Lyn and Reinhardth share a drink and watch the carnage their respective lovers do.
If you're feeling fancy, you can let Reinhardth take some damage and watch as his quadruple strikes one-round everybody on the map, even the green mage.
The team start composition should be with Grima on the left, Tiki at the center, BK on the right and Zelgius under Tiki
Builds:
M!Grima +Spd -HP (Expiration, Swap, Ignis, N/A, Vengeful Fighter, Ward Armor, Distant Def 3)
L!Tiki +Atk -Spd (Base kit + Armored Boots)
Zelgius +Def -Res (Alondite, Swap, Black Luna, Fierce Stance, Vantage, Panic Ploy, Free S slot)
Black Knight +3 (Alondite, Swap, Black Luna, Warding Breath, WoM, Ward Armor, Spur Res 1)
First turn: Move Grima, who should be buffed by Tiki's C slot, up in the slot where he can be targeted by both Isthar and the Bow Fighter. Move Tiki under him and then use Swap with BK so he can use spur res and Ward Armor to help Grima against Ishtar. Ishtar and the Bow Fighter should attack Grima, resulting in Ishtar's death and leave the Bow Fighter with 20 HP. Reinhardt will move down, but the green Cav will use Draw Back on him to put him to safety. Sadly for them, Tiki has Armored boots.
Second turn: With Ishtar dead, the map will be a lot easier. Move Tiki up two spaces and attack Reinhardt. Then move Grima under her, BK one space up (should be at Grima's left) and Zelgius right under Grima. The Bow Fighter will attack BK with his special dealing almost half health of damage to BK (From 50 HP he ends up to 26). The Green Cav will attack Tiki leaving her with 24 HP, while the Green Manakete will attack BK for some little damage and receive a Black Luna in the face, surviving with 1 HP.
Third turn: With Reinhardt gone, move Tiki up and kill the Green Cav mage while moving Grima on the forest tile. BK must use swap on Zelgius and Zelgius must attack the Green Manakete. Even though the enemy has Vantage it is needed so that Zelgius can be in the Vantage range. The Red Mage will attack Zelgius, but since he has Vantage the Jet-Black General will attack first. At this point, Zelgius should have Black Luna ready. The Bow fighter will dig his own grave by attacking Tiki who in turn just annihilates him with Moonbow.
Last turn: With only the Red Mage alive, move Zelgius in and smack his face with Black Luna and the victory is yours.
https://www.youtube.com/watch?v=tCPpZwzP2PI
Legendary Ike
5* Level 40+1
Neutral IVs
Ally Support: Summer F!Robin (S)
Blessing: Earth (Legendary Hero; Earth Season)
Weapon: Ragnell
Support Skill: N/A
Special: Radiant Aether
A: Warding Breath
B: Seal Atk/Def 2
C: Def Tactic 3
Seal: Distant Def 3
Performing Shigure
5* Level 40+1
+RES/-DEF
Ally Support: Deirdre
Blessing: Earth
Weapon: Dancer's Score+ (+SPD)
Support Skill: Dance
Special: N/A
A: N/A
B: Geyser Dance 2
C: B Tome Valor 3
Seal: Spur Atk 1
Summer F!Robin
5* Level 40+1
+HP/-RES
Ally Support: Legendary Ike (S)
Blessing: Earth
Weapon: Deft Harpoon+ (+MT Forge)
Support Skill: Reposition
Special: Iceberg
A: Deathblow 3
B: Quick Riposte 2
C: Threaten Defense 3
Seal: Spur Res 1
Deirdre
5* Level 40
+SPD/-DEF
Ally Support: Performing Shigure
Blessing: Earth
Weapon: Divine Naga
Support Skill: Reposition
Special: Iceberg
A: N/A
B: Quick Riposte 3
C: Speed Ploy 3
Seal: N/A
While this strat can be flexible teamwise, there are some conditions.
* Lance cavalry that can ORKO Reinhardt. I chose to use Silas (+atk -spd, +2), who has Goad Cavs enabled, plus Guard, just in case, as well as Bonfire.
* A red anti-dragon. Exalted Chrom (mine's +spd -hp, and +1) with Hone Cavs fills this slot.
* TA Gronnraven, with QR; breaker skills optional. Cecilia (mine's +res -hp, +1)with Fortify Cavs can fill this role; mine had to resort to a seal, with Bowbreaker (wasn't doing much, but doesn't hurt) and Iceberg.
* Ward Cavs, or Distant Guard. Priscilla (she won't see much combat, so IVs and level are negligible) fits this role; she also has Drive Att seal)
Turn one: Cecilia is positioned to lure Ishtar and the bow, and Priscilla is positioned diagonally to Cecilia's left. The guys won't move. Alternatively, if not running horse emblem, then make sure the lance is behind Cecilia, with the anti-dragon to their right. Ishtar and the bow will SD.
Turn two: Silas takes out Rein, Chrom takes out green cav. The ladies should move away. The dragon and red mage will advance.
Turn three: Chrom takes out the dragon. Finally, take out the mage.


